
It is by no means enjoyable when a storage machine decides to play disguise and search, particularly when it incorporates necessary information that you just want, and Home windows 11 cannot acknowledge or detect your SSD. However fret not. Whether or not your new SSD is contemporary out of the field or falling aside on the seams, there are a number of methods so that you can get better your misplaced information and return your SSD’s performance.
Your method to fixing points when your SSD cannot be detected will rely on what you will have on the drive. If the SSD is new or does not have any necessary information on it, then it provides you rather more leeway when troubleshooting the drive. In case your SSD does have necessary paperwork on it, then chances are you’ll need to try to get better the information earlier than making an attempt fixes like altering the drive’s settings or formatting the SSD, as this will likely result in corrupted information or information loss.
Testing your SSD on a special PC

A Western Digital Blue SN550 M.2 SSD with no bodily DRAM chip.
To begin, we must always establish if the issue seems on all PCs or in case your PC is the issue. When you’ve got a second/outdated PC mendacity round or have a buddy who has a pc, plug your SSD into the secondary machine and see whether it is detected.
In case your SSD is detected on the second PC, then there is a matter together with your laptop’s BIOS/Home windows settings or the pc’s connections itself. If the SSD is not detected, then there’s a downside with the SSD itself. This might be due to the SSD’s settings, software program, or {hardware}.
One other methodology to confirm the supply of the issue is to make use of a secondary SSD in your PC and see whether it is detected. If the secondary SSD is detected in your PC, then that signifies that all of your connections are working superb. If the second SSD will not be detected, then your PC is the issue.
Test the connections in your SSD

Supply: Essential
In case your SSD has stopped working or is now not detected, you must first search for any free connections or broken cables connected to the SSD or motherboard. An SSD wants two cables to operate accurately: a SATA information cable that plugs into the motherboard and a SATA energy cable from the facility provide. When you’re utilizing an M.2 SSD in your laptop, it won’t have these two connections. As an alternative, will probably be plugged straight into your motherboard.
To begin, flip off and unplug your PC, take away all SATA cables, wipe the cable connections with a dry paper towel to take away any mud, and search for any harm to the connectors, like burn marks or scratches. If the cables are undamaged, then plug them again in and begin the pc. If it nonetheless does not detect the SSD, then attempt utilizing a special SATA information cable and plug it into a special SATA port on the motherboard. You can too attempt utilizing a special SATA energy cable on the SSD (your energy provide ought to have 3-5 of those cables).
When you’ve got an M.2 SSD, you possibly can take away it and wipe the connections, search for any harm to the connections or motherboard. If it appears superb, attempt to take away any mud or particulates within the M.2 slot.

If all the things has checked out thus far, then it is time to see in case your BIOS can establish the drive. Getting into the BIOS is totally different for each motherboard, and every interface seems to be totally different, so there is no such thing as a one-size-fits-all information.
Nevertheless, to enter BIOS on any PC, it’s essential to boot it up and frequently press a key earlier than the beginning display seems. The important thing you could press will rely in your laptop producer, and can typically show on the display earlier than startup. Essentially the most generally used keys to enter BIOS are: Tab, Del, Esc, F2, F10, and F12.
After getting efficiently entered BIOS, navigate to the Startup tab and search for a setting that claims Boot. In your boot settings, you’ll have an inventory of all HDDs and SSDs related to your laptop. If the drive is listed there, then you will have a software program situation that’s simpler to resolve. If the drive does not seem, then it’s a {hardware} situation. This can be a lot more durable to repair.
Initializing your SSD in Disk Administration
When you simply purchased your SSD and you’re utilizing it for the primary time, then you will want to initialize your SSD earlier than your PC can acknowledge it.
- Open your Disk Administration utilizing Home windows + X.
- A pop-up will seem, asking you to initialize your SSD. In case your SSD is underneath 2TB, select MBR (Grasp Boot Document). In case your SSD is bigger than 2TB, then you will want to pick GPT (GUID Partition Desk). Click on OK, and your SSD can be initialized.
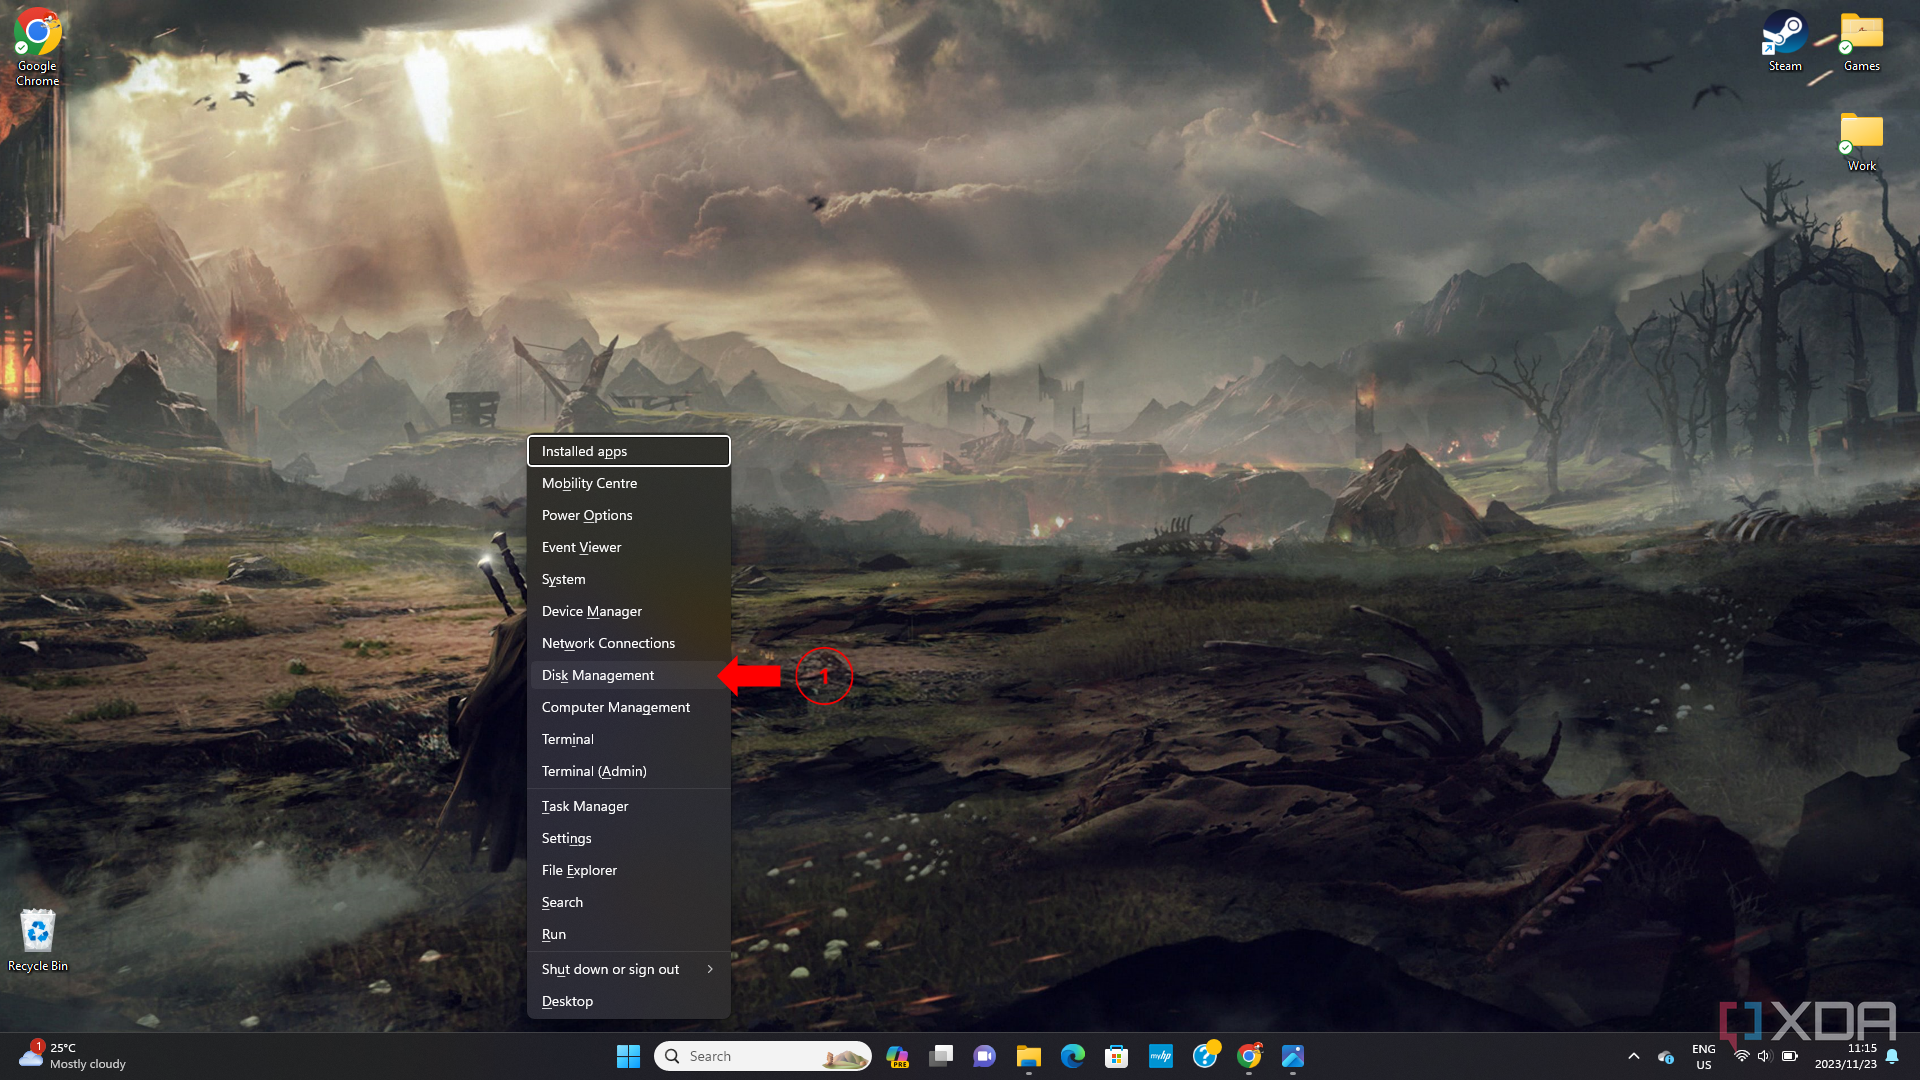


The way to allocate area to a brand new SSD
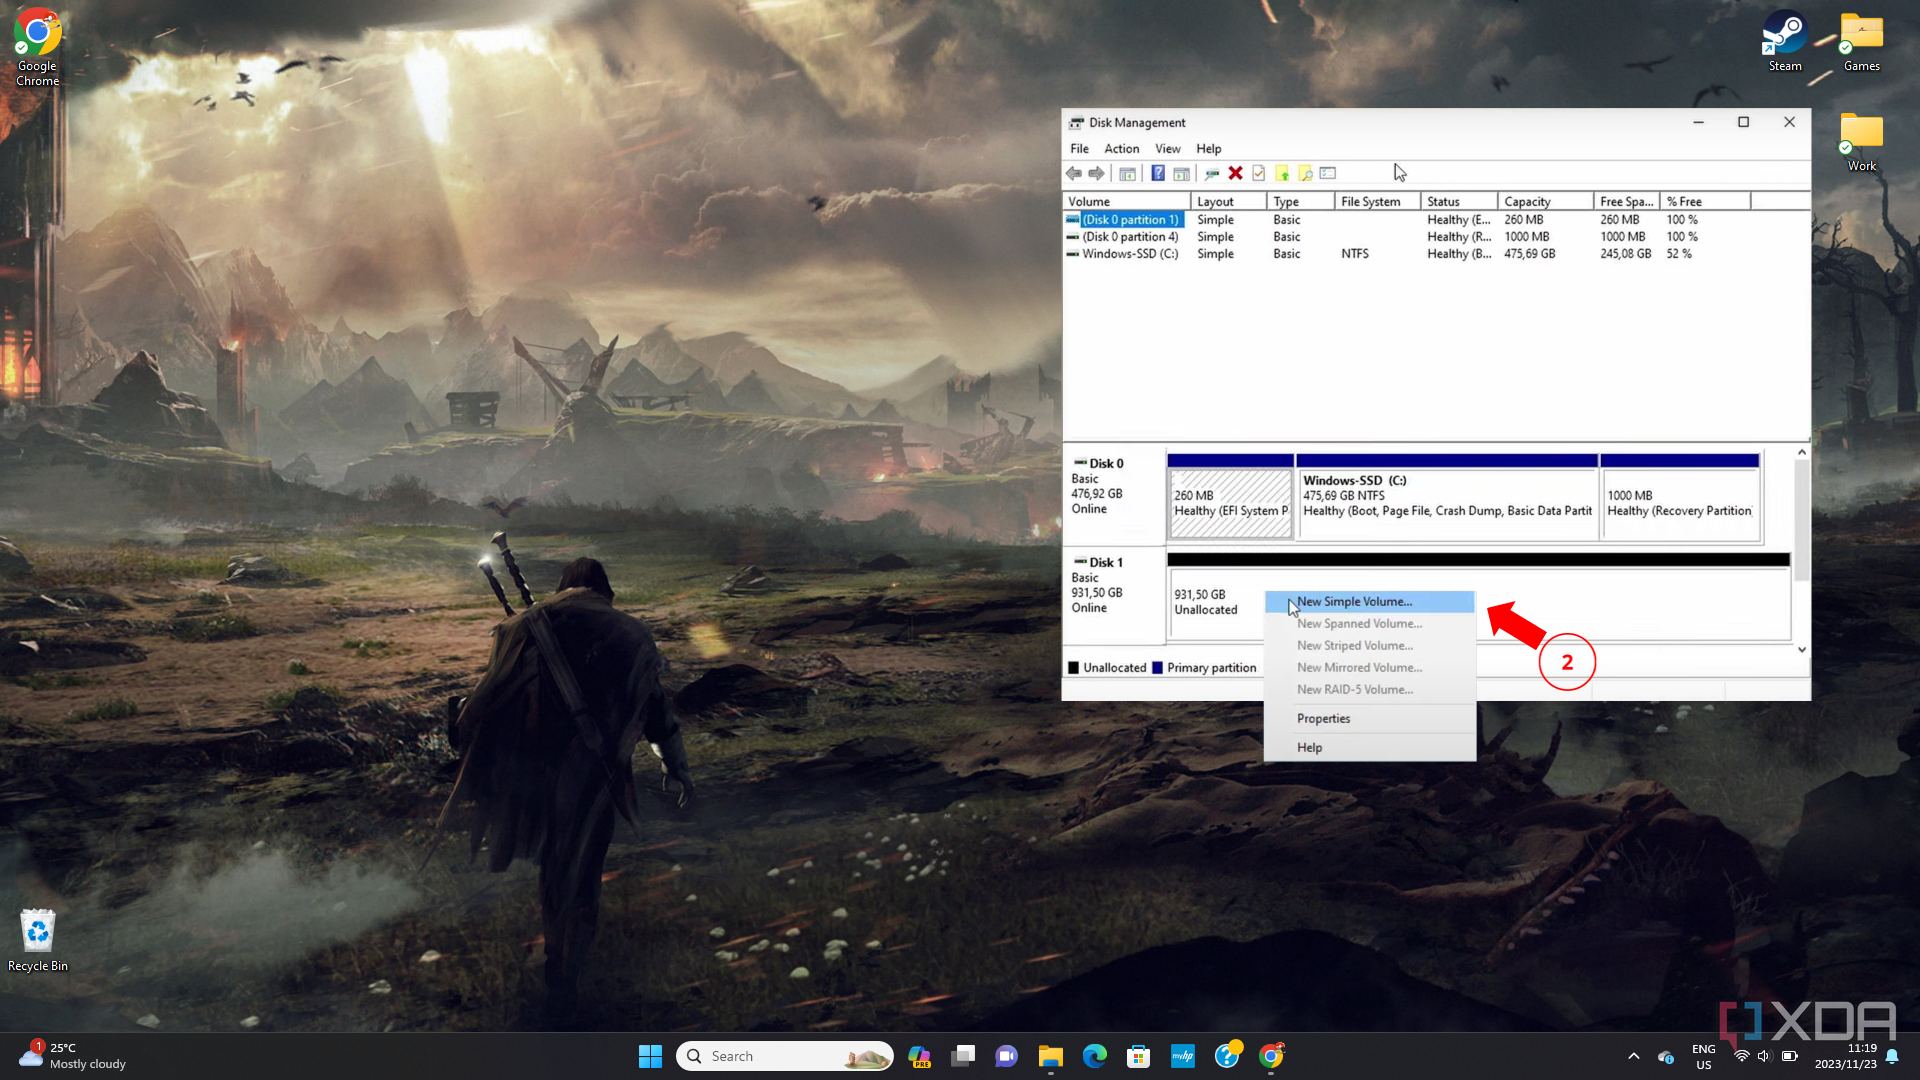
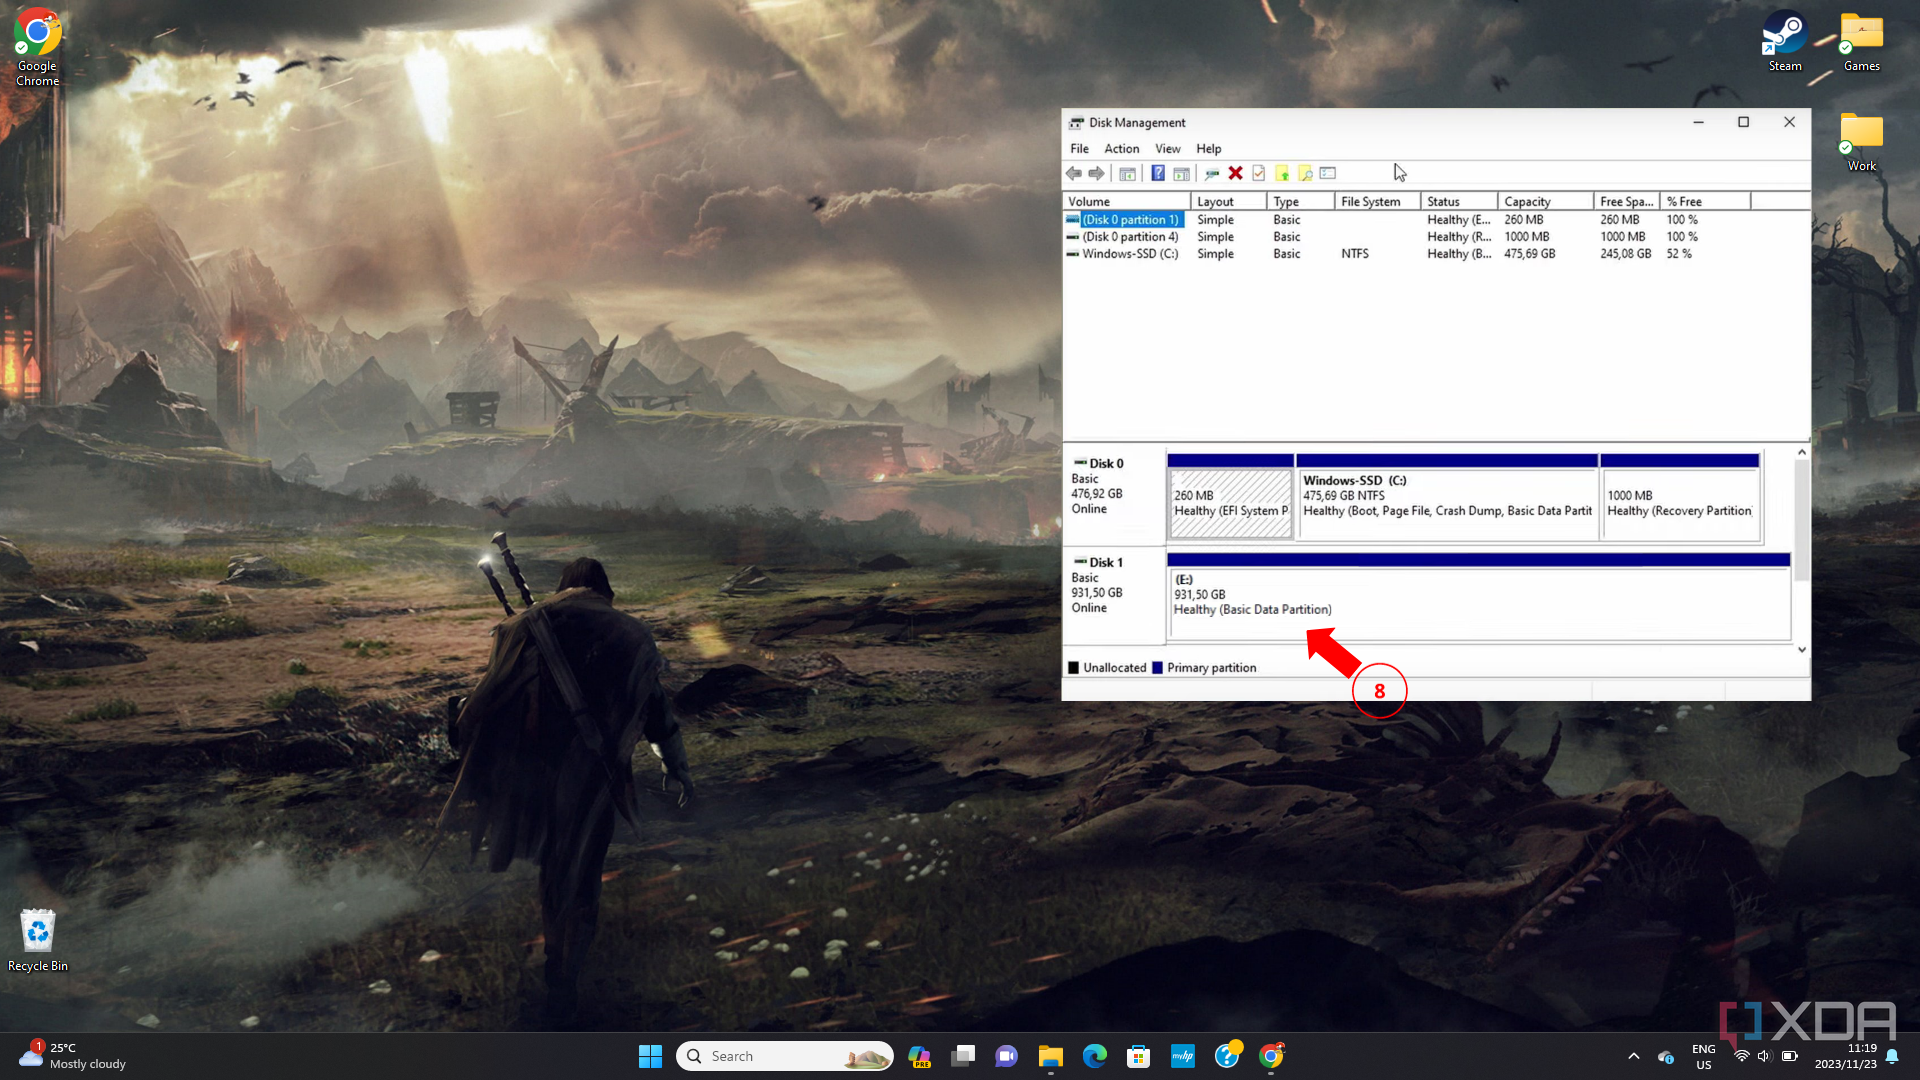
In case your SSD will not be being detected, however the SSD you are utilizing has already been initialized, then chances are you’ll have to create a partition in your SSD to your laptop to register it.
- Open Disk Administration with Home windows + X.
- Proper-click on the SSD with unallocated area and choose New Easy Quantity…
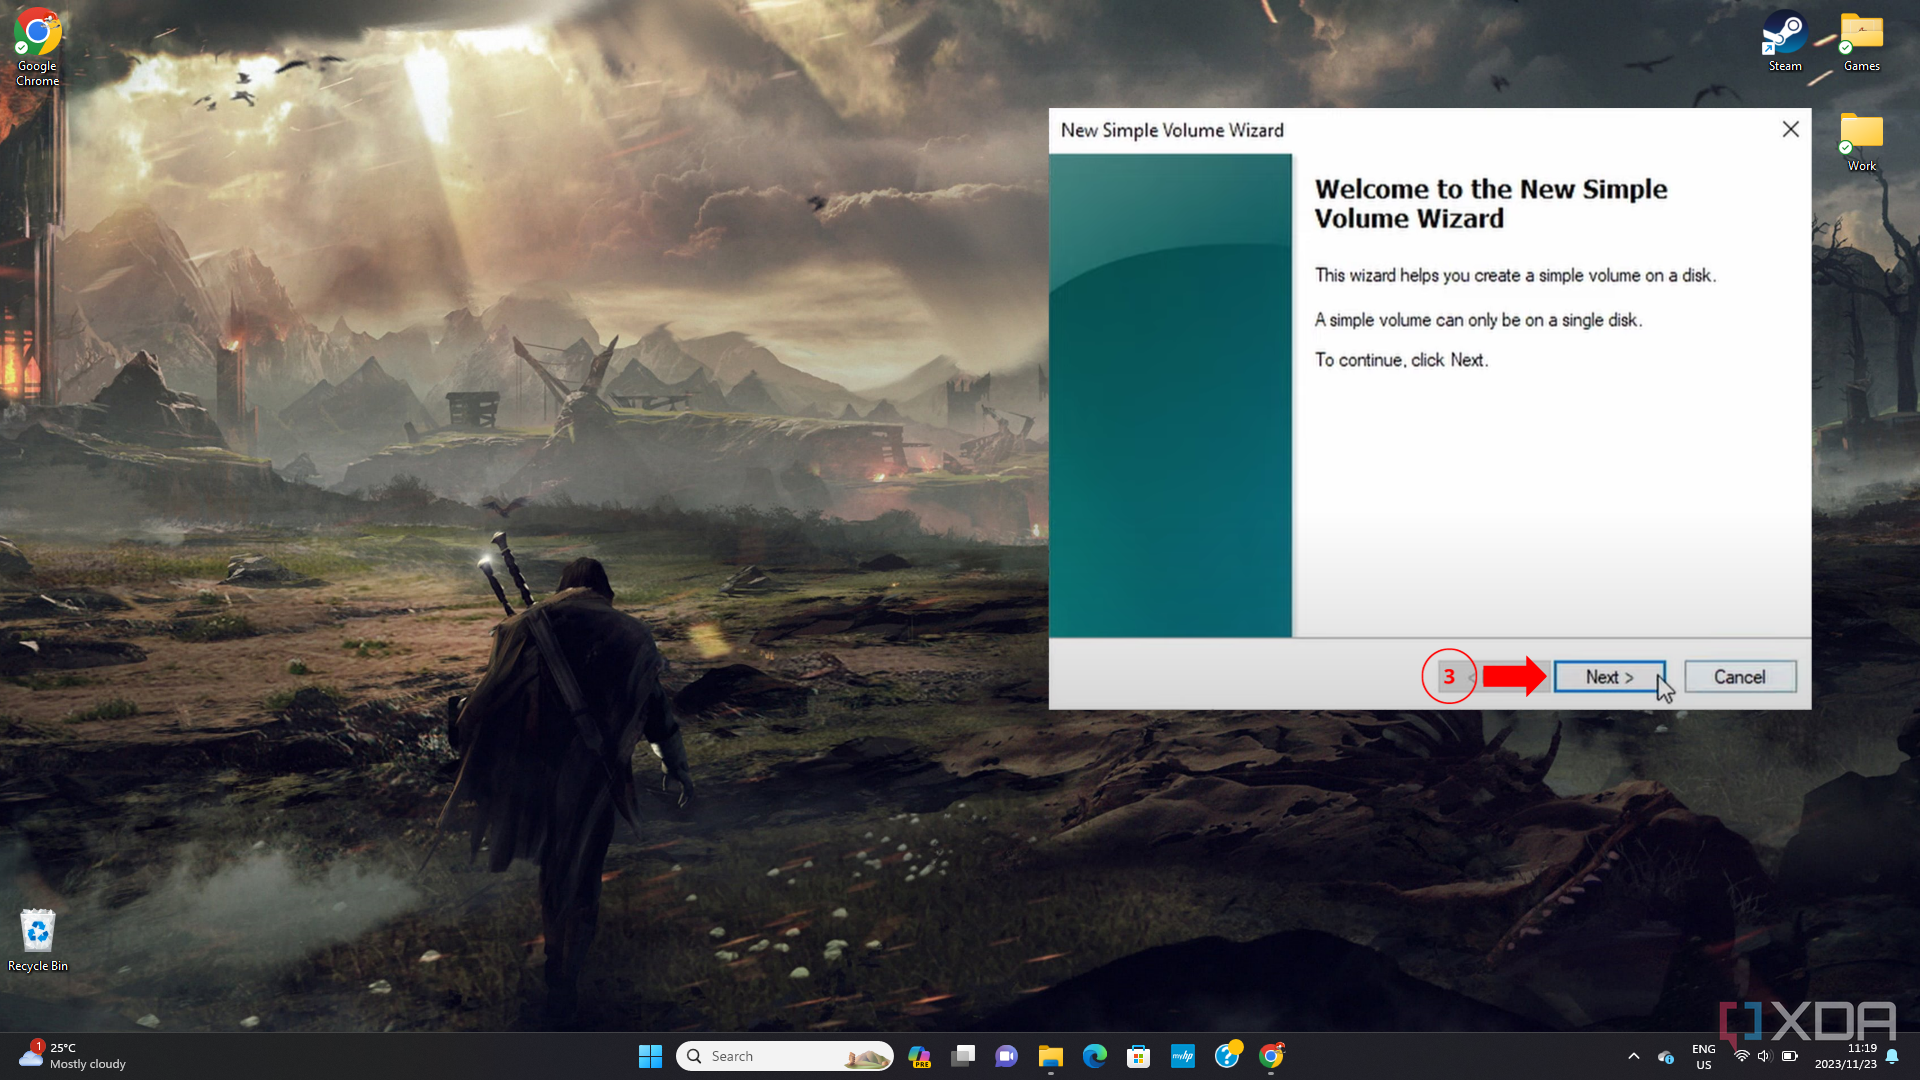
- An set up wizard will pop up. Click on on Subsequent.
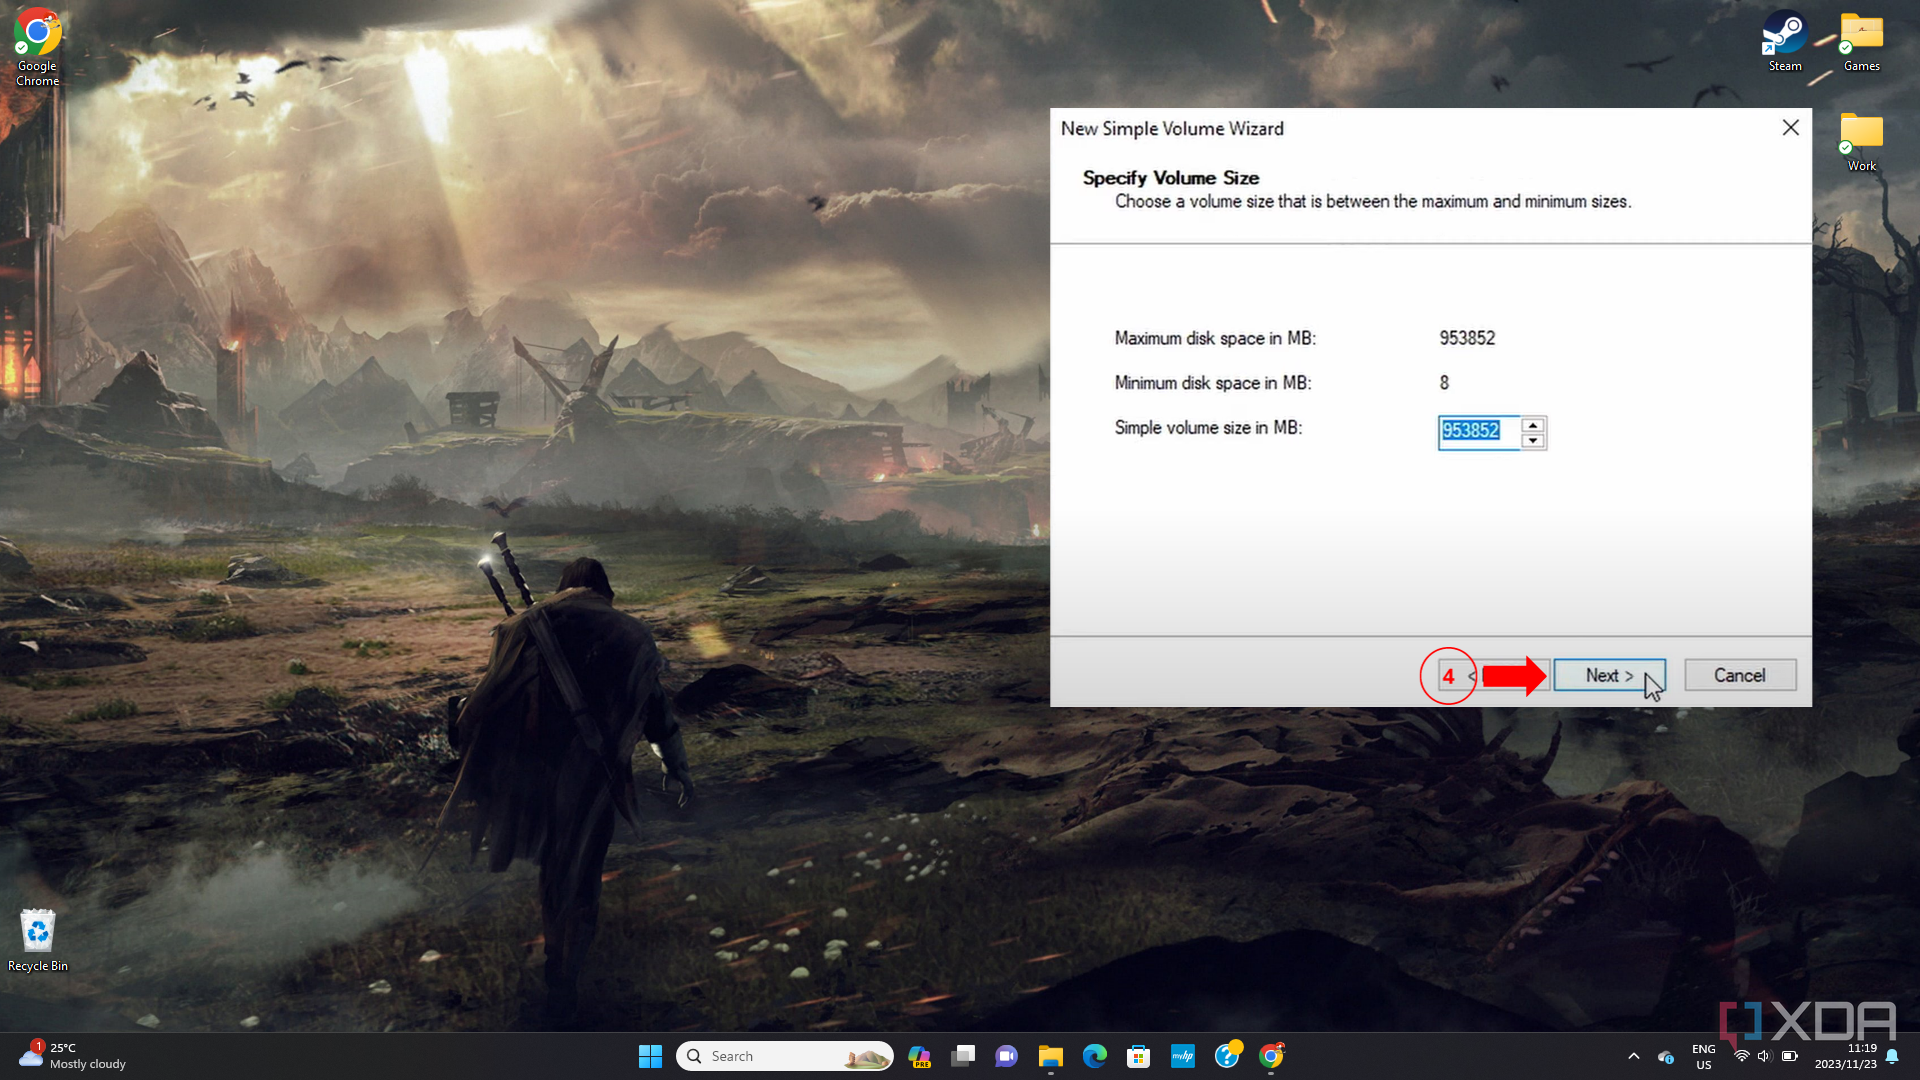
- When you’d prefer to partition your drive into a couple of quantity, then decrease your quantity dimension. In any other case, click on on Subsequent.
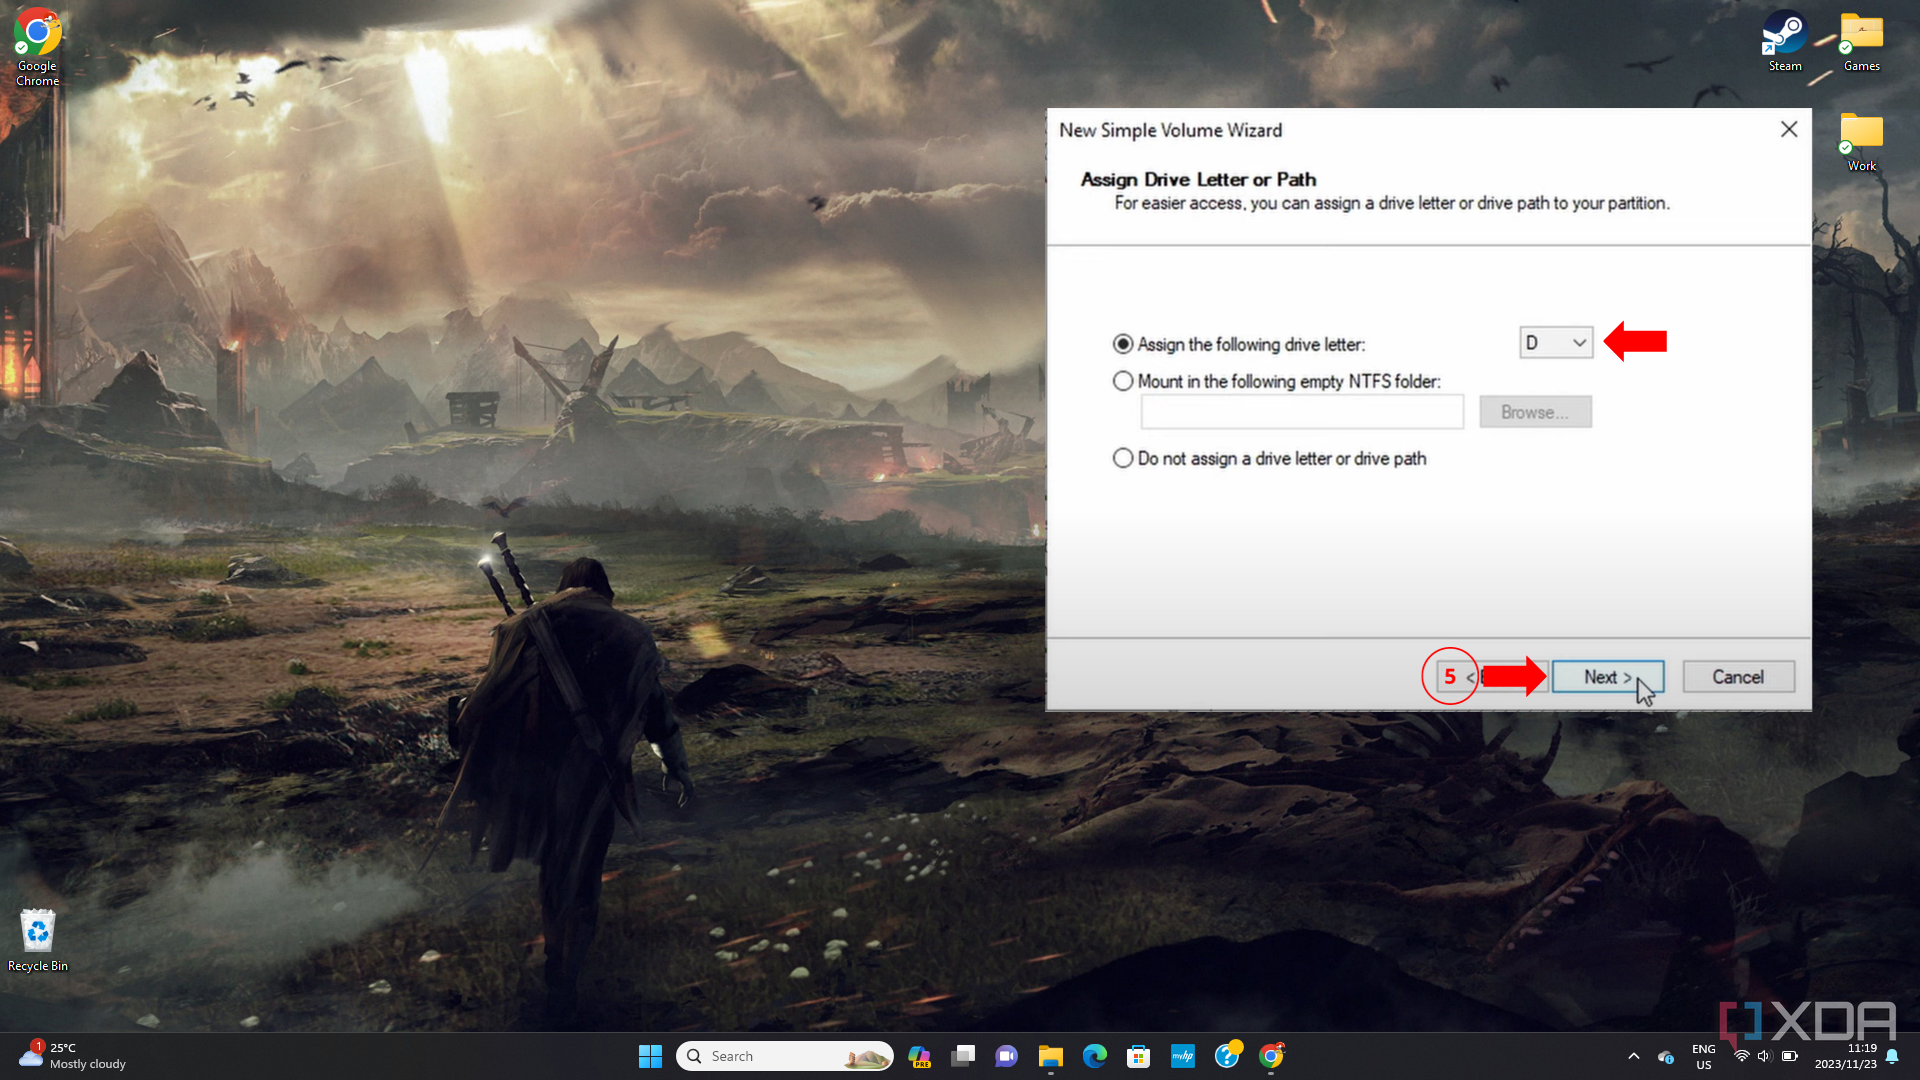
- Select your drive letter and Click on Subsequent.
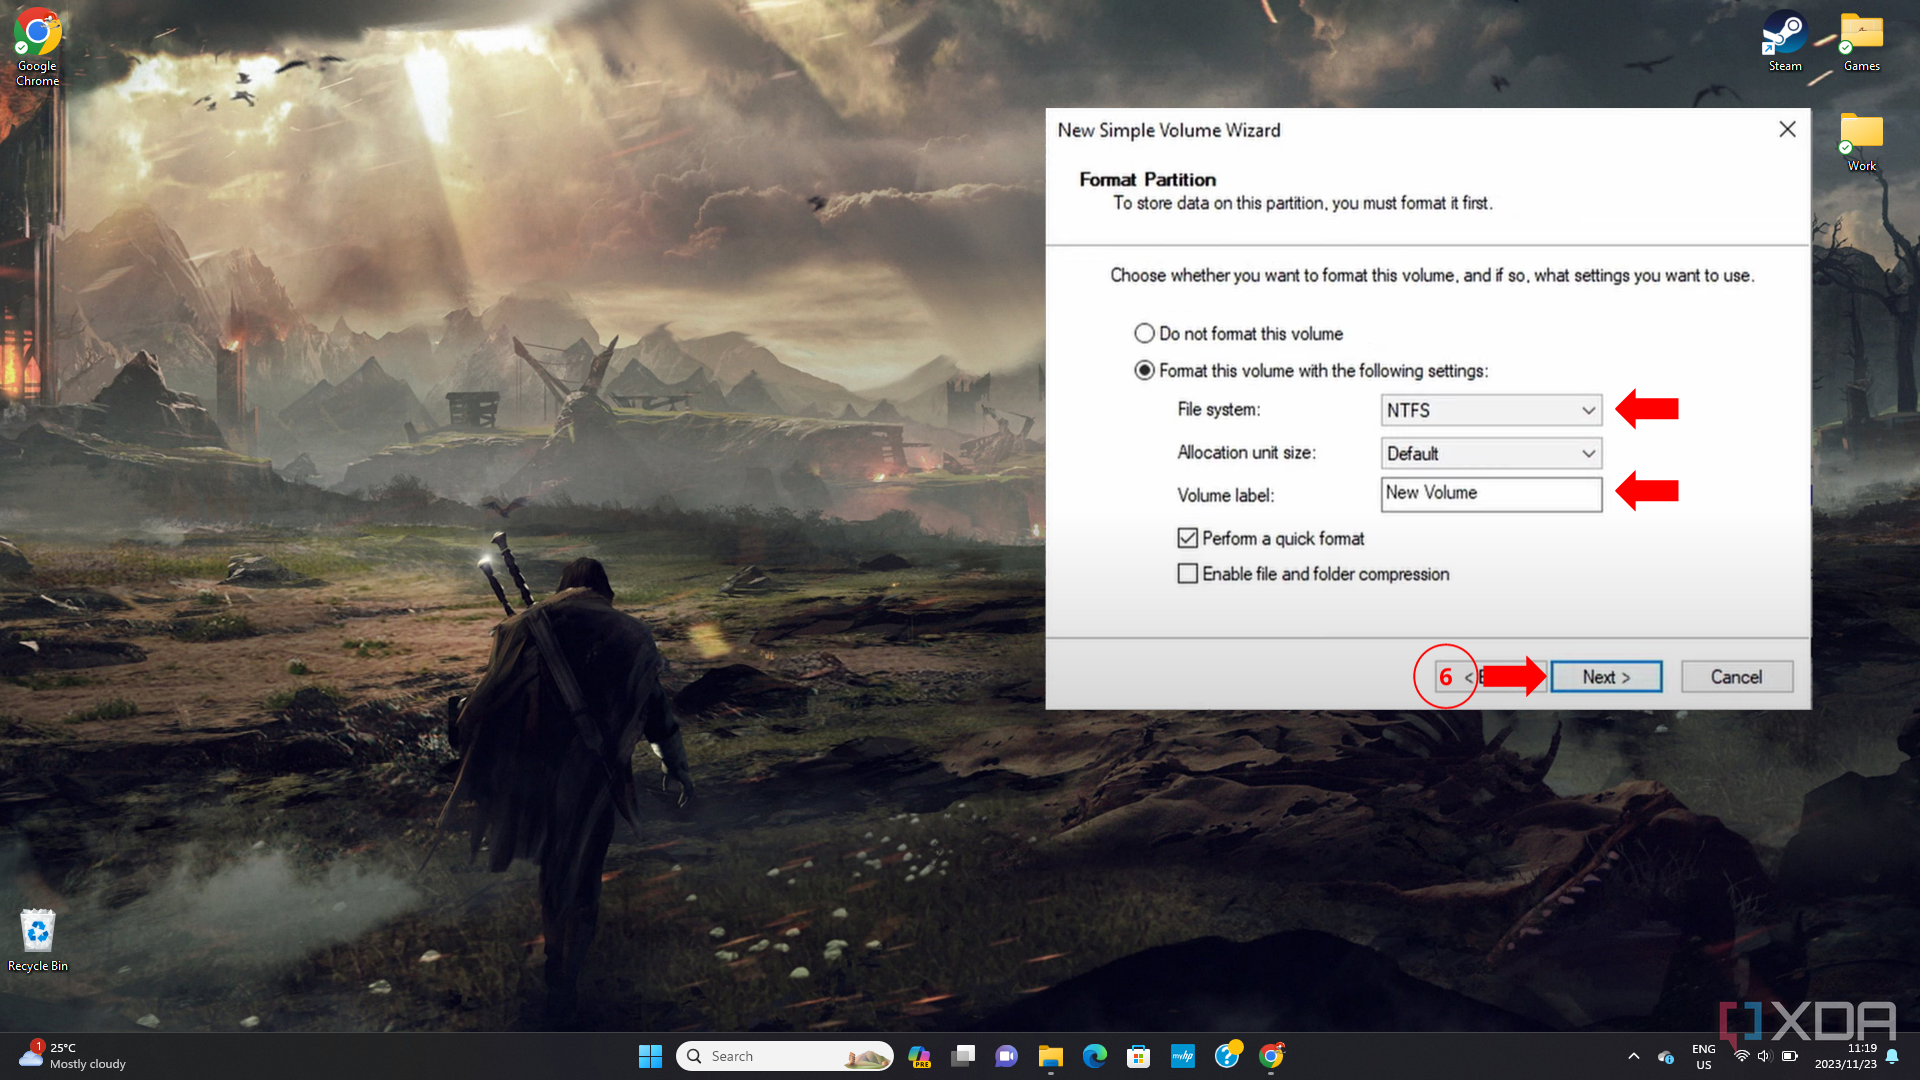
- Choose your file system (NTFS for inside drives). Rename the Quantity labeland click on on Subsequent.
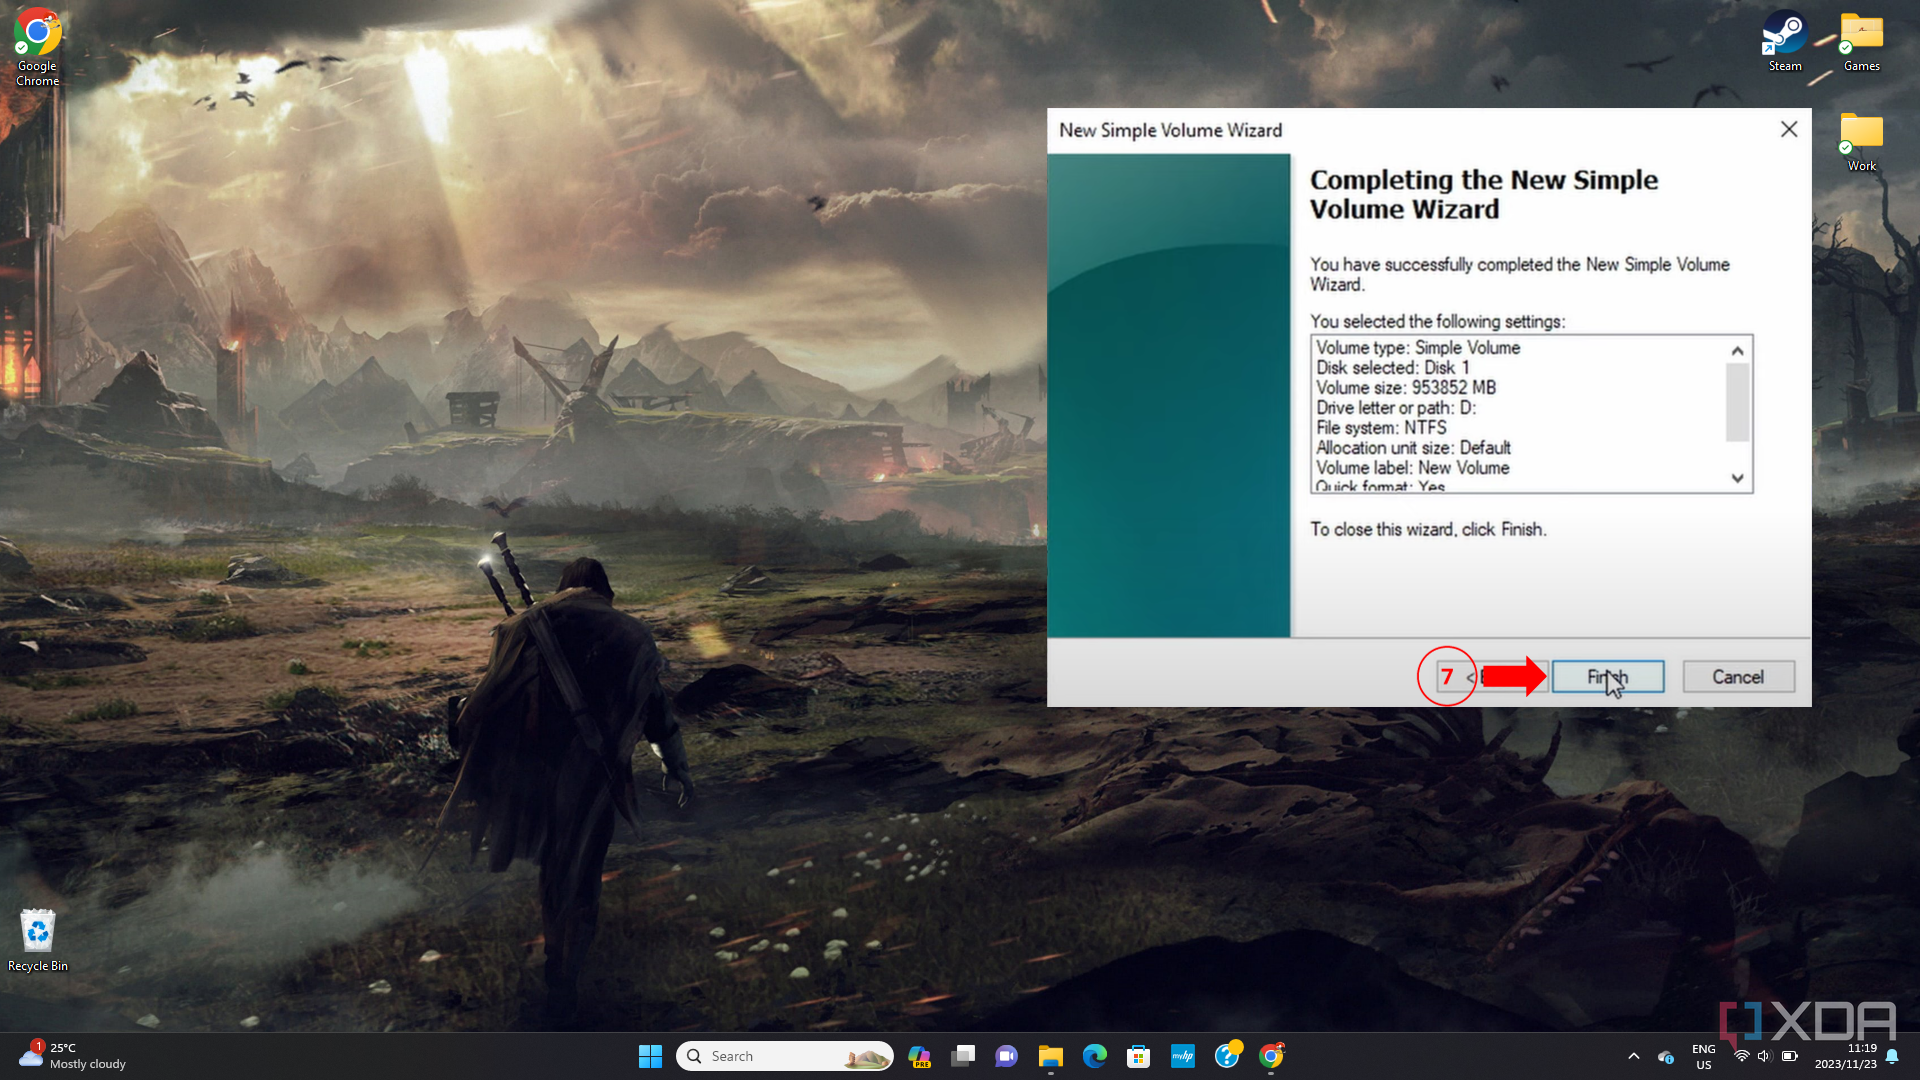
- Verify the knowledge on the display and click on End.
- Your SSD ought to now be Initialized, and the drive needs to be usable.


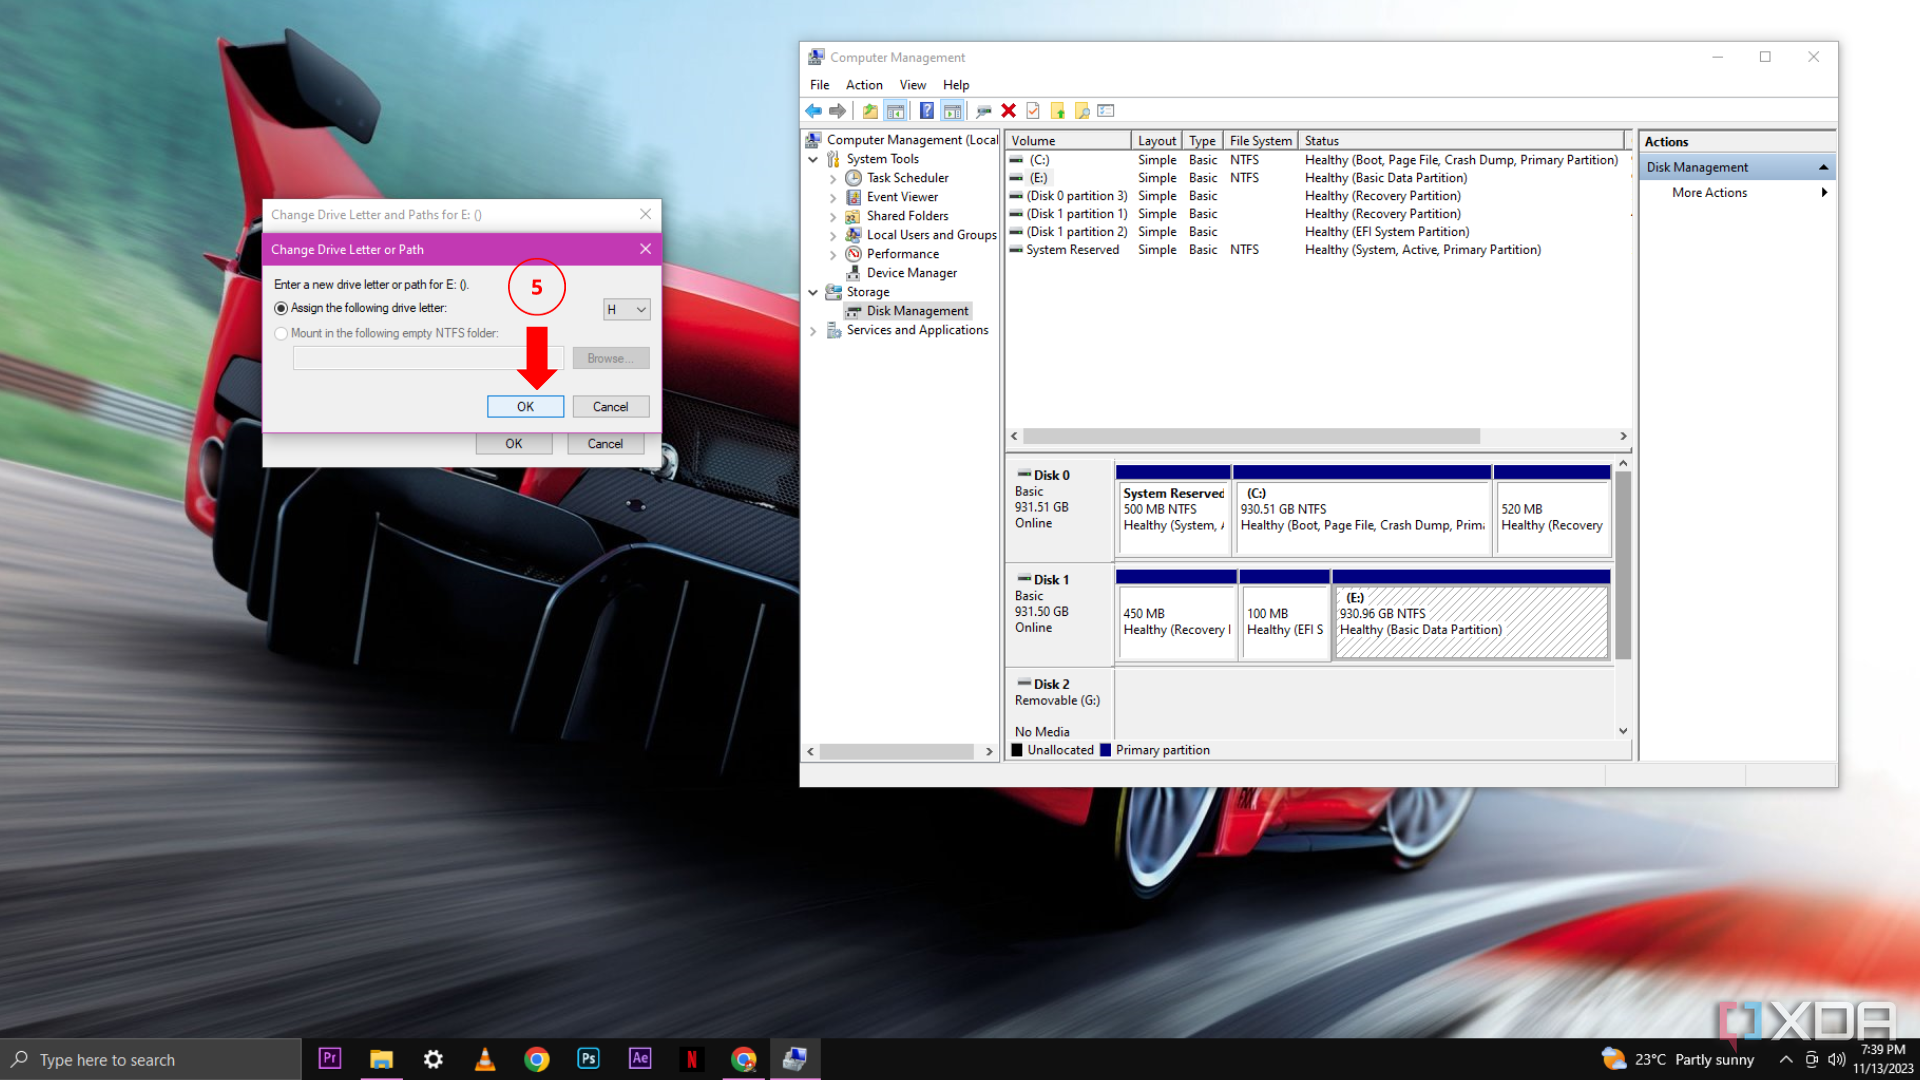
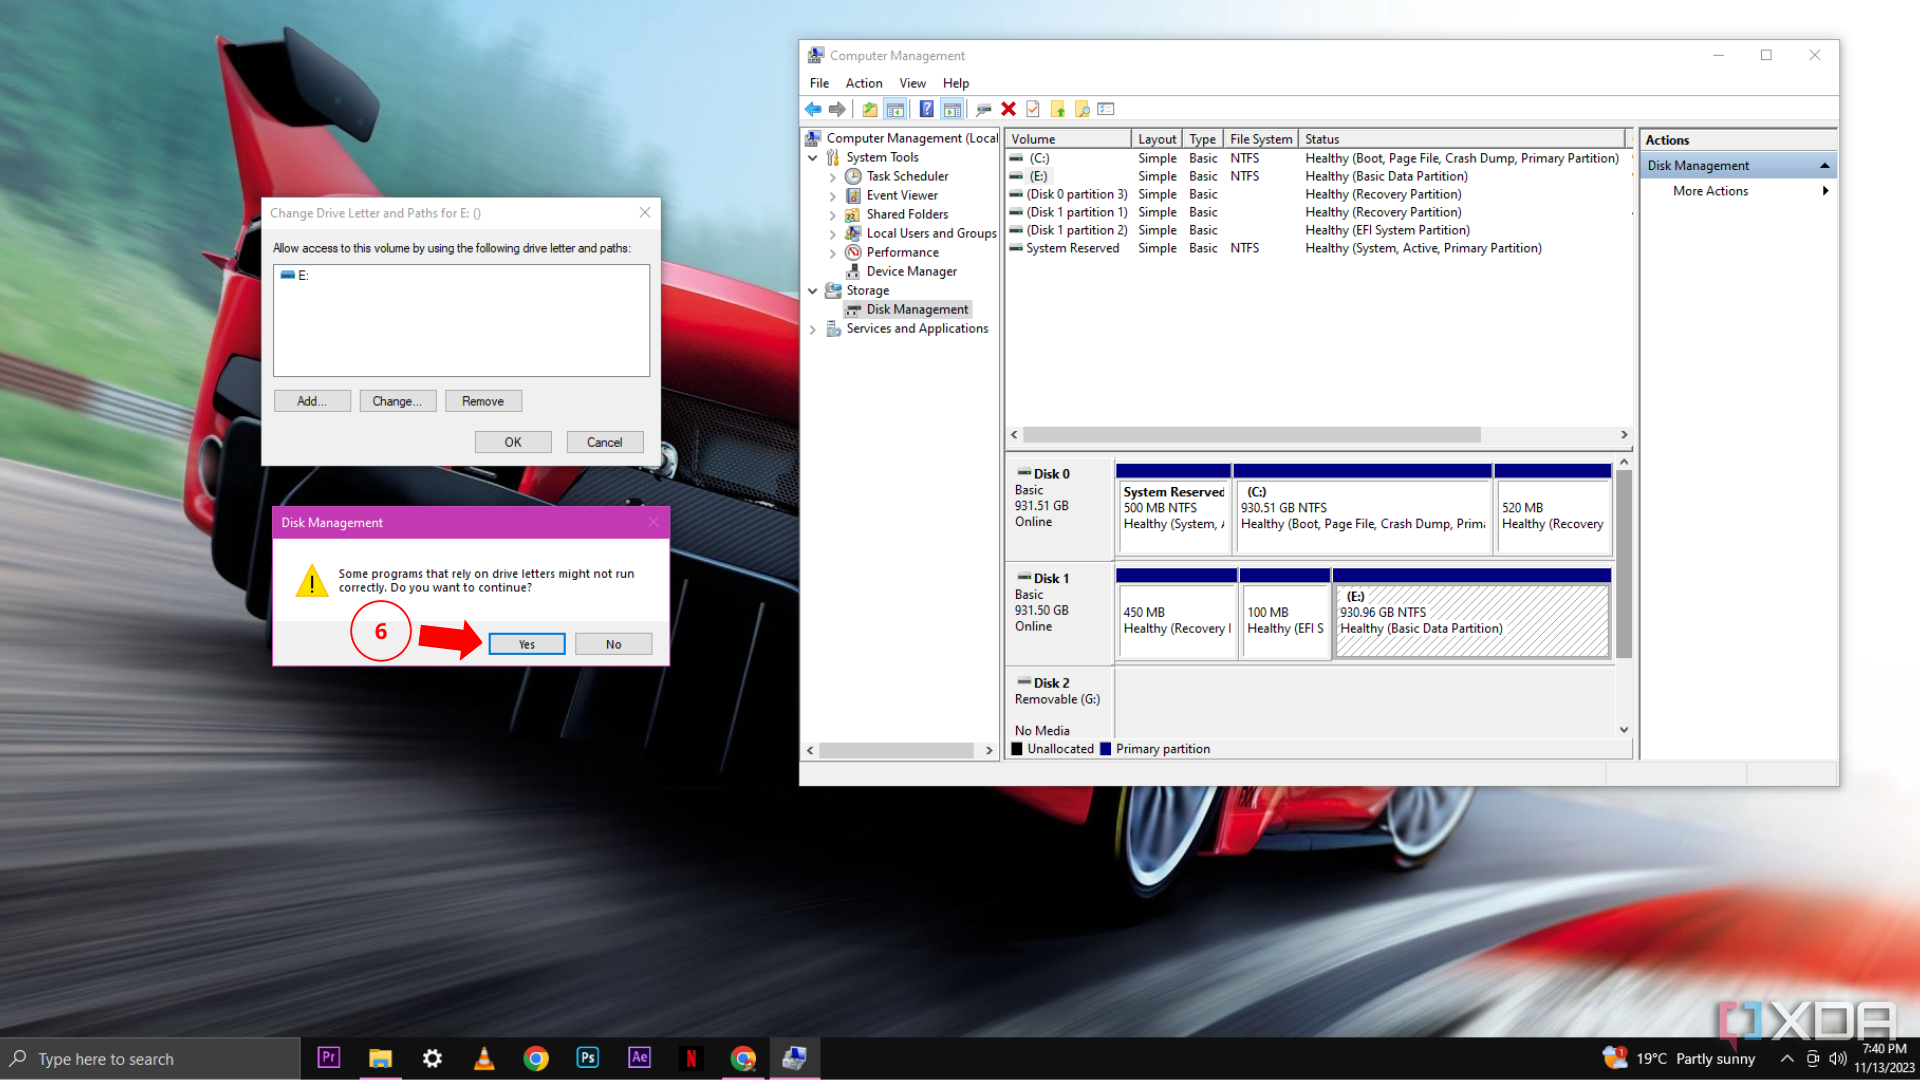
Change the drive letter in your SSD
In case your SSD is new and the cables are all working superb, then merely altering your SSD’s drive letter may repair the issue. In case your SSD has a reproduction drive letter or a label that the PC doesn’t acknowledge, it might trigger the Home windows PC to not detect it.
- Open Disk Administration by utilizing Home windows + X.
- Proper-click on the SSD drive and choose Change Drive Letter And Paths…
- Click on on Change and choose a brand new letter for the drive.
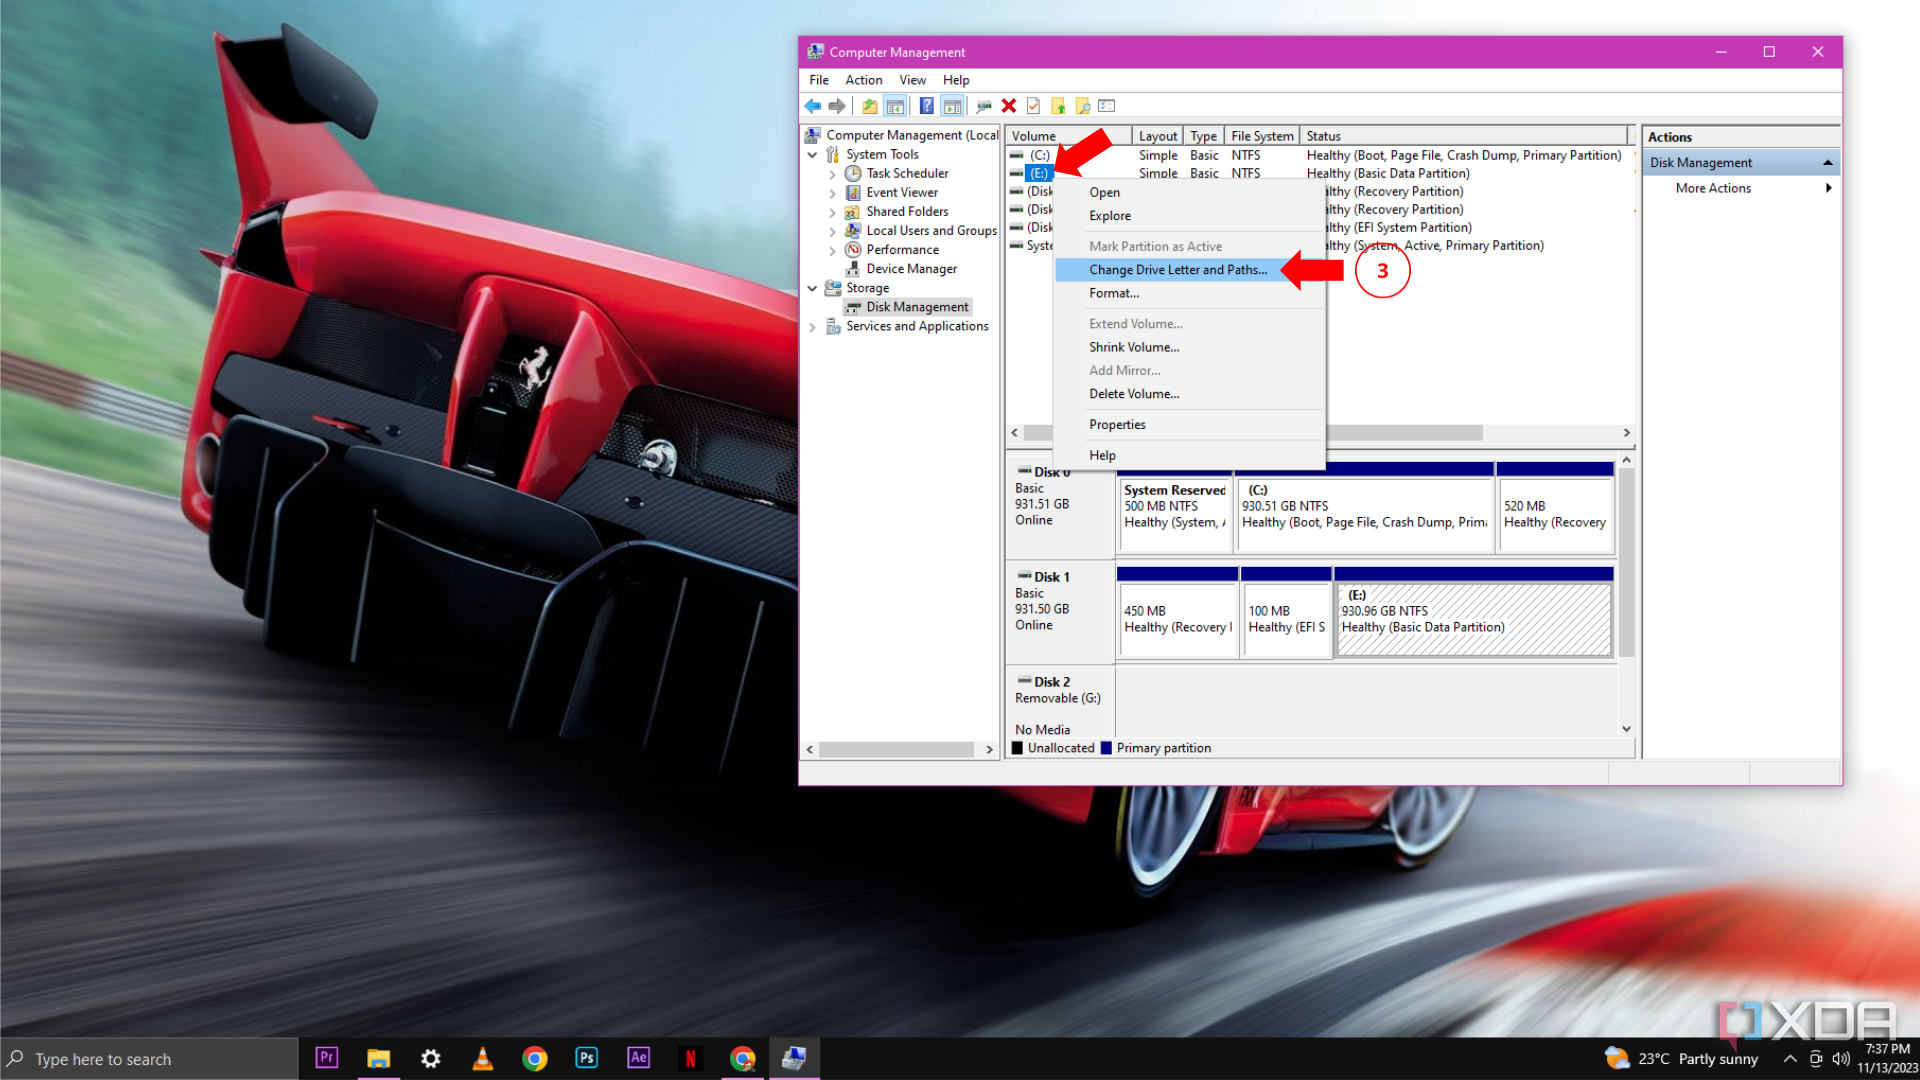
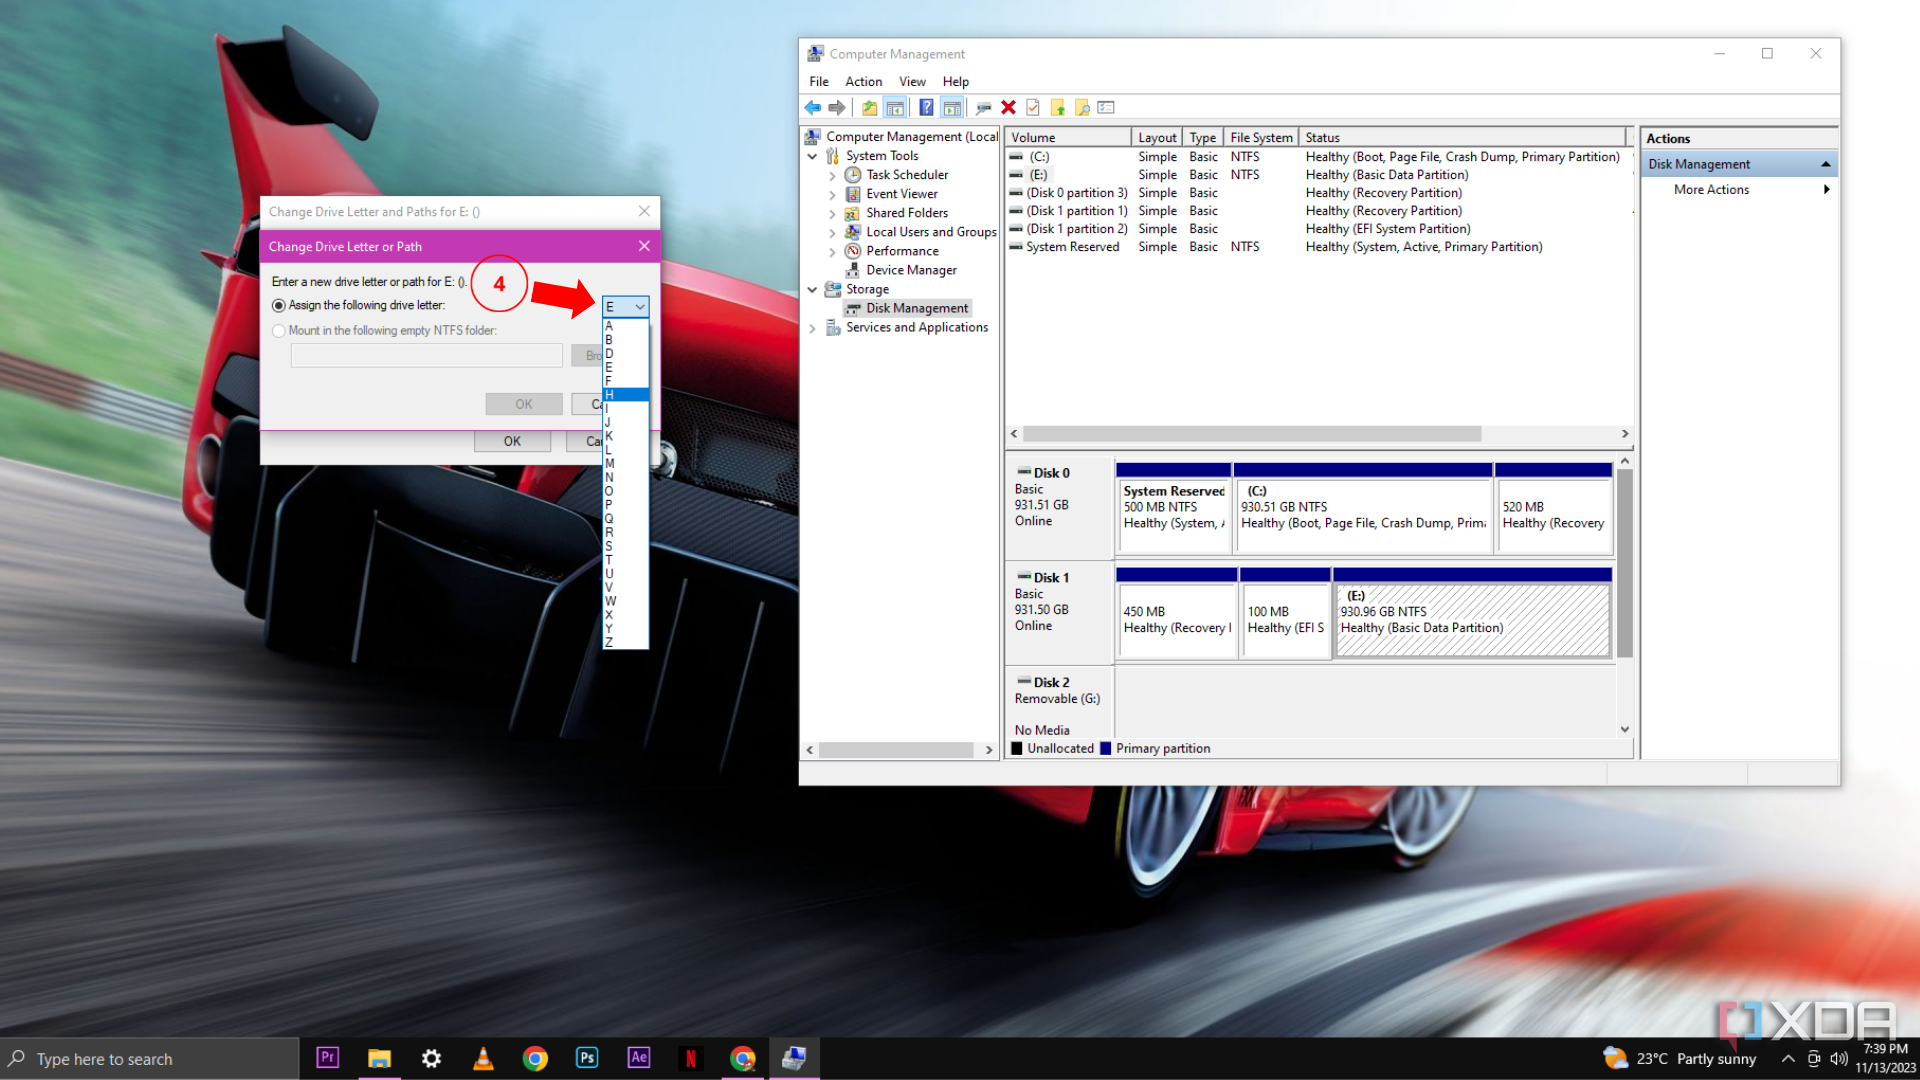
- As soon as you’ve got chosen your letter, click on OK.
- Click on Sureand your drive can be re-labeled.


Replace your SSD’s storage controller driver
Your storage controller driver controls how your storage gadgets are managed and recognized in your laptop. In case your SSD will not be detected, then you must attempt updating your Microsoft Storage House Controller.
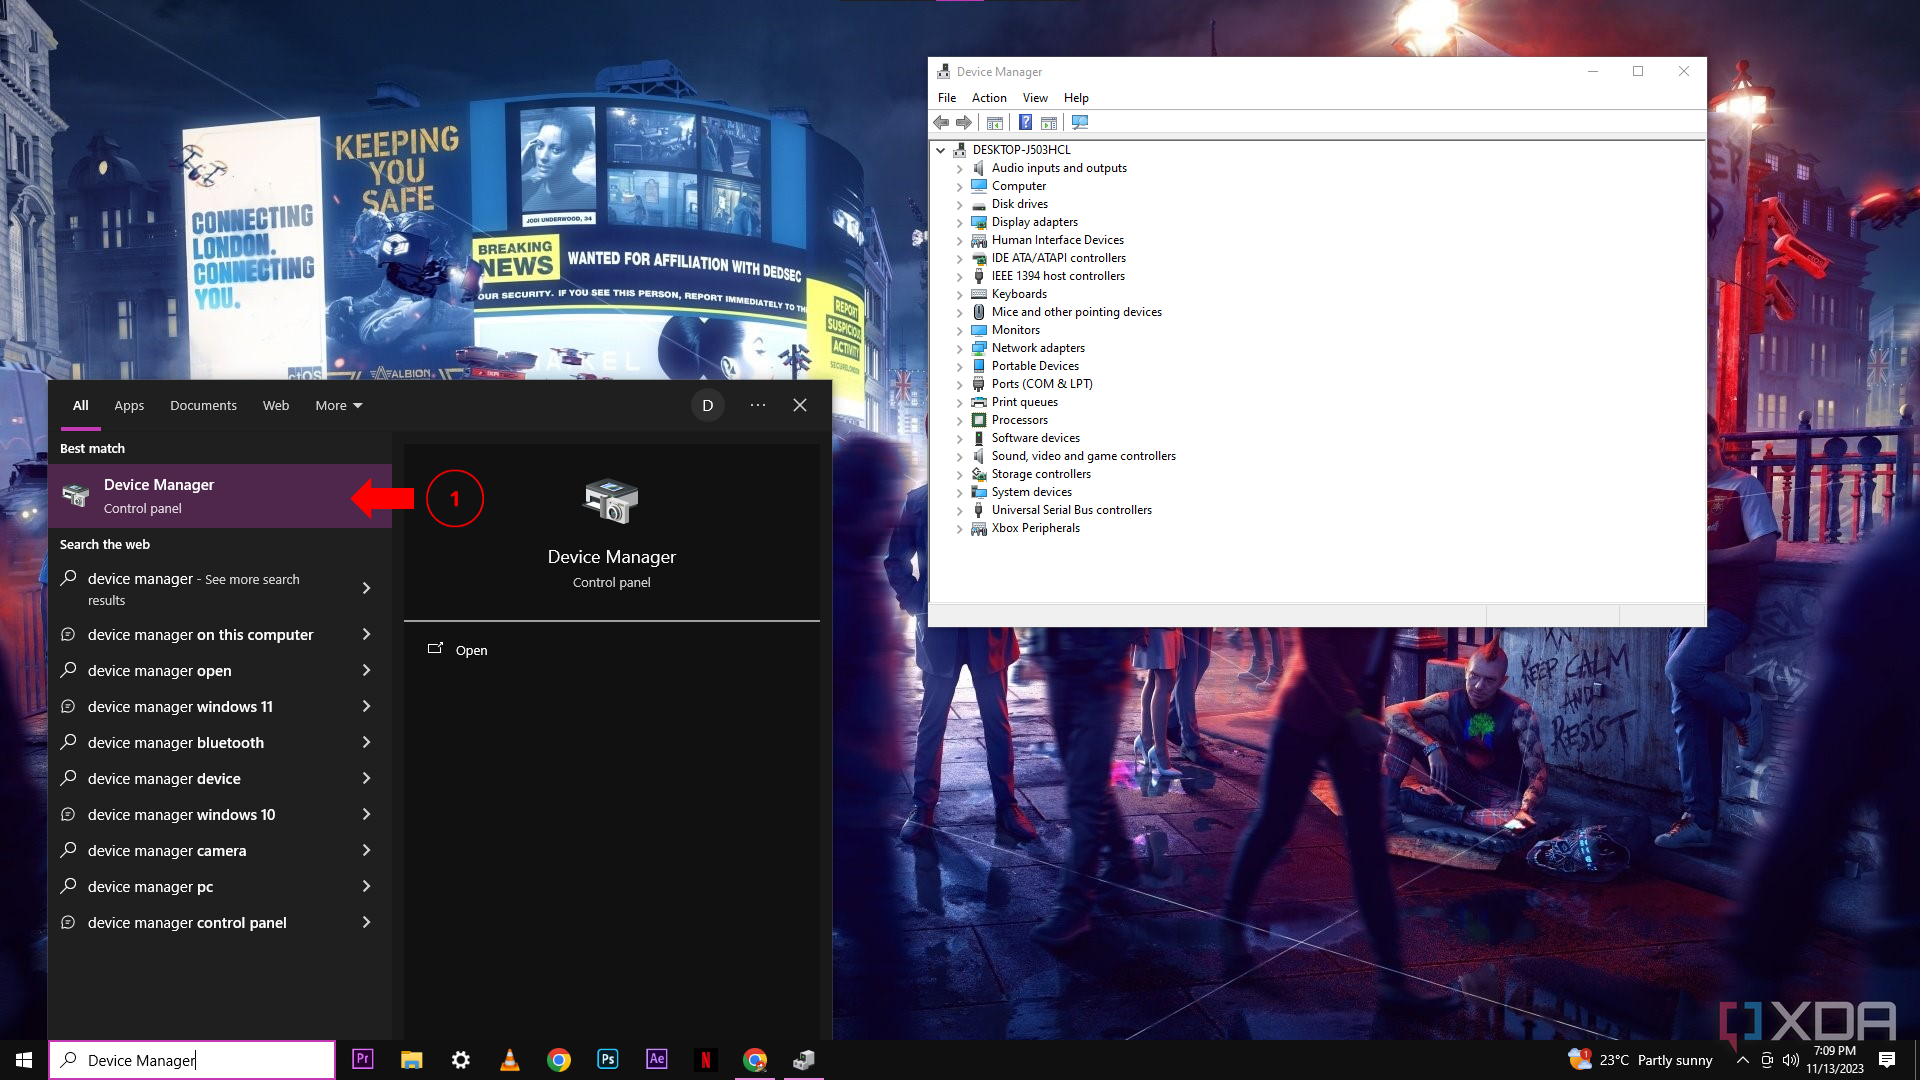
- Seek for and open your System Supervisor.
- Click on on the Storage controllers drop-down menu.
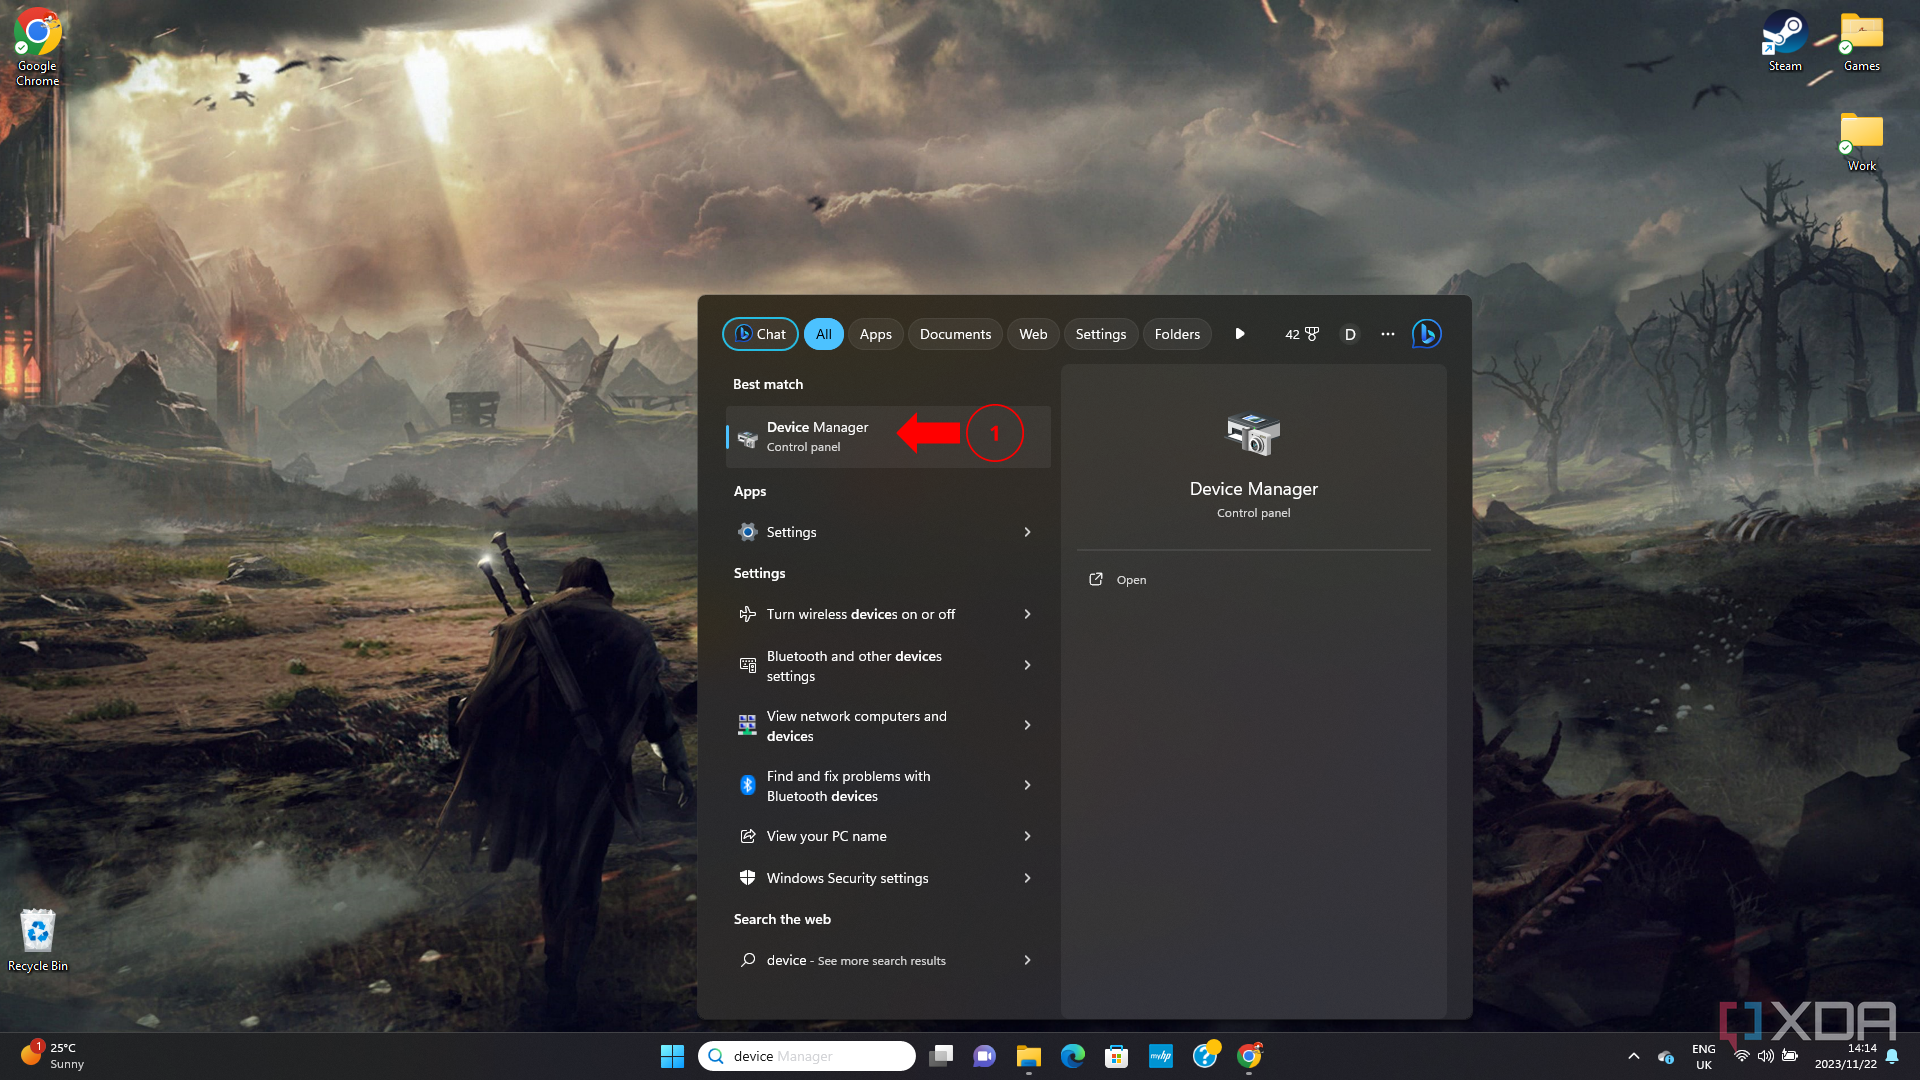
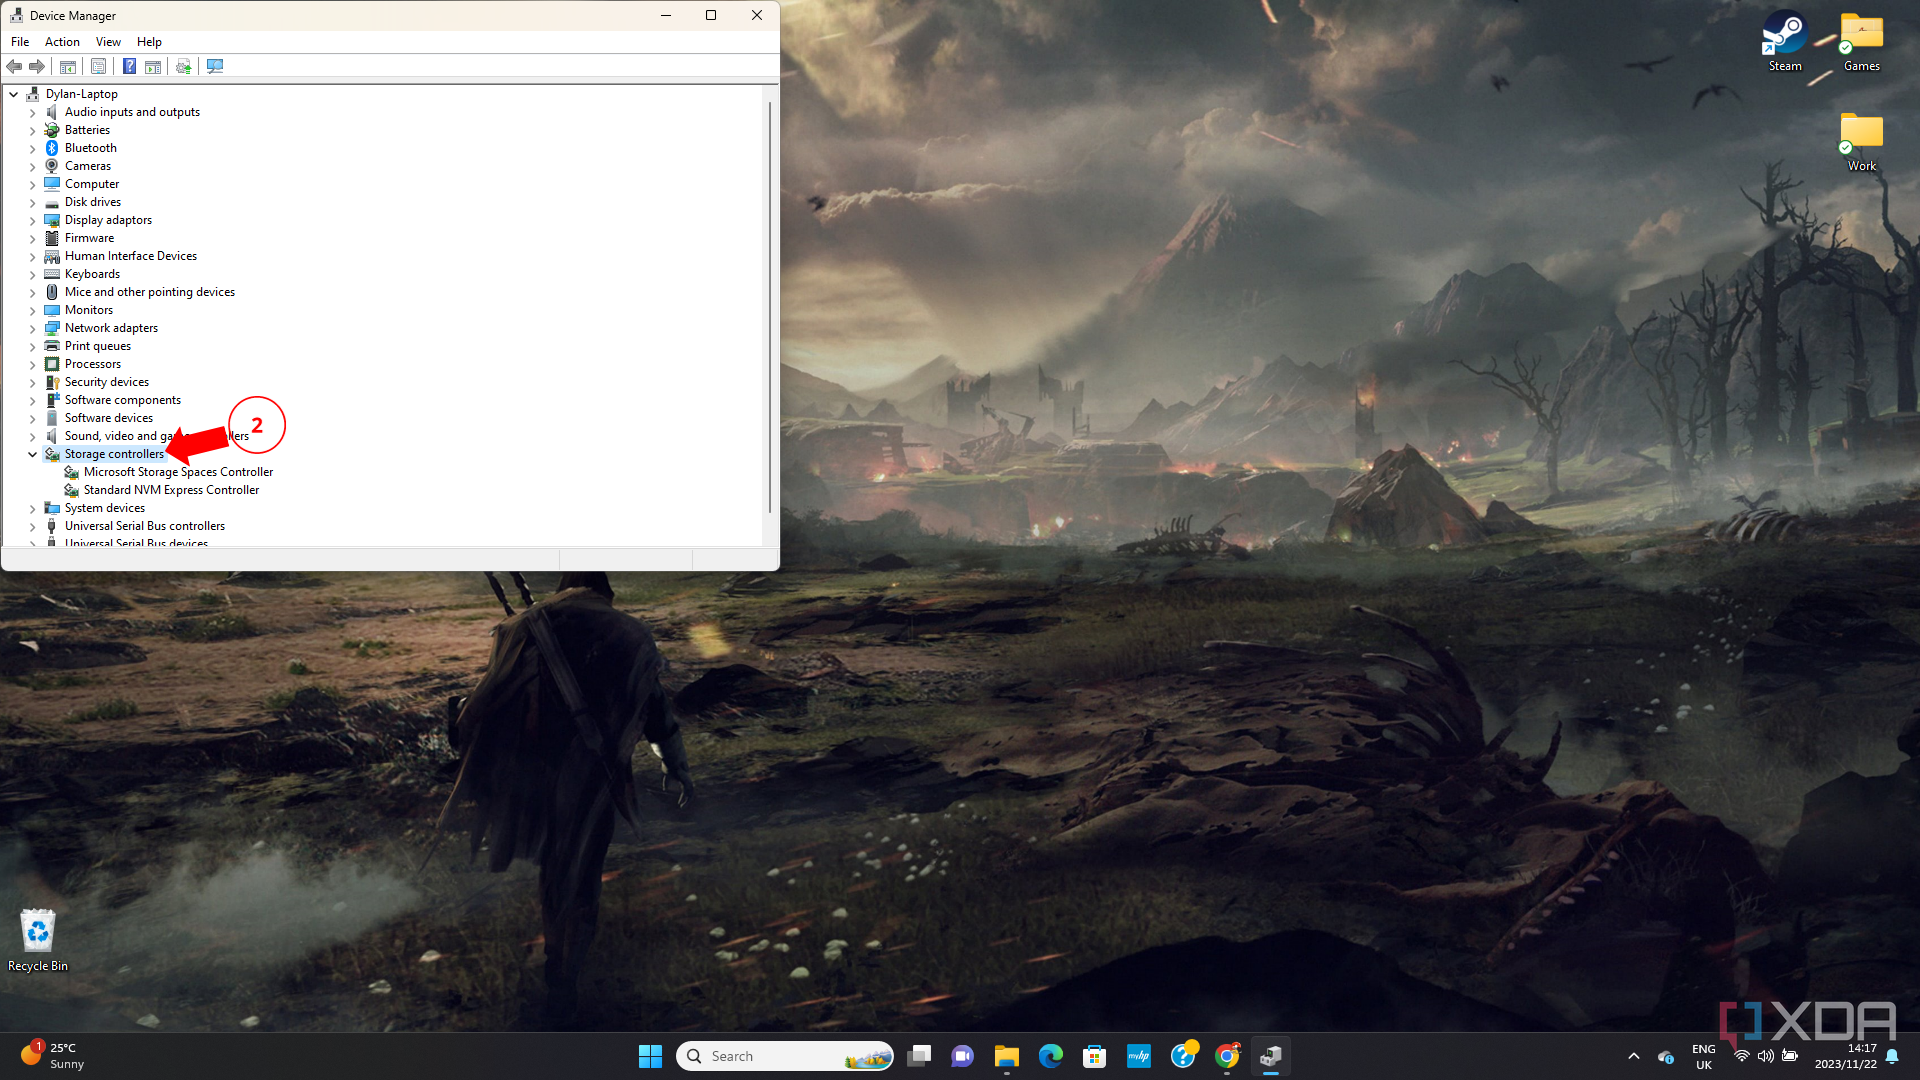
- Proper-click on the Microsoft Storage Areas Controller.
- Click on on Replace driver.

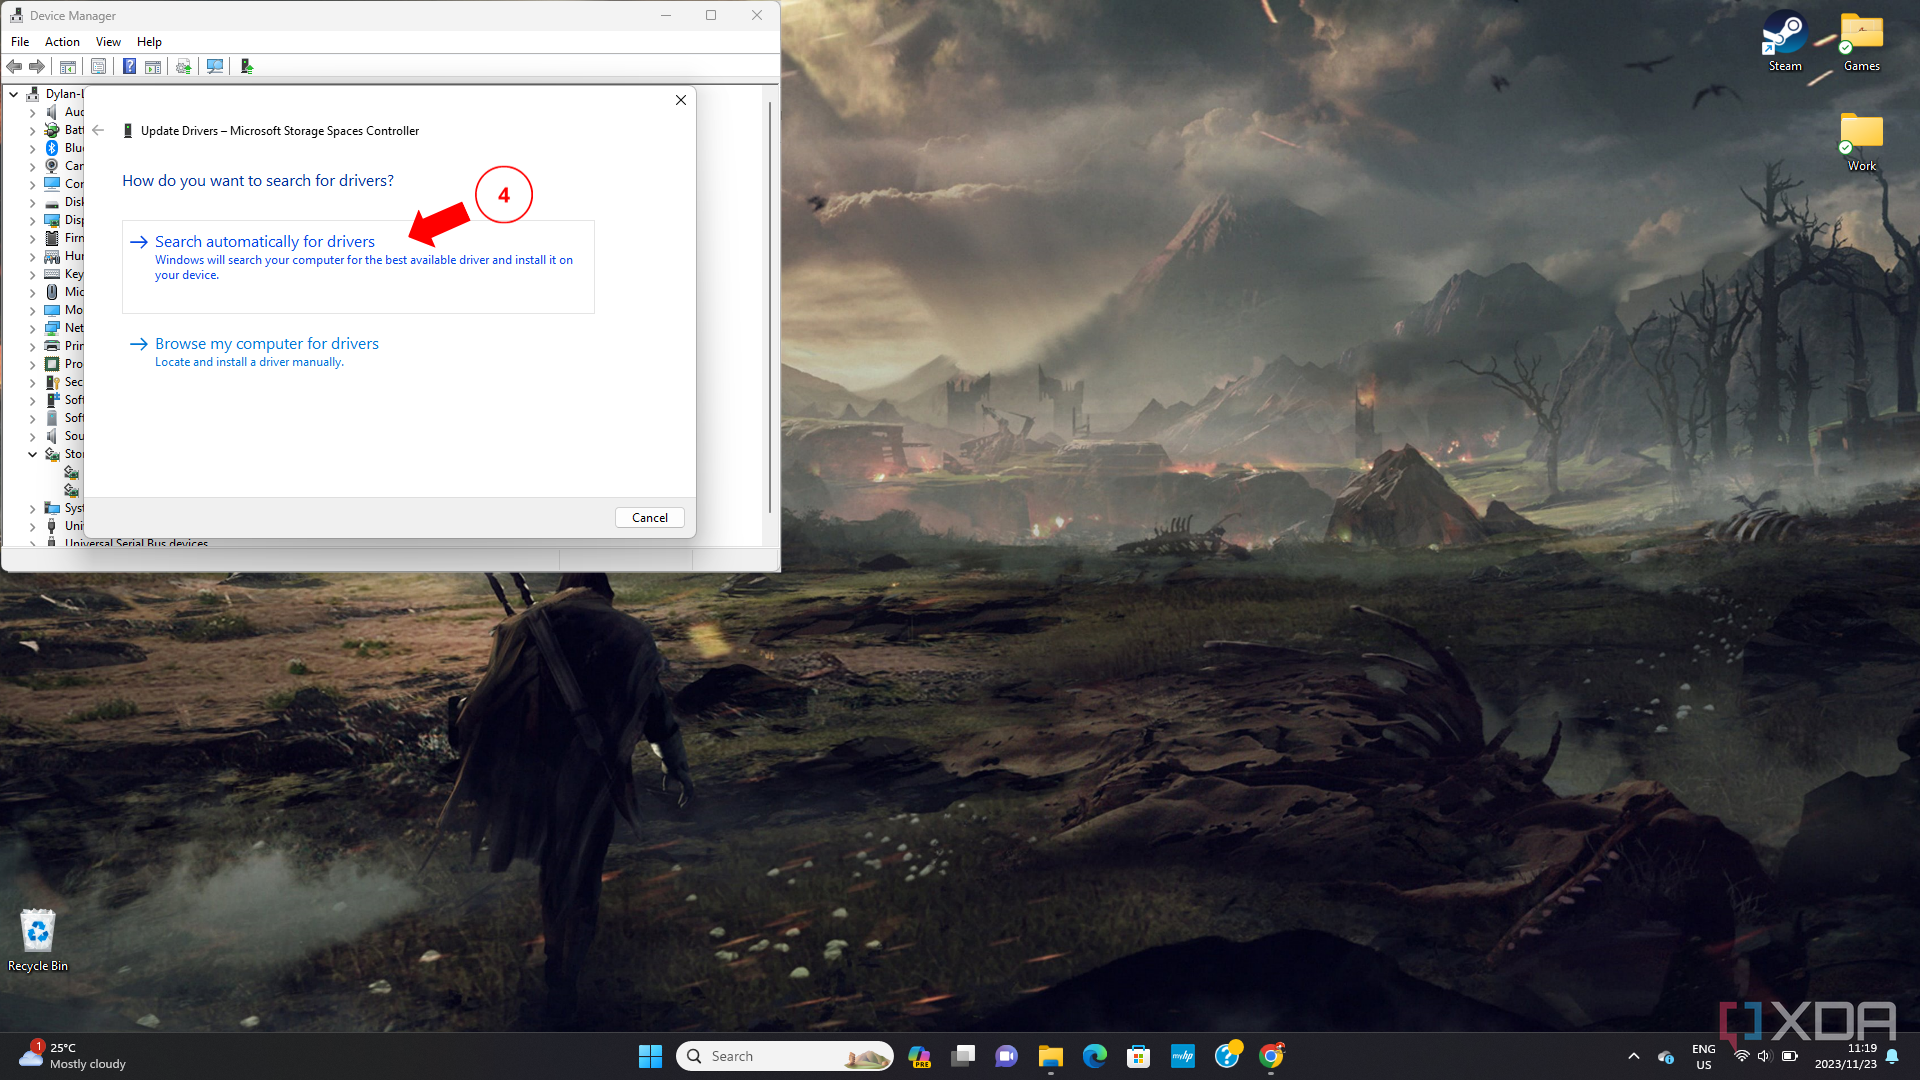
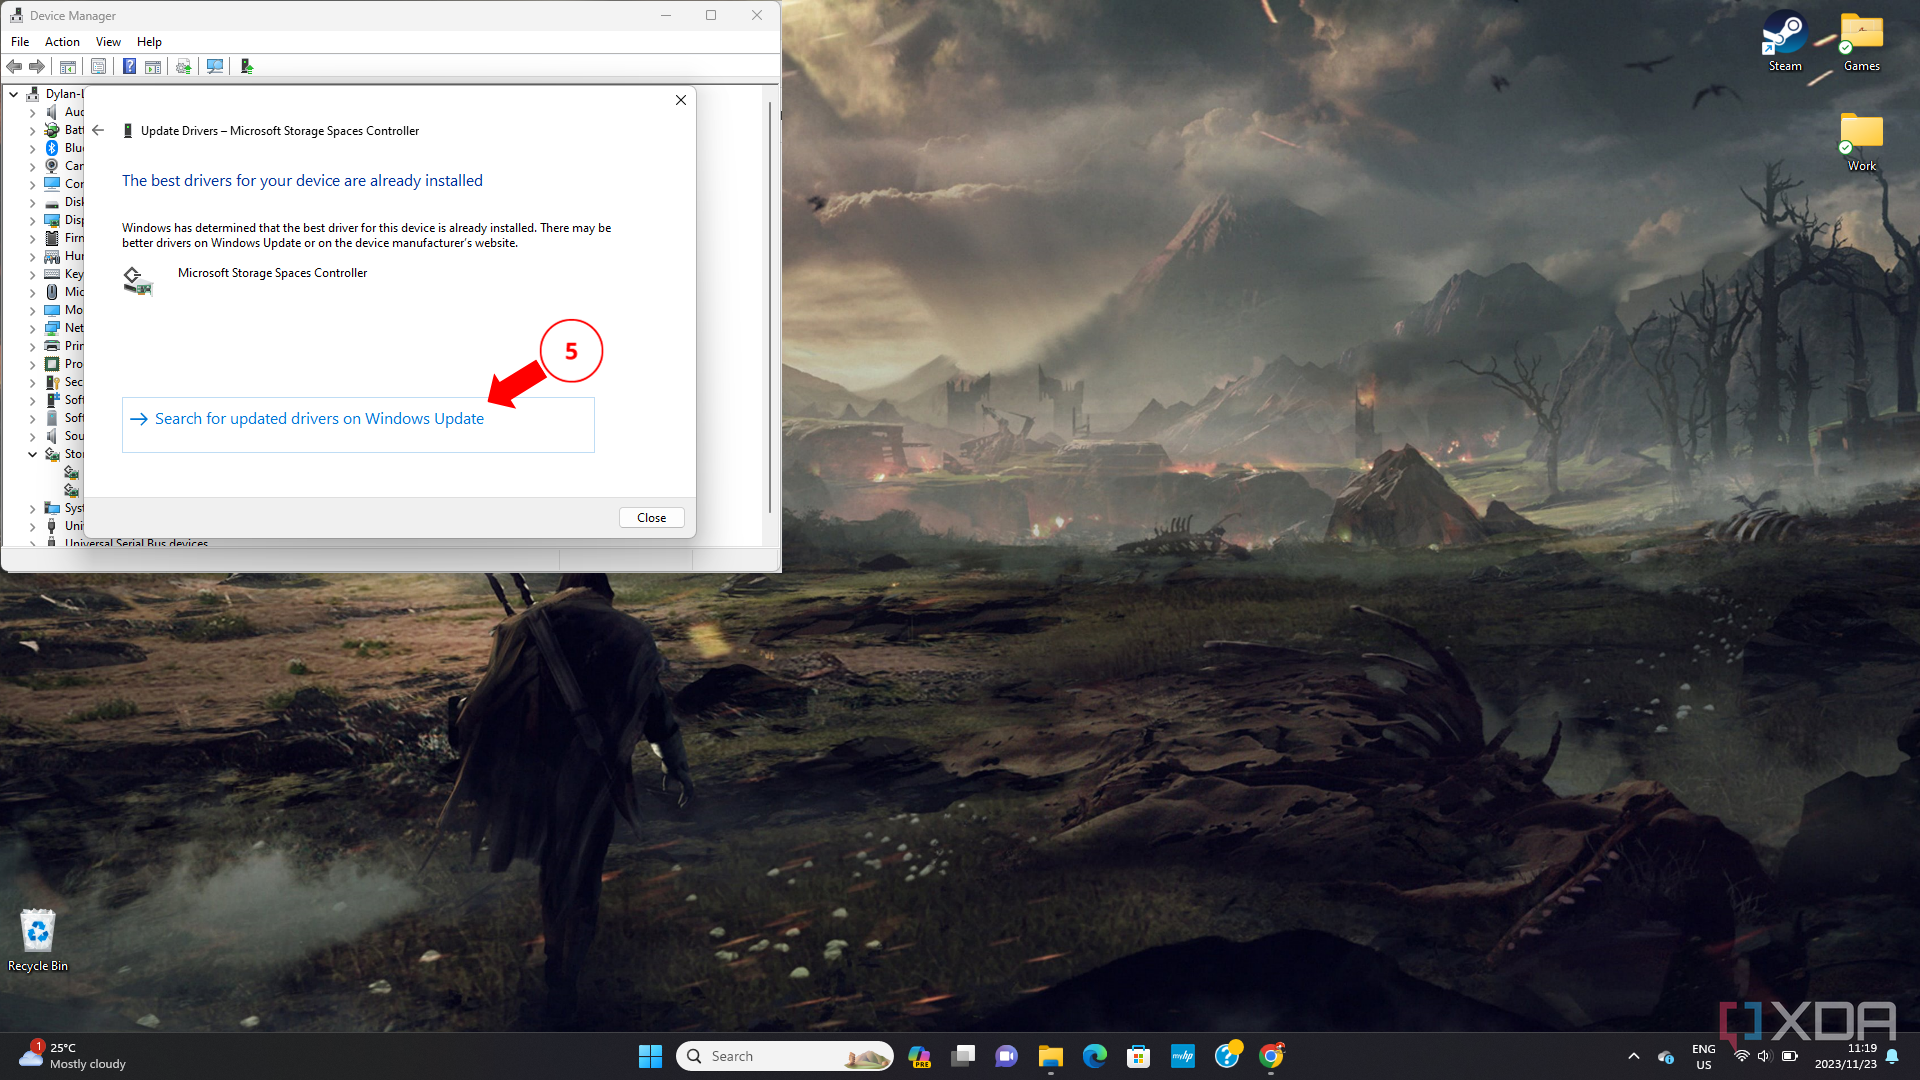
- Choose the Search routinely for drivers possibility.
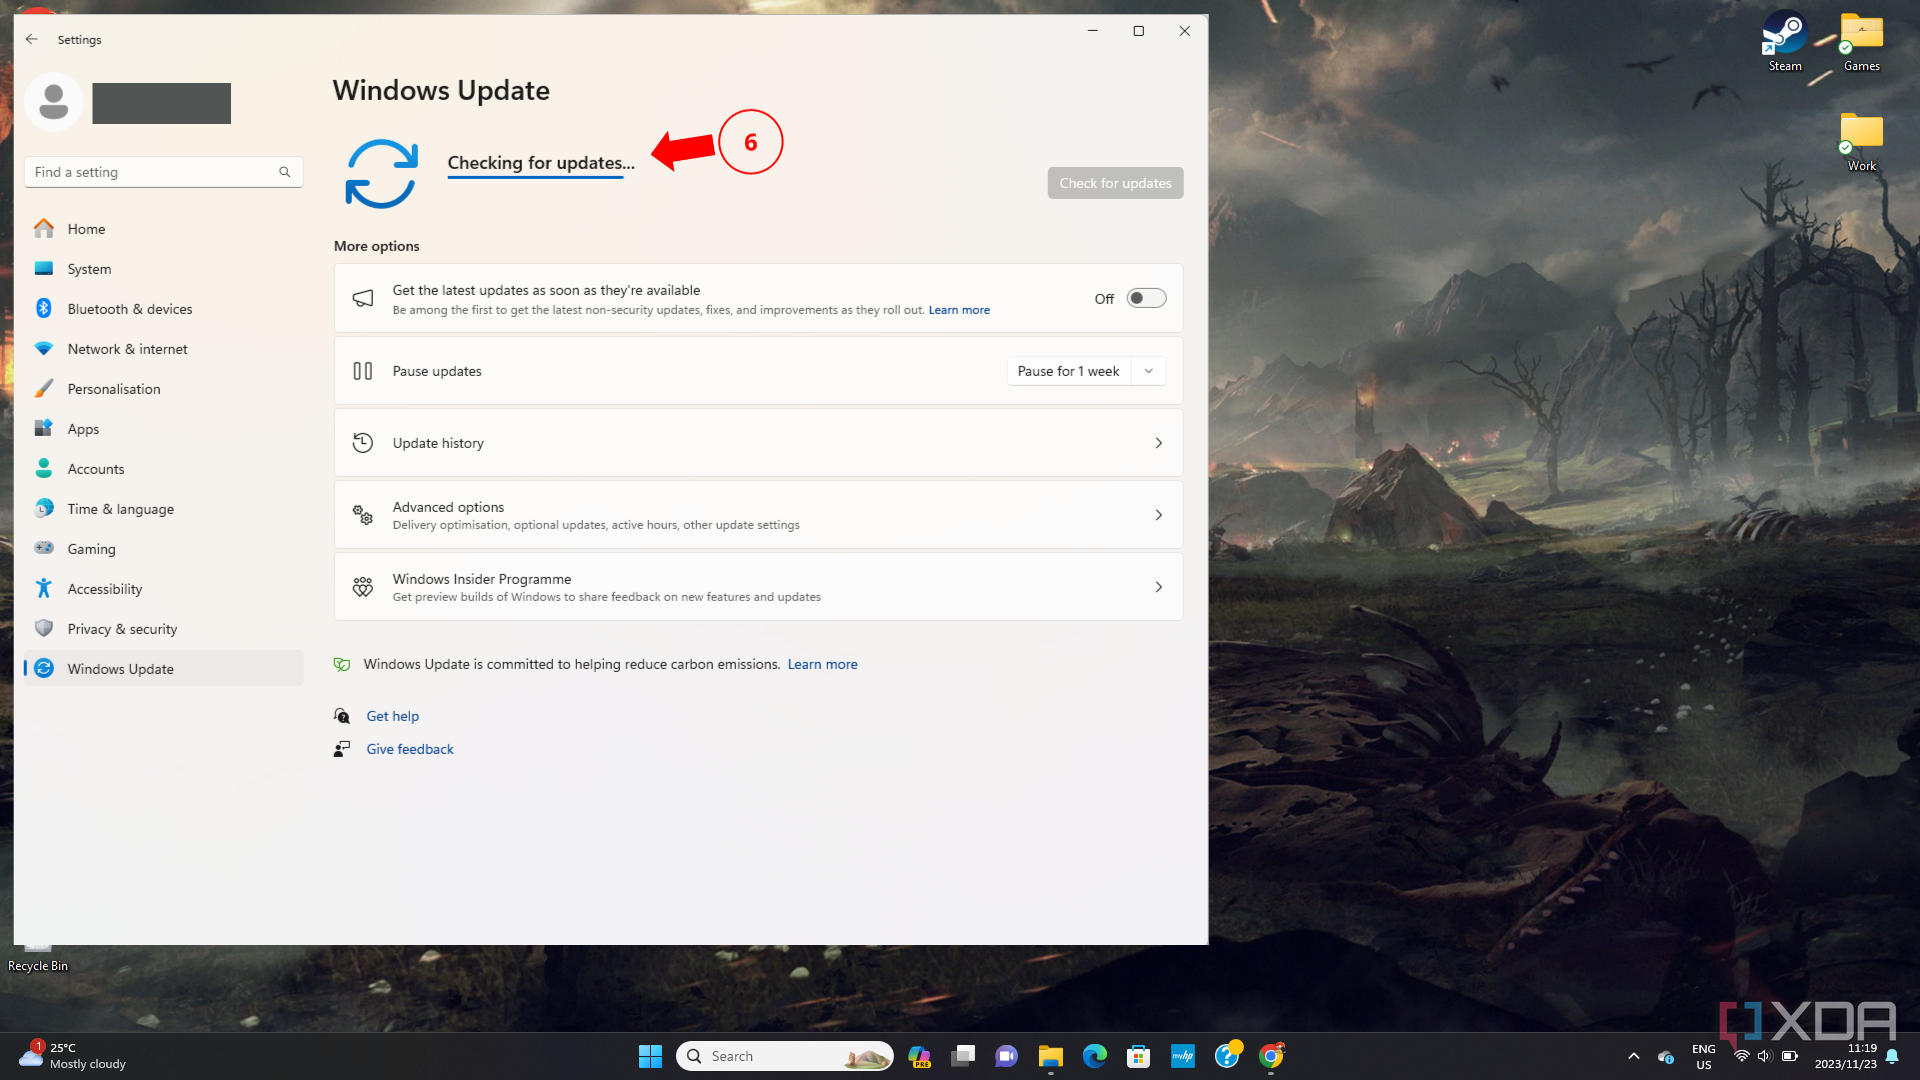
- If the pop-up says that you’ve got the newest driver, then click on on Seek for up to date drivers on Home windows replaceand look to see if any new Home windows updates might be inflicting the issue.


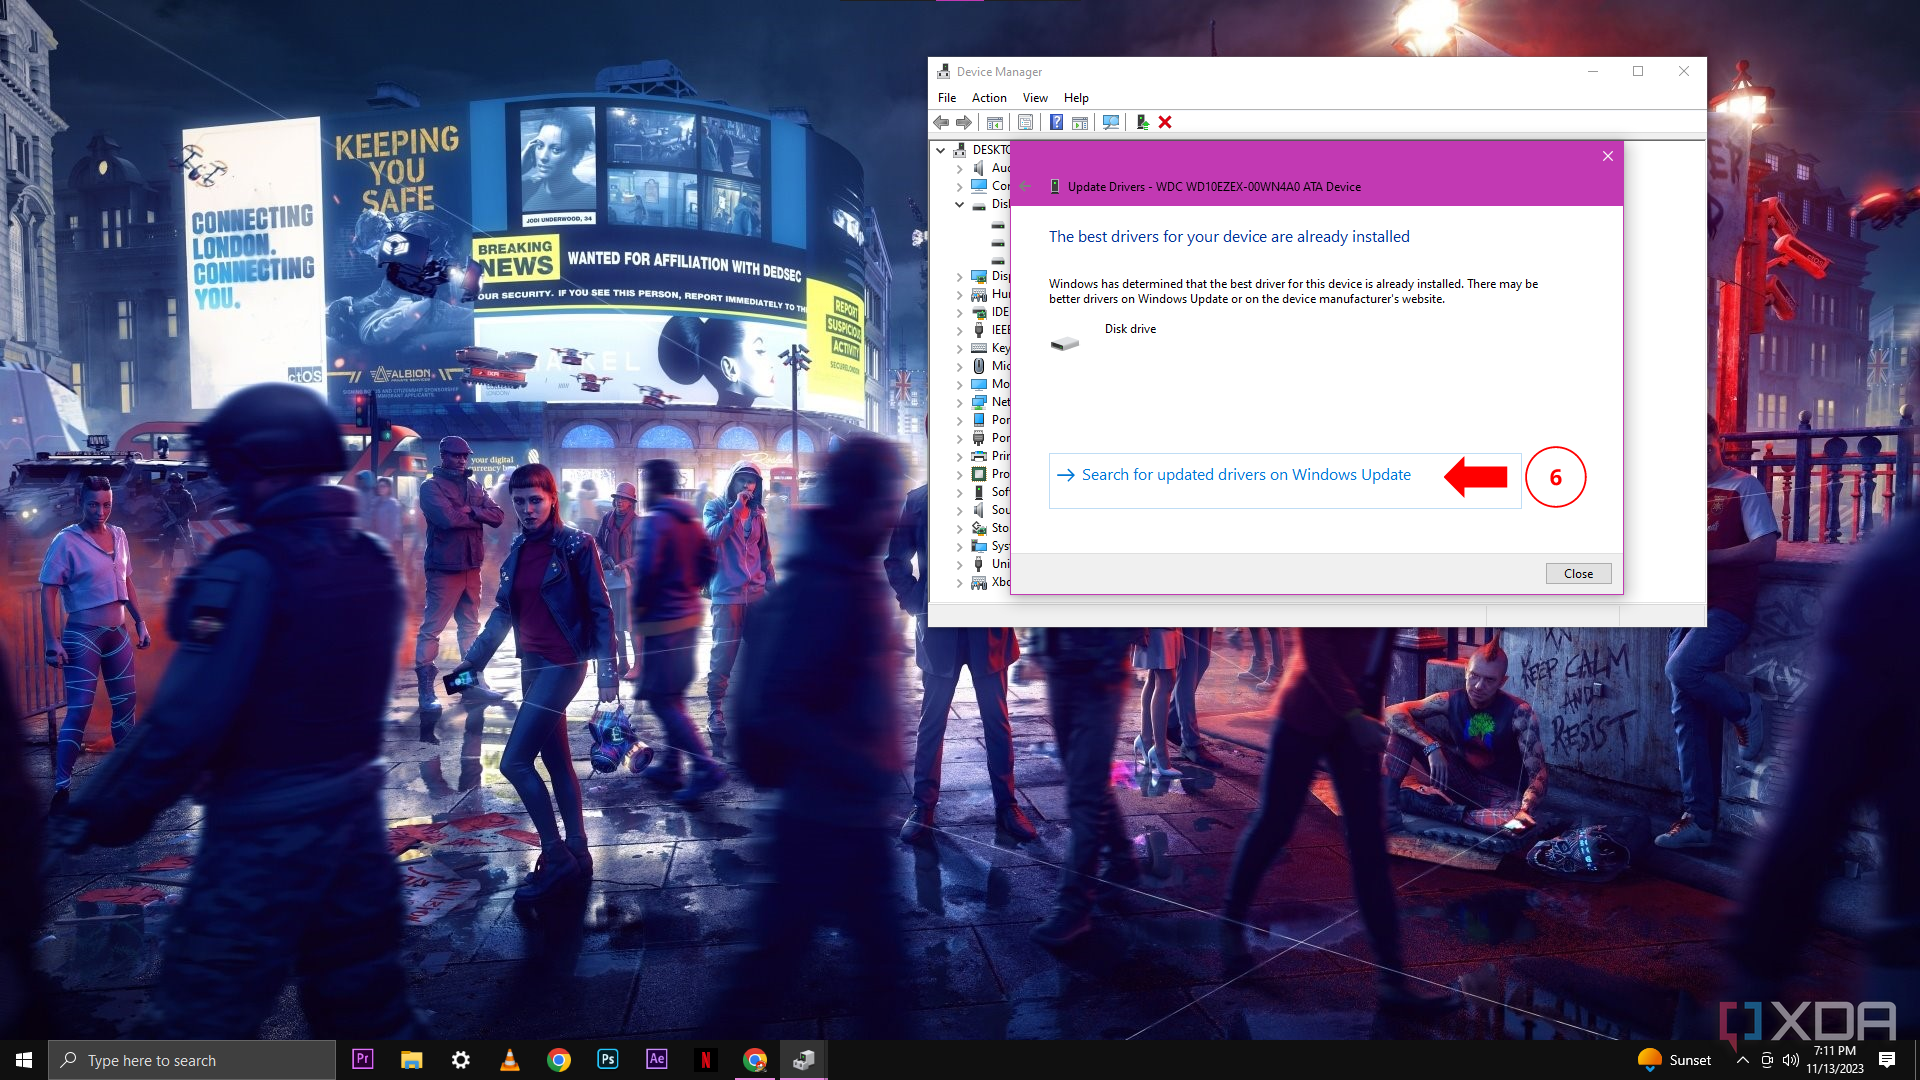
Replace your SSD driver
If the SSD you’re utilizing is outdated or from one other laptop, then its drivers may be outdated. An outdated SSD driver will cease your system from with the ability to acknowledge the machine, so it is strongly recommended to replace your SSD driver and restart your laptop.
- Seek for and open the System Supervisor.
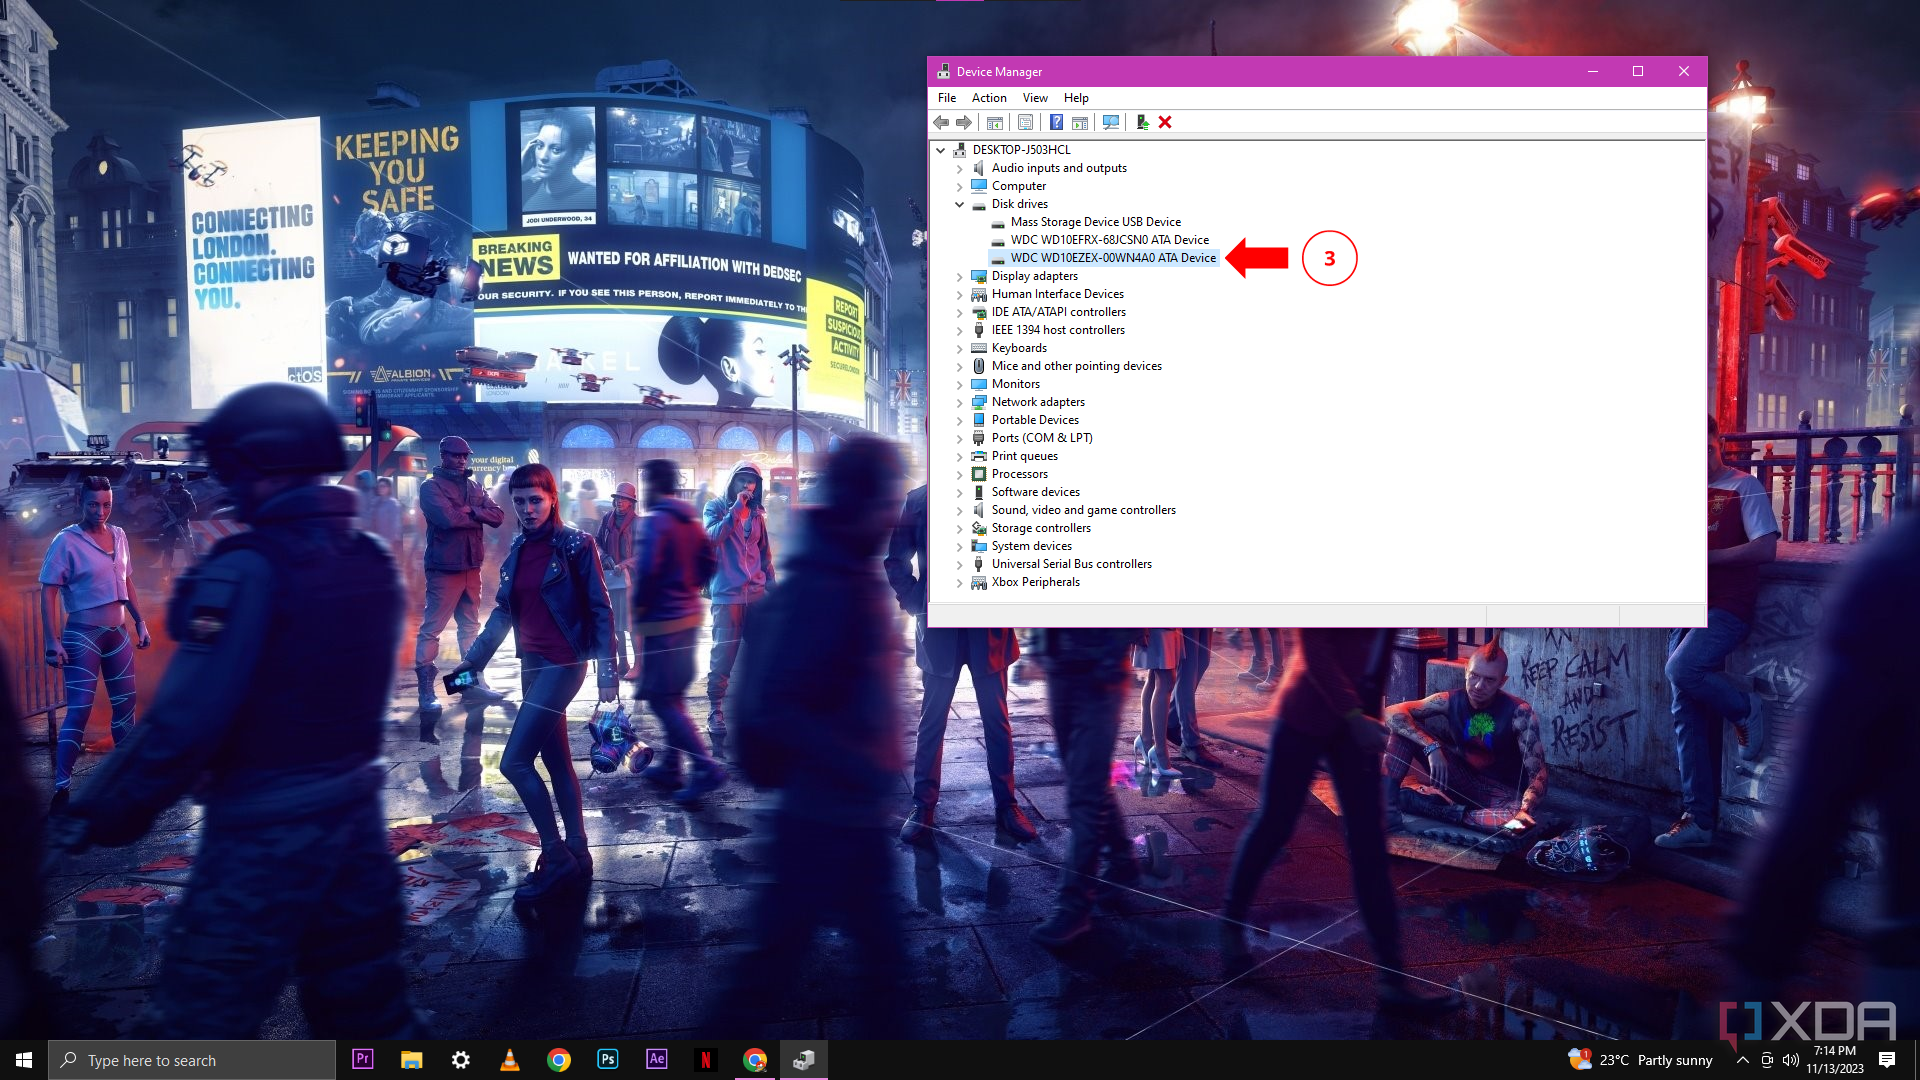
- Click on on the Disk drives tab.

- Proper-click on the SSD drive
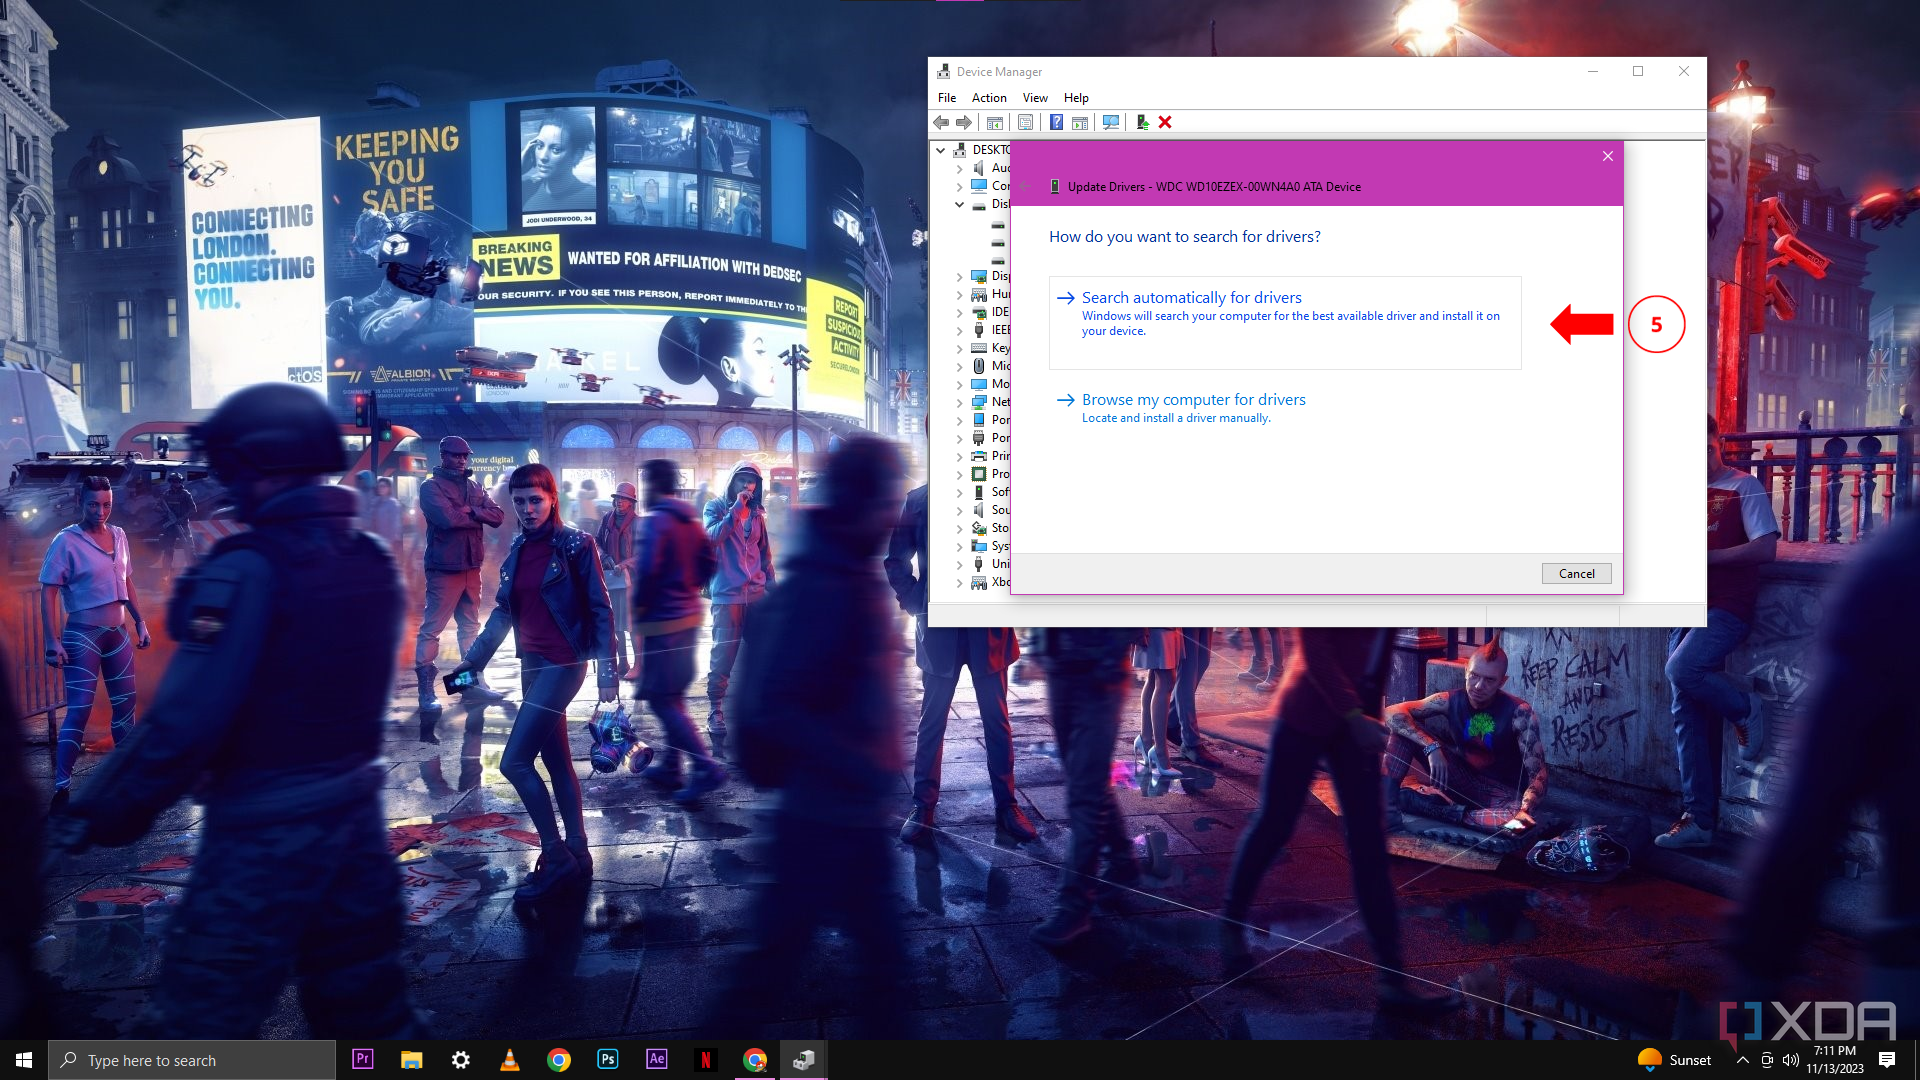
- Click on on Replace driver.

- Choose the Search routinely for drivers possibility.
- When you’ve got the newest driver put in and the SSD remains to be not detected, then you possibly can click on on Seek for up to date drivers on Home windows replace.


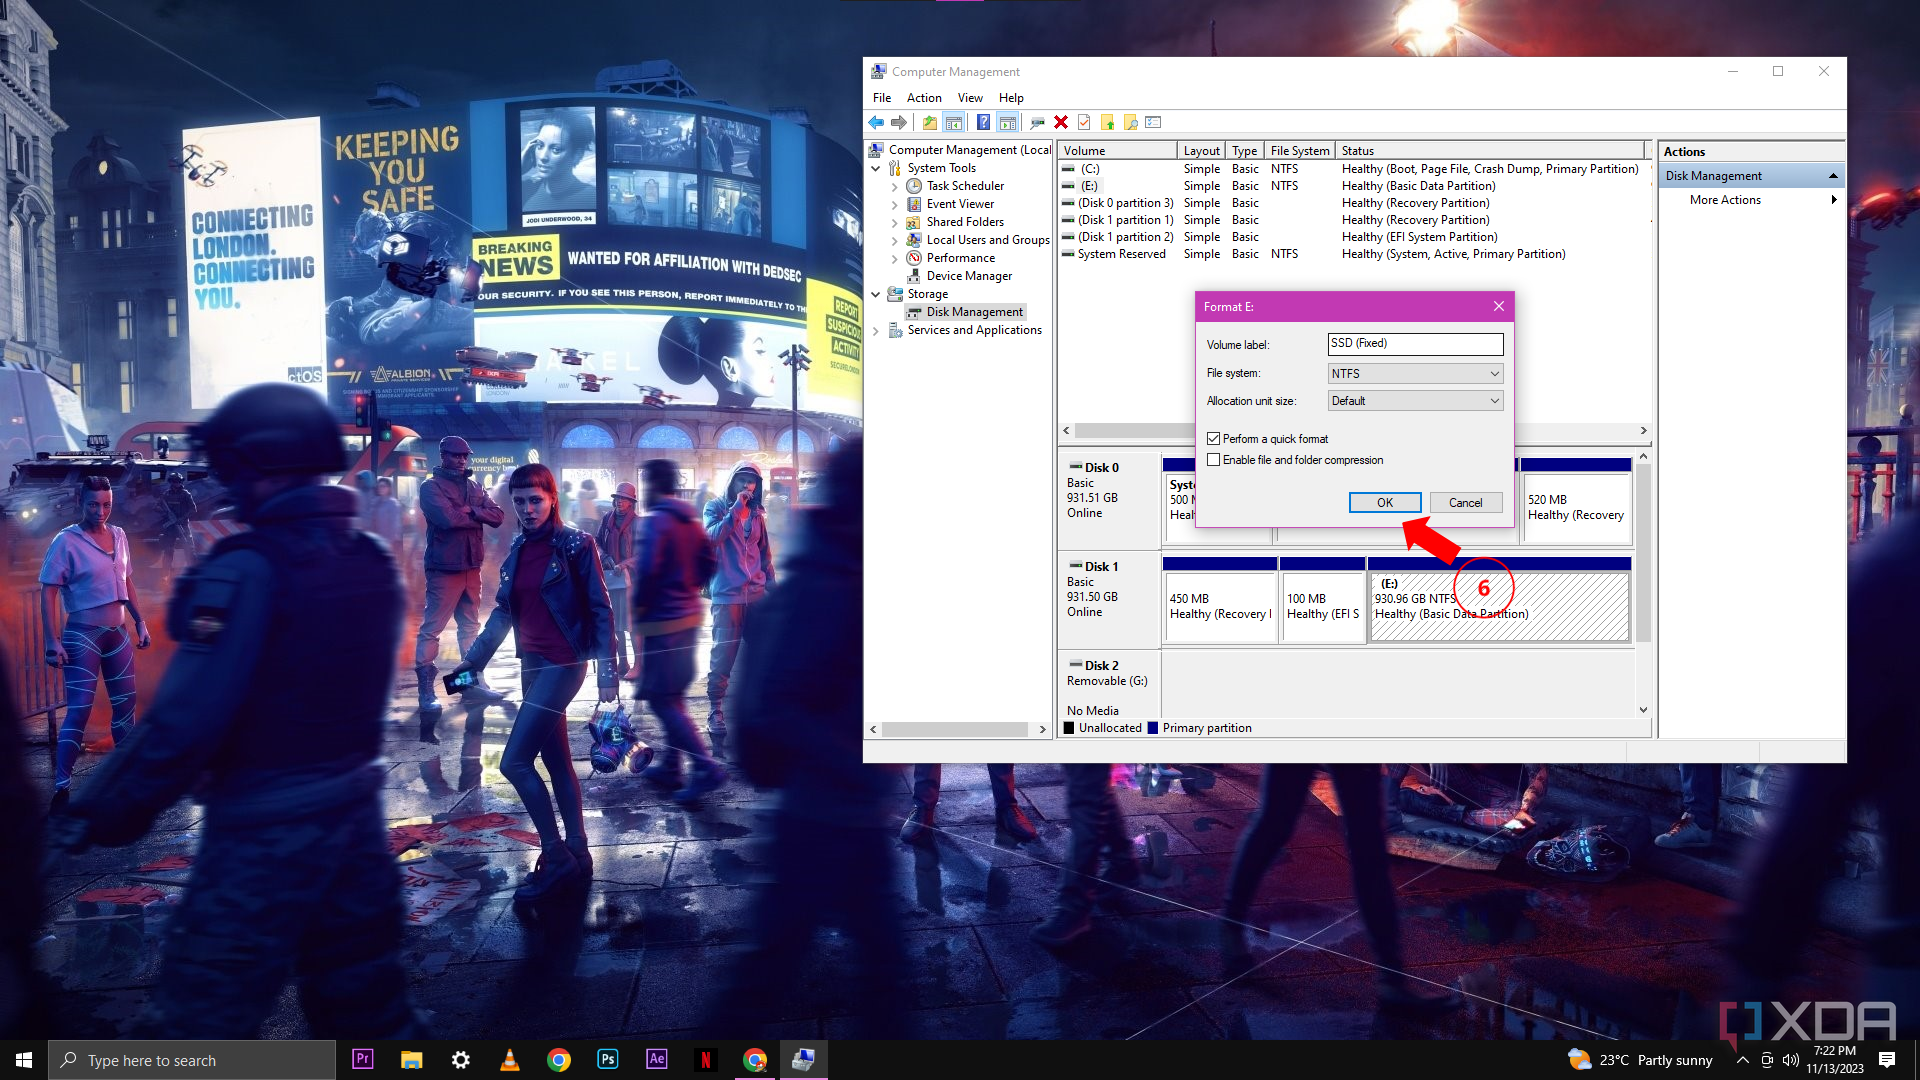
Format your SSD
We typically chorus from utilizing the “F-word” when speaking about storage gadgets, however if in case you have tried all the things else and do not have necessary information to lose on the drive, then there may be no different selection however to format your drive. Warning! This may delete all of your information from the drive.
- Open Disk Administration by utilizing Home windows + X.
- Proper-click on the Drive, and click on Format…
- Identify the SSD Drive label.
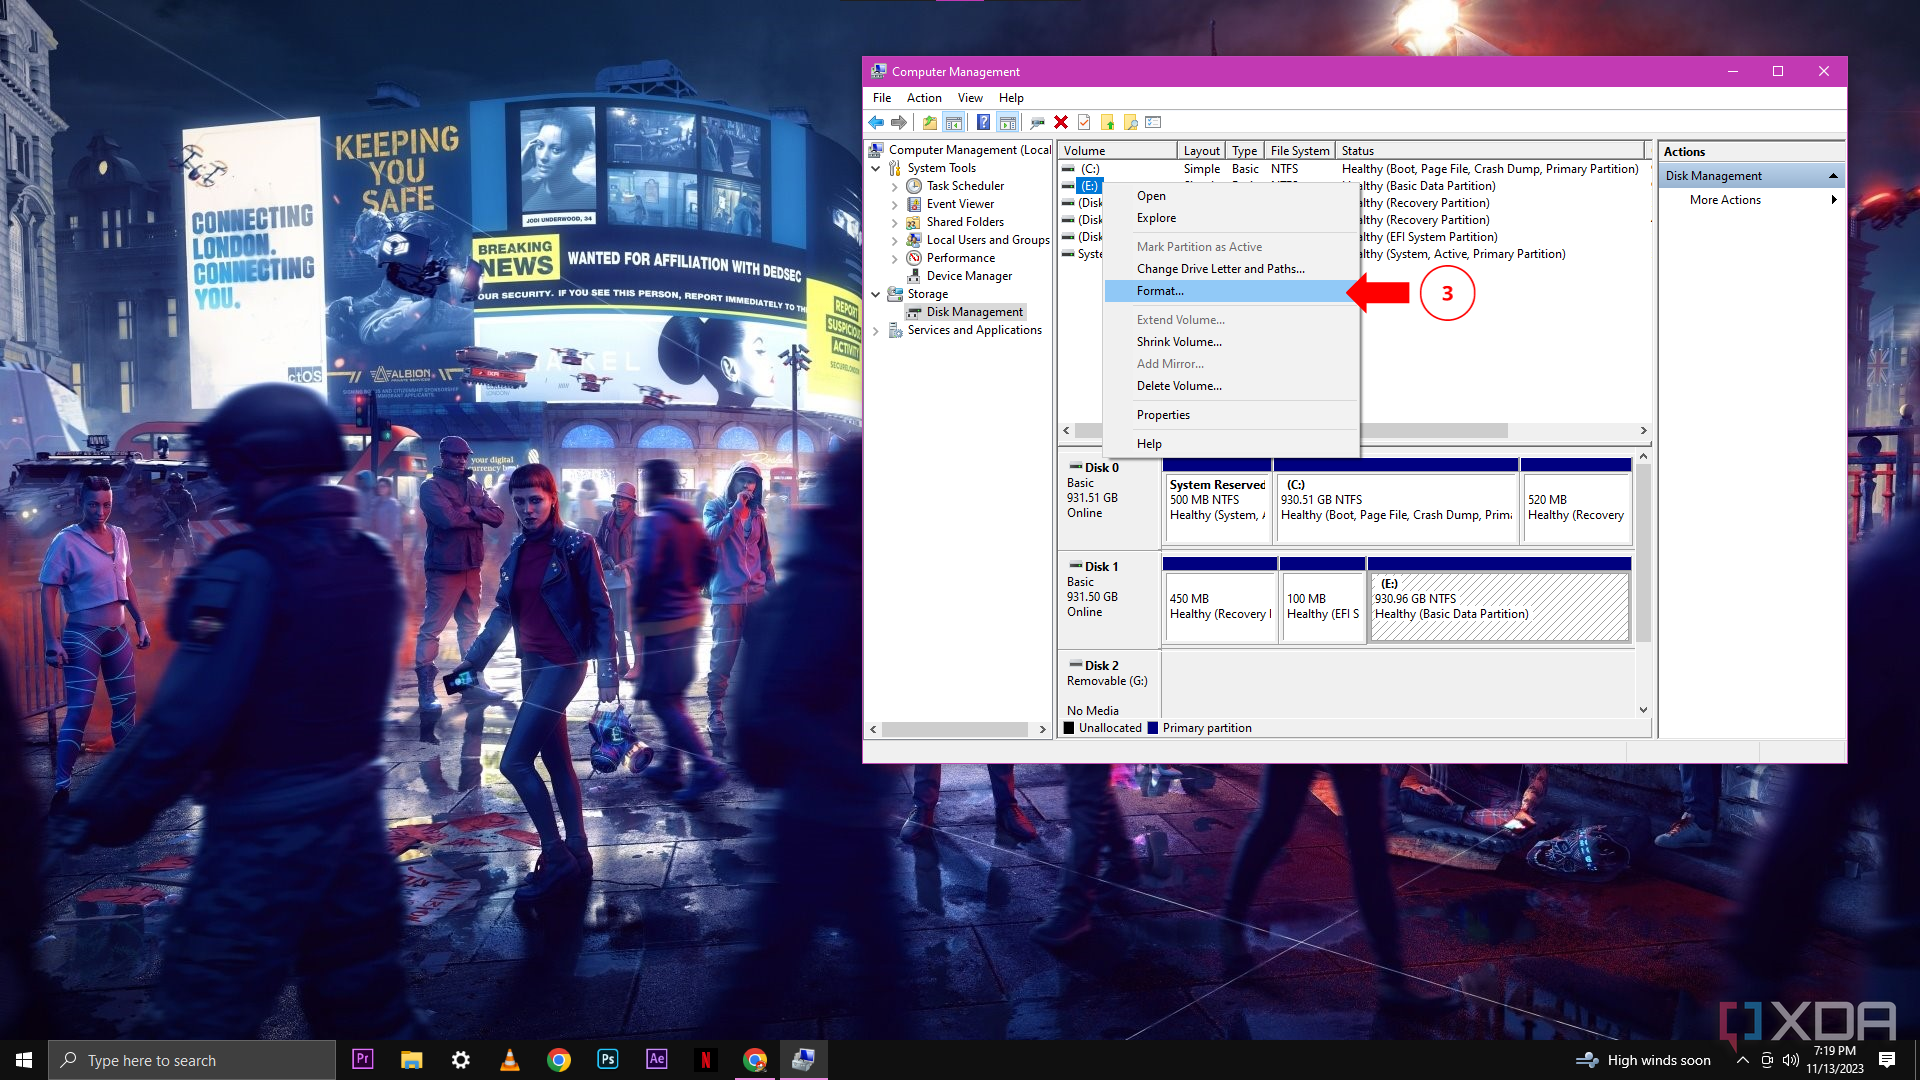
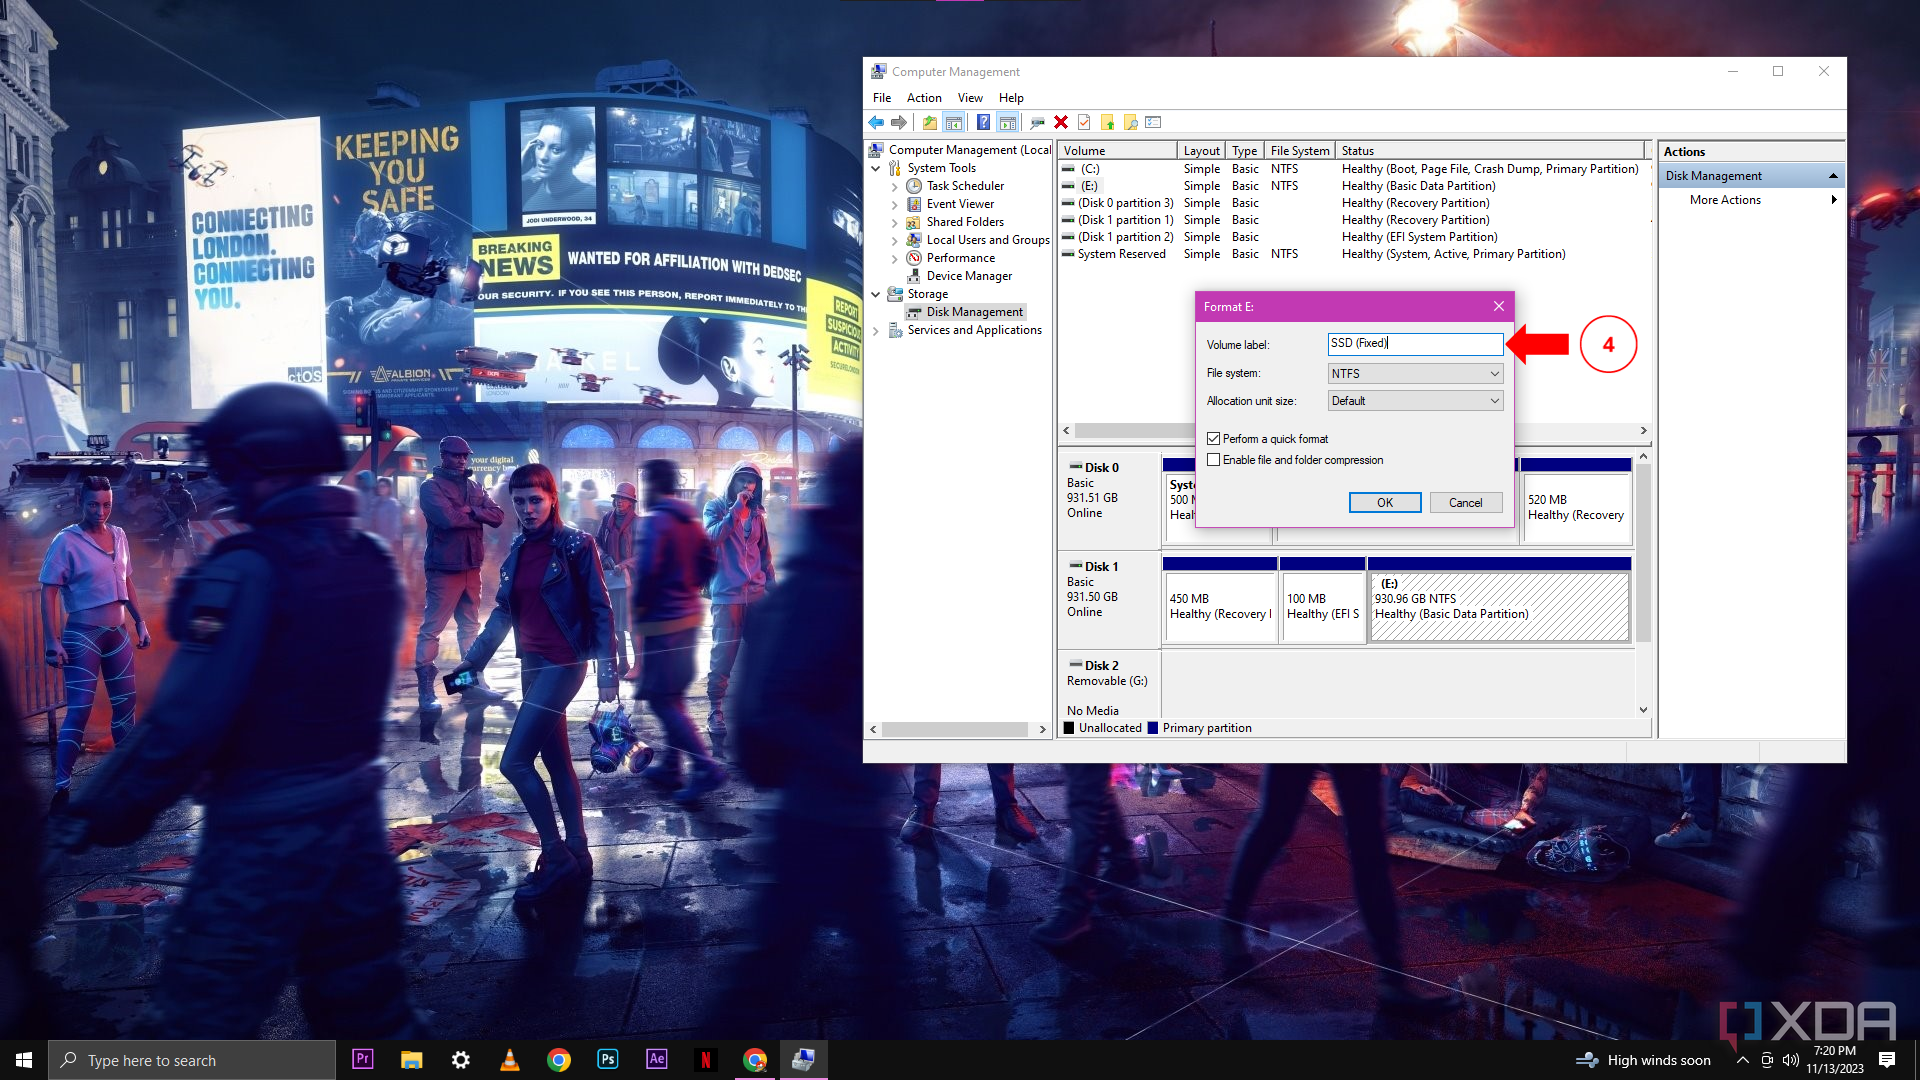
- Select the File system format. NTFS for Home windows inside drives or exFAT for exterior drives which can be suitable with Home windows and MAC.
- Click on on OK and your drive can be formatted and able to use.


Do you need to substitute your SSD?
The reply to this query relies on how outdated your SSD is. If the SSD you’re utilizing is outdated, and the steps above did not remedy the issue, then, sadly, you will want to purchase a brand new drive to switch the outdated SSD. If the drive is new or not too long ago bought, then it’s most probably defective, and, fortunately, you’ll most probably be capable to return the SSD and both get a brand new one or obtain a refund for it. Consult with your product’s guarantee as nicely to see in case you can ship it in for a substitute.
In fact, there are extra invaluable issues than cash. If the SSD you are attempting to repair has necessary paperwork or household photograph albums on it then it is strongly recommended to carry on to the drive so long as attainable and to not format it. Whereas many “laptop consultants” could say that your information can’t be saved, the reality is that with sufficient effort, the correct software program, and numerous dedication, it’s attainable to retrieve all of your info on the drive.