
The Steam Deck is a tremendous gadget for gaming, however you may discover you’re shortly working out of cupboard space. Right here’s methods to repair that concern.
Fashionable video video games are inclined to take up numerous house. All these shiny high-resolution textures have to be saved someplace, in any case. Transportable units just like the Steam Deck have restricted inside storage, so customers may discover they should add some further storage.
For the reason that Steam Deck runs on Linux, which means that just a few further steps are required if you wish to use exterior storage drives to again up your saves or load video games. Simply plugging the gadget in won’t work, as Linux and the customized Steam surroundings won’t acknowledge it with out extra configuration.
Article continues after advert
Worry not, for this information will provide help to connect an exterior drive to your Steam Deck and guarantee it auto-mounts at boot and hundreds into Gaming Mode.
Bear in mind, SteamOS 3.5 already helps auto-mounting drives into Gaming Mode. This information is for 3.4 and under.
format your exterior drive for Steam Deck
The very first thing you’ll discover, whether or not you’re utilizing the official Dock, or a third-party choice, is that inside the sport mode’s storage choices, there will likely be nothing displaying up. It’s because the drive you’ve simply introduced over must be formatted for Linux.
Article continues after advert
Sadly, this implies you’ll be sacrificing the drive to SteamOS, binding it to Linux till you reformat it once more. There are applications like Ext2Read to see these on Home windows, and on macOS, you’ll want to make use of Mac Fuse to see the information, however except you want further leg work, simply get a particular drive on your Steam Deck.
We’re unsure if this can work on the JSAUX M.2 Dock’s ‘inside drive’, but it surely ought to work with any USB exterior drive.
Article continues after advert
Set a Steam Deck password and enter desktop mode
Earlier than something although, for those who’ve by no means been via to desktop mode, or been prompted to set a password whereas in desktop mode, we must always do this.
To get to desktop mode, press the Steam button (use the mouse to press the digital Steam button within the nook or information button in your controller for those who’re related as much as a dock) after which Energy. It ought to provide the choice to go into desktop mode.
Article continues after advert
From right here, go into the taskbar and seek for Konsole. It will convey up a terminal, the place we will set the password for the primary time.
Clearly, for those who’ve already completed this, skip this step.
In case you haven’t received a keyboard related, we’d suggest you accomplish that, but when it’s not an choice, press Steam+X to convey up the digital keyboard.
Within the terminal, kind: passwd and also you’ll be prompted to vary the password.
Article continues after advert
Partition the Steam Deck exterior drive: KDE Partition Supervisor

After that’s completed, head again into the taskbar search and discover KDE Partition Supervisor. That is the place you’ll be formatting your drive into the suitable format.
When you’ve got a big drive and nonetheless need it to be accessed on different working programs, you’ll be capable to partition it out right here. For instance, for those who go along with a 1TB drive and nonetheless need half to be saved for Home windows, right-click the partition and select Resize/Transfer from the context menu. Then kind in how a lot house you need the Home windows aspect to be. Consider it like making two, or extra drives out of 1.
Article continues after advert
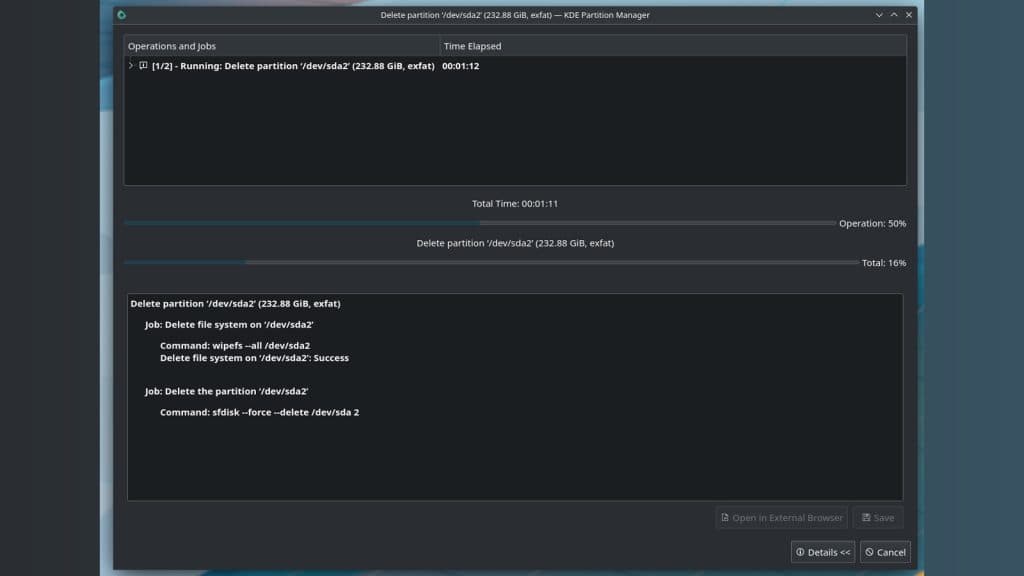
To make any modifications to the drive, we’ll want to ensure it’s unmounted first. When you’ve tapped your password into the partition supervisor, click on ‘Partition’ after highlighting your chosen drive. From this drop-down menu, hit Unmount. Now you can make modifications.
If the drive was already in use elsewhere and remains to be prepped for different programs, right-click and press delete on the partition. It will prep KDE to deal with it as a recent drive once we hit apply.
Article continues after advert
No modifications will take impact till you hit apply, so for those who determine to again out, simply hit undo or shut KDE earlier than continuing.
Set to ext4
In your clean partition, right-click and press ‘New’. It will convey up one other menu and we need to select ext4.
Ext4 is basically the wanted drive format. Like on Home windows, with FAT32, or macOS with its Prolonged Journal, that is the wanted strategy to get SteamOS to acknowledge it as a spot to put in video games as soon as we head again to Recreation Mode.
Article continues after advert
When you’ve got no intention of utilizing the sport mode to play the video games you put in right here, exFAT will deal with every thing. This might be for individuals who need to emulate or play video games of this drive between Home windows and SteamOS.
Nevertheless, not utilizing ext4 will imply that recreation mode received’t discover the drive and deal with it correctly.
Give the drive a reputation and press OK. When you’ve double-checked that every thing is right, press Apply within the high left-hand nook. It will start the method of formatting and organising the drive for SteamOS.
Subscribe to our e-newsletter for the newest updates on Esports, Gaming and extra.
Article continues after advert
Mount the drive and alter proprietor permissions
On the taskbar, you’ll see a small USB icon. Press this, and mount the drive with the button that pops up. We will now transfer on, barely.
A stumbling block that may occur when formatting a drive on Linux, is that the permissions change. As of proper now, we, the person, have entry to it in desktop mode, however Steam doesn’t. Even when we have been to set it as a spot to put in video games, there’d be no means for the OS to change it.
Article continues after advert
Going into the file supervisor and taking a look at its properties will reveal that the drive is ‘owned’ by root and never ‘deck’. To vary this, return into the terminal and carefully observe alongside, as altering the next incorrectly, might result in instability points.
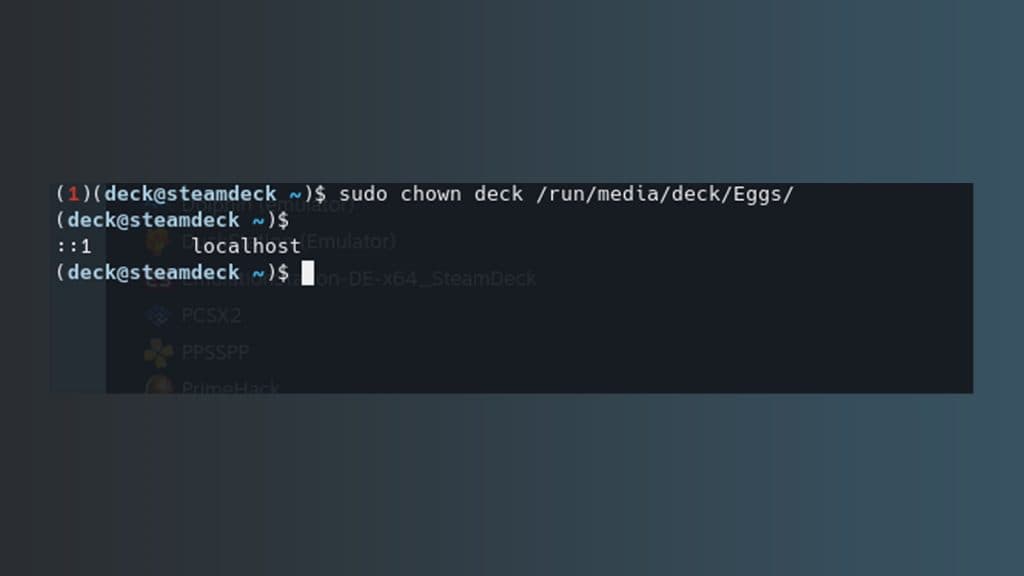
In terminal, kind:
sudo chown deck /run/media/deck/[drive name]
Sudo is successfully a skeleton key for directors on Linux, permitting us to bypass any layers of safety and make the wanted modifications. It’ll nonetheless ask for a password, so simply kind within the one you’ve received set.
Article continues after advert
When you hit enter, the permissions and possession could have modified to ‘deck’. Now we will inch a bit nearer to the end line.
create a Steam Library on an exterior drive on your Steam Deck

Now, open Steam, and on the high, press Steam, then Settings. Within the Downloads part, select Steam Library Folders, and if all went accurately whenever you hit the plus signal so as to add a brand new drive, your new drive needs to be on the record.
It will create a Steam Library folder, and we’ve simply received one small step left.
Article continues after advert
The primary concern with exterior drives and the Steam Deck is that they don’t mount mechanically. In our testing of the Steam Deck Dock, we discovered that even placing the system to sleep for too lengthy would trigger the drive to turn out to be disconnected, forcing a visit to desktop mode to get it again once more.
auto-mount exterior drive on Steam Deck and Linux
To keep away from having to mount the drive every time, we will edit the configuration file of the Steam Deck to acknowledge it upon loading, no matter the place we load into.
Article continues after advert
Again within the terminal, kind the next:
sudo nano /and so forth/fstab
It will convey up the terminal textual content editor and the wanted config file we have to alter. You may right-click and paste most of this, however we do suggest you employ a keyboard for this.
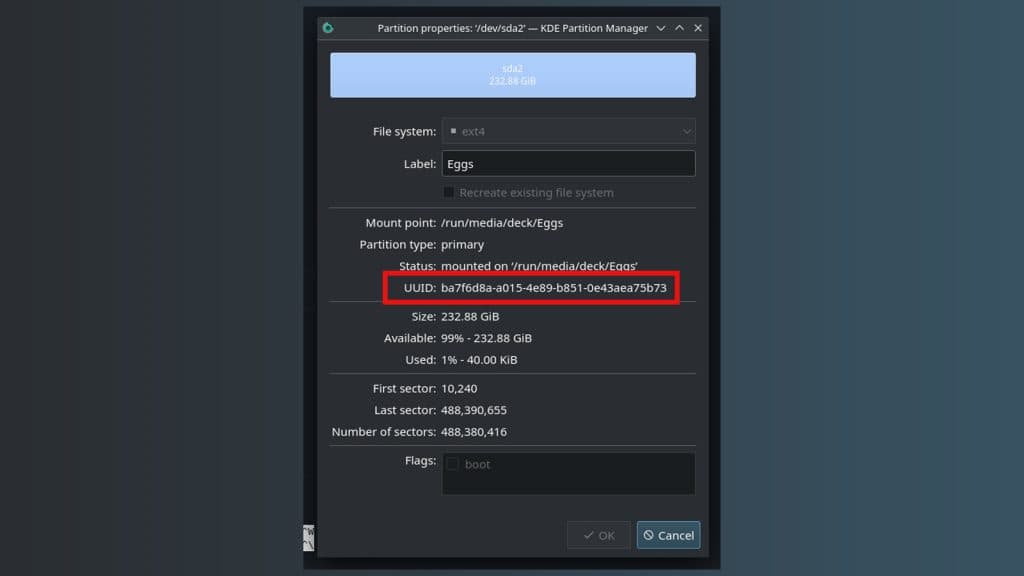
There’s going to be an inventory of drives and directions for them. We’ll additionally want the UUID quantity for the drive, so head again into KDE Partition Supervisor, select your new partition, right-click, and enter Properties. Copy-paste your UUID or be aware of it and return to the Terminal.
Article continues after advert
Faucet your down arrow to unravel the record, and kind the next:
UUID=[insert your UUID here] /run/media/deck/[drive name] ext4 defaults,nofail 0 0
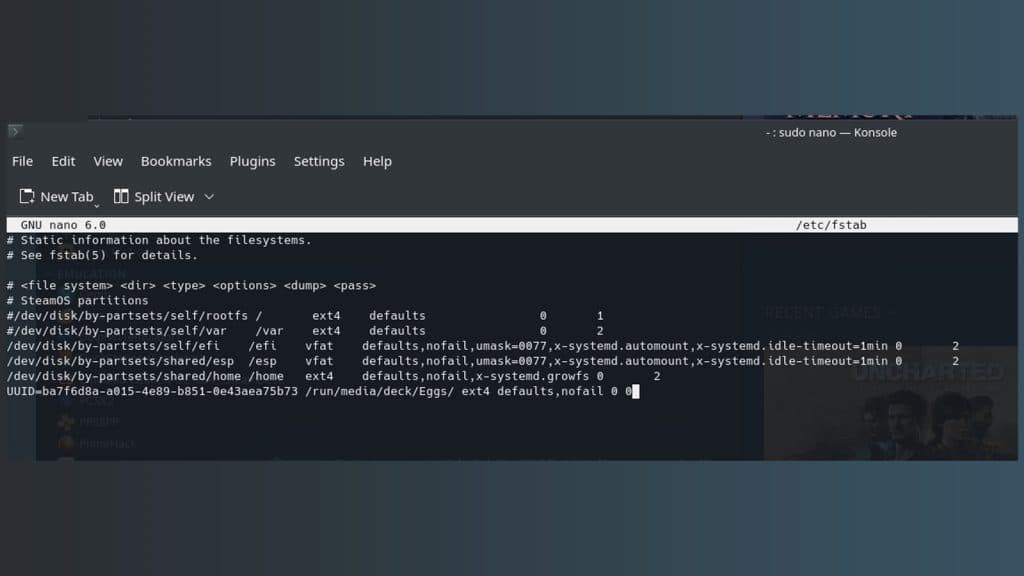
The ‘nofail’ half on the finish is totally required. In case you don’t embrace this in your modifications, the Steam Deck won’t boot with out the drive related. This added little bit of instruction will allow you to function the Steam Deck as regular when out and about.
Article continues after advert
It’s also vital you make sure that capitals, dashes, and something are right, or it is going to fail besides. We known as ours ‘eggs’, however Linux provides a capital letter. Double-check how Linux has formatted it in your file supervisor and kind it in precisely the identical means.
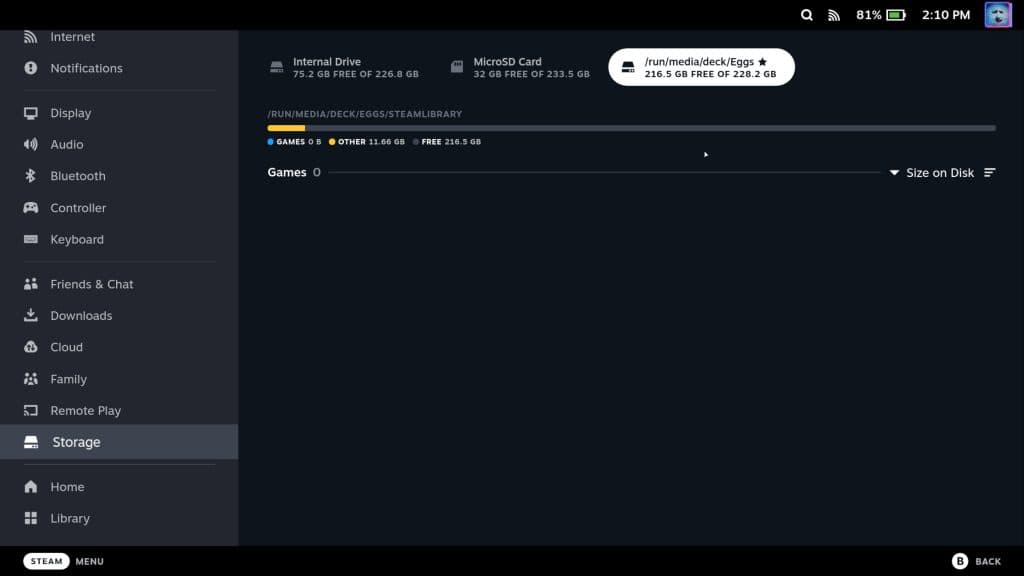
Reboot your console and in recreation mode, go to your settings and storage choices. The drive ought to now seem on the high alongside the interior and SD card. You may set it because the precedence drive, however there’s no means to decide on the place to put in it except you go to desktop mode and again into recreation mode.
Article continues after advert
Don’t take away the drive whereas on
Eradicating the drive, and plugging it again in, or eradicating the Steam Deck from its Dock, will imply you’ll must plug it again in earlier than you reboot. For no matter motive, whereas auto-mounting the drive is straightforward, really attending to auto-mount whereas the system remains to be on is a trouble. Hopefully, this will likely be fastened in a future replace.
Make sure you try our guides on methods to play Epic, GoG, Amazon, and Xbox Recreation Move video games on the Steam Deck.
Article continues after advert