
Over time, it may be simple to refill the exhausting drive in your PC with out realizing it. The very best laptops all include loads of storage now, however even then, sooner or later, you may need to improve the SSD in your machine, or possibly your drive is simply previous and also you need to substitute it earlier than it goes dangerous. However how do you do this with out shedding your recordsdata? Fortunately, that is doable, as you’ll be able to transfer your Home windows set up and information to a different drive if you’ll want to. This works for Home windows 11 in addition to older variations of Home windows, too.
If you wish to transfer your individual Home windows set up to a special drive, you are able to do it by way of Home windows itself, or use a third-party program. Some packages, like EaseUS Partition Grasp, make it simple to completely clone your drive with none sophisticated restore course of, however these instruments are additionally paid. The built-in Home windows resolution is a bit more convoluted, however it’s free, so we’ll give attention to that one.

Home windows 11: Launch date, value, and every thing that is new
Home windows 11 is official, and this is what we all know in regards to the launch date, new options on the way in which, and every thing else about it.
What you may want
With the intention to transfer your Home windows set up to a special drive, you may want a couple of issues:
- The functioning Home windows PC you need to backup
- The drive you need to transfer Home windows to (it must be greater than the supply drive).
- An extra exterior drive to create the backup picture,
- A flash drive with at the very least 16GB to create the restoration picture
The entire drives talked about above ought to be empty earlier than beginning the method, as their content material will get deleted for this process. There’s an opportunity you may have already got every thing you want, nevertheless it’s nonetheless numerous gear. If you do not have every thing, you’ll be able to try a few of the choices beneath.
It is crucial that the goal drive for Home windows is similar dimension or greater than the supply drive in your PC. The restore course of is not going to work in any other case.
-
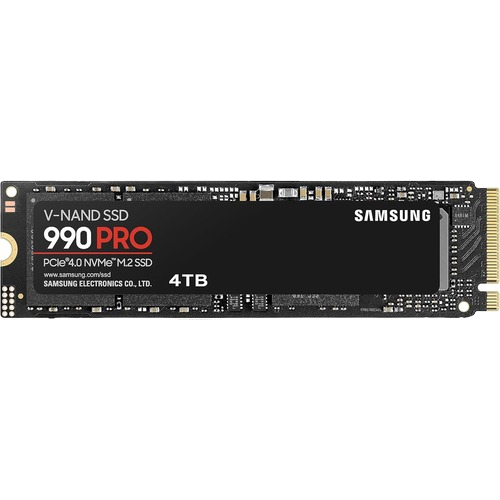
Samsung 990 Professional
$110 $140 Save $30
One of many quickest SSDs available on the market, the Samsung 990 Professional is the best resolution should you’re in search of a brand new SSD to your PC.
-

WD 2TB My Passport SSD
An exterior SSD just like the WD My Passport will likely be wanted to create a system picture. You should use an HDD, however this resolution is way sooner.
-

SanDisk Extremely Twin Drive Luxe
The SanDisk Extremely Twin Drive Luxe is a future-ready USB flash drive with each USB Sort-C and Sort-A connectors, making this an awesome alternative for a restoration drive.


Step 1: Making a system picture
One of the simplest ways to maneuver your Home windows system to a different drive with out spending cash is utilizing the built-in Backup & Restore (Home windows 7) characteristic. Sure, that’s the appropriate title Microsoft makes use of for this characteristic, nevertheless it’s out there on Home windows 11. The very first thing you’ll want to do is create the system picture to your present disk.
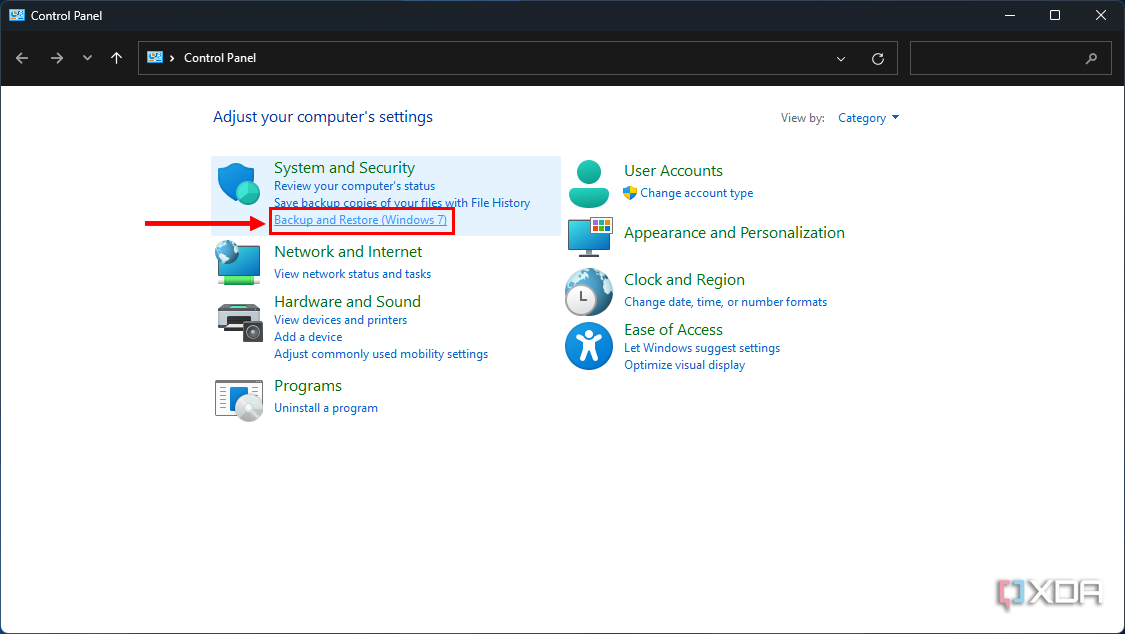
- Open the Begin menu and seek for Management Panel.
- Select Backup & Restore (Home windows 7).
- Plug in your exterior drive that may comprise the Home windows backup (to not be confused with the restoration drive).
- Click on Create system picture on the sidebar.
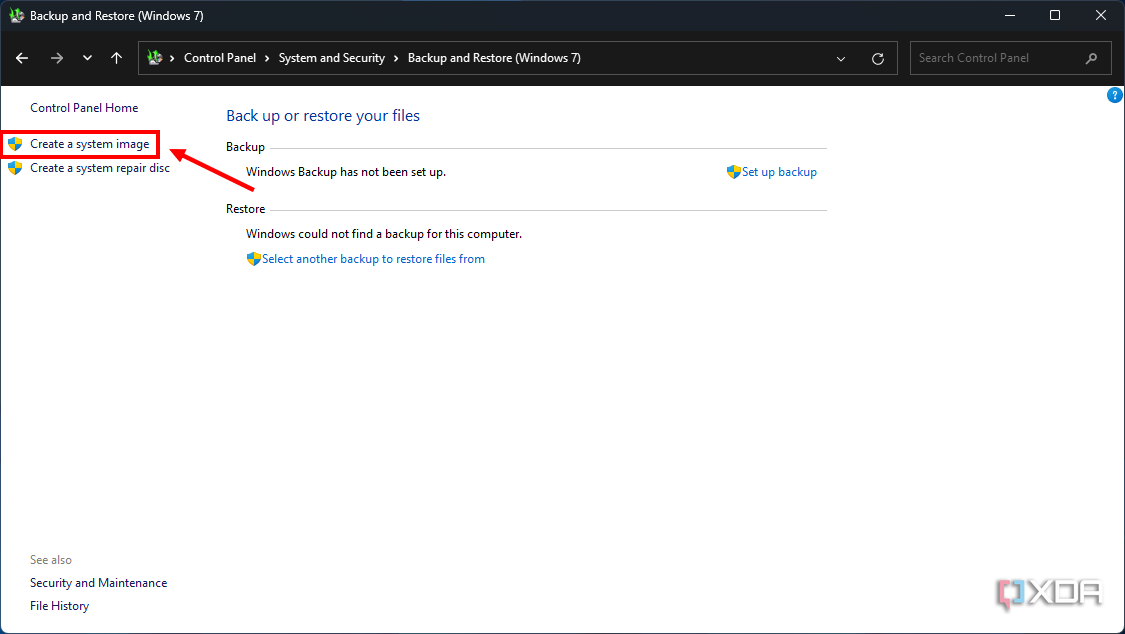
- Select the proper drive to create the backup in. We advocate solely having one exterior drive plugged in at this level to attenuate confusion.
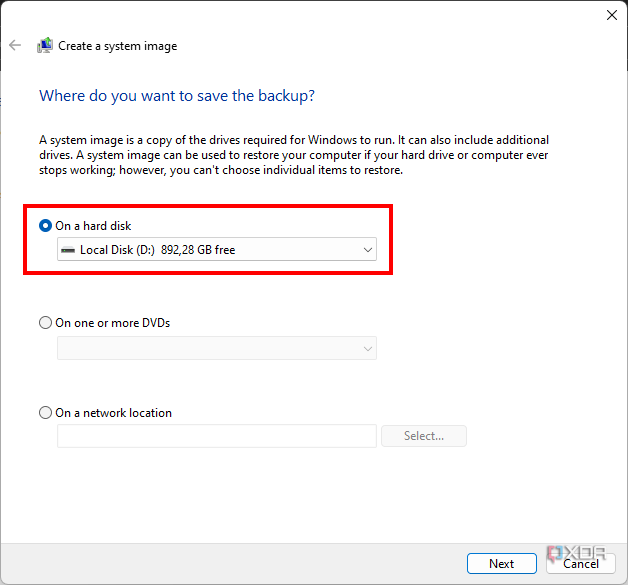


- Click on Subsequent.
- Choose the drives you need to again up. By default, all of the drives required for Home windows to run will likely be backed up, however if you need extra drives, you may have to pick them manually. This will likely have an effect on your means to revive the backup, although.
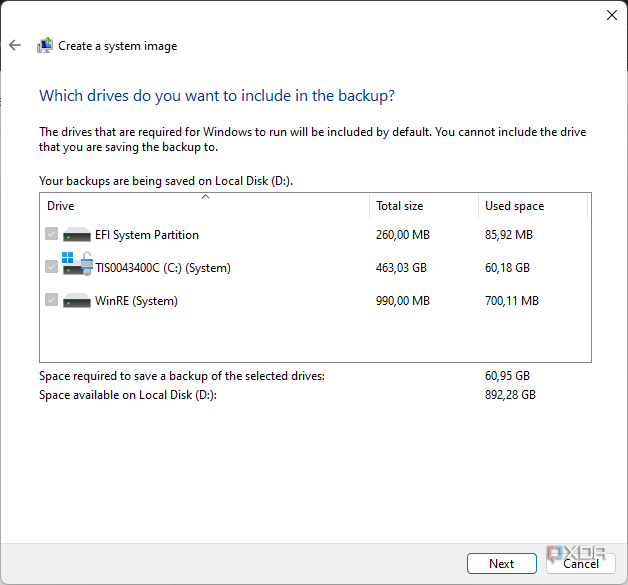
- Click on Subsequent.
- You will be warned about information in your backup drive being deleted. Click on OK after which Begin backup.
- Anticipate the method to complete.

Step 2: Making a restoration drive
Upon getting the system picture, you may additionally must create a restoration drive utilizing the smaller USB flash drive. This drive gives a booting atmosphere so you’ll be able to restore the system picture if you insert your new drive that does not have an working system but. To do that, comply with these steps:
- Plug in your USB flash drive. We advocate unplugging the exterior drive containing the system picture to keep away from confusion.
- Open the Begin menu and seek for restoration drive. Select the primary outcome.
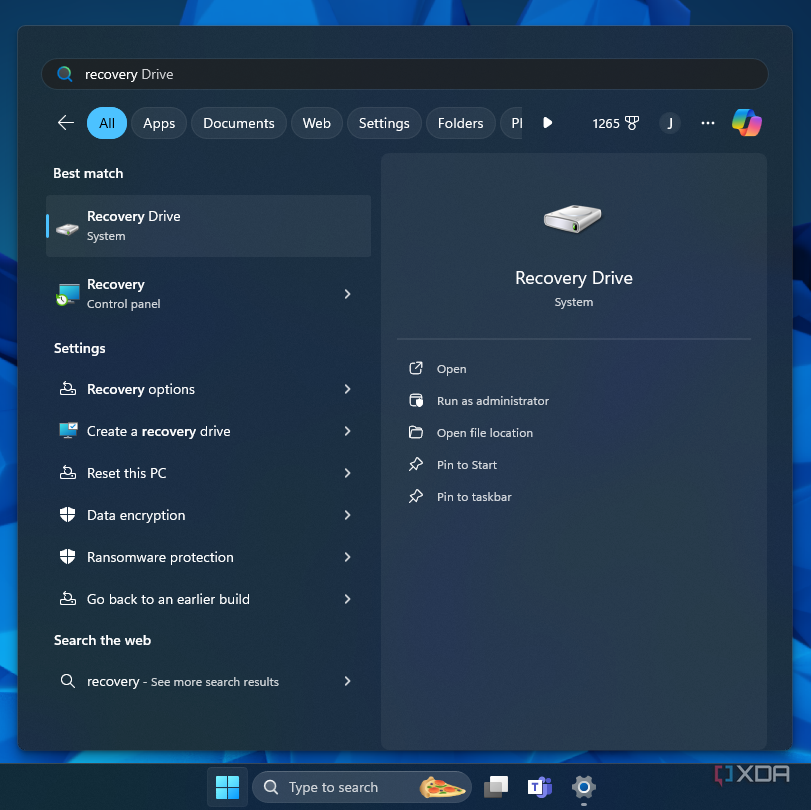
- Within the window that opens, click on Subsequent.
- Select which drive you need to use as a restoration drive (once more, we advocate unplugging different drives to keep away from confusion).

- Affirm you are okay with deleting the content material contained in the flash drive and the method will start.
- Anticipate the method to complete, then shut the dialog.


Step 3: Change the drives inside your PC
At this level, you may be prepared to maneuver your Home windows set up to the brand new drive. As such, you may now have to put in the brand new drive inside your PC, if you have not already. You will must open up your PC or laptop computer, take away the prevailing SSD or drive, and set up the brand new one.
This course of will range considerably relying on the type of PC you will have, however we have now a information on the way to set up an SSD on a desktop PC that ought to assist. The final steps are:
- Flip off your PC totally.
- Take away the facet panel in your desktop (or the underside cowl on a laptop computer).
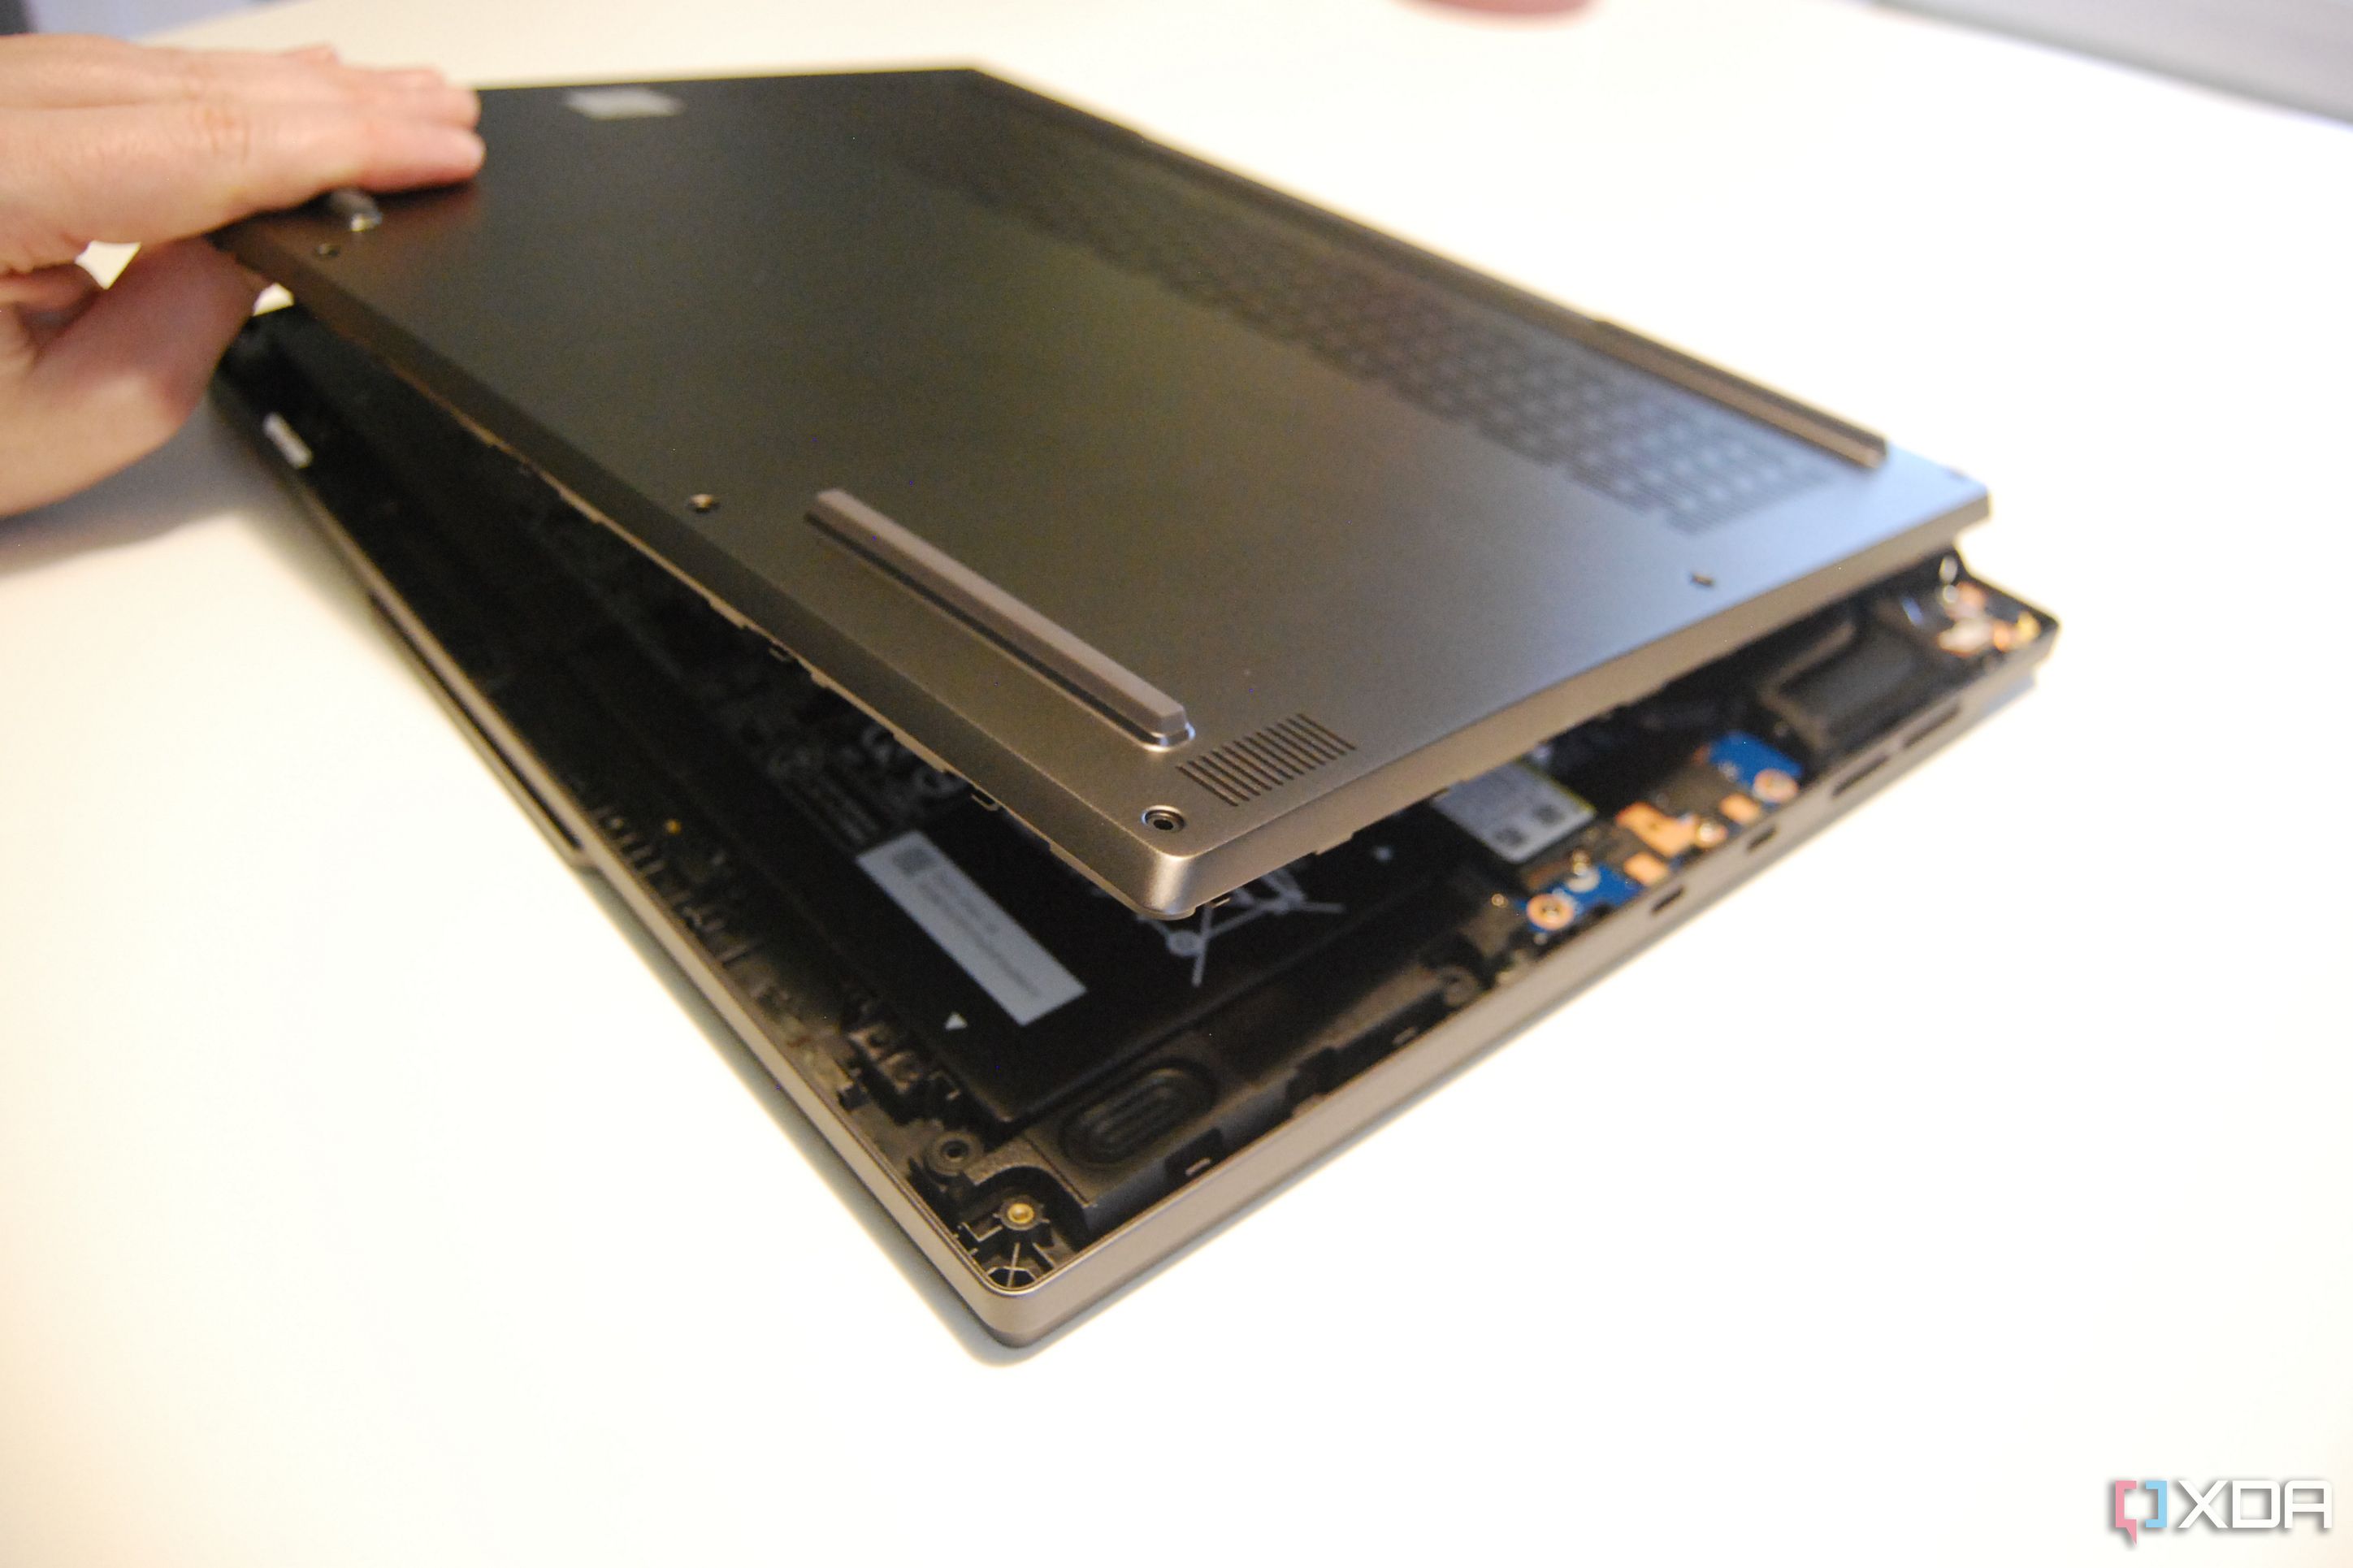
- Find the M.2 SSD slot.
- Take away the screw holding the SSD in place and pull the SSD away from the slot.
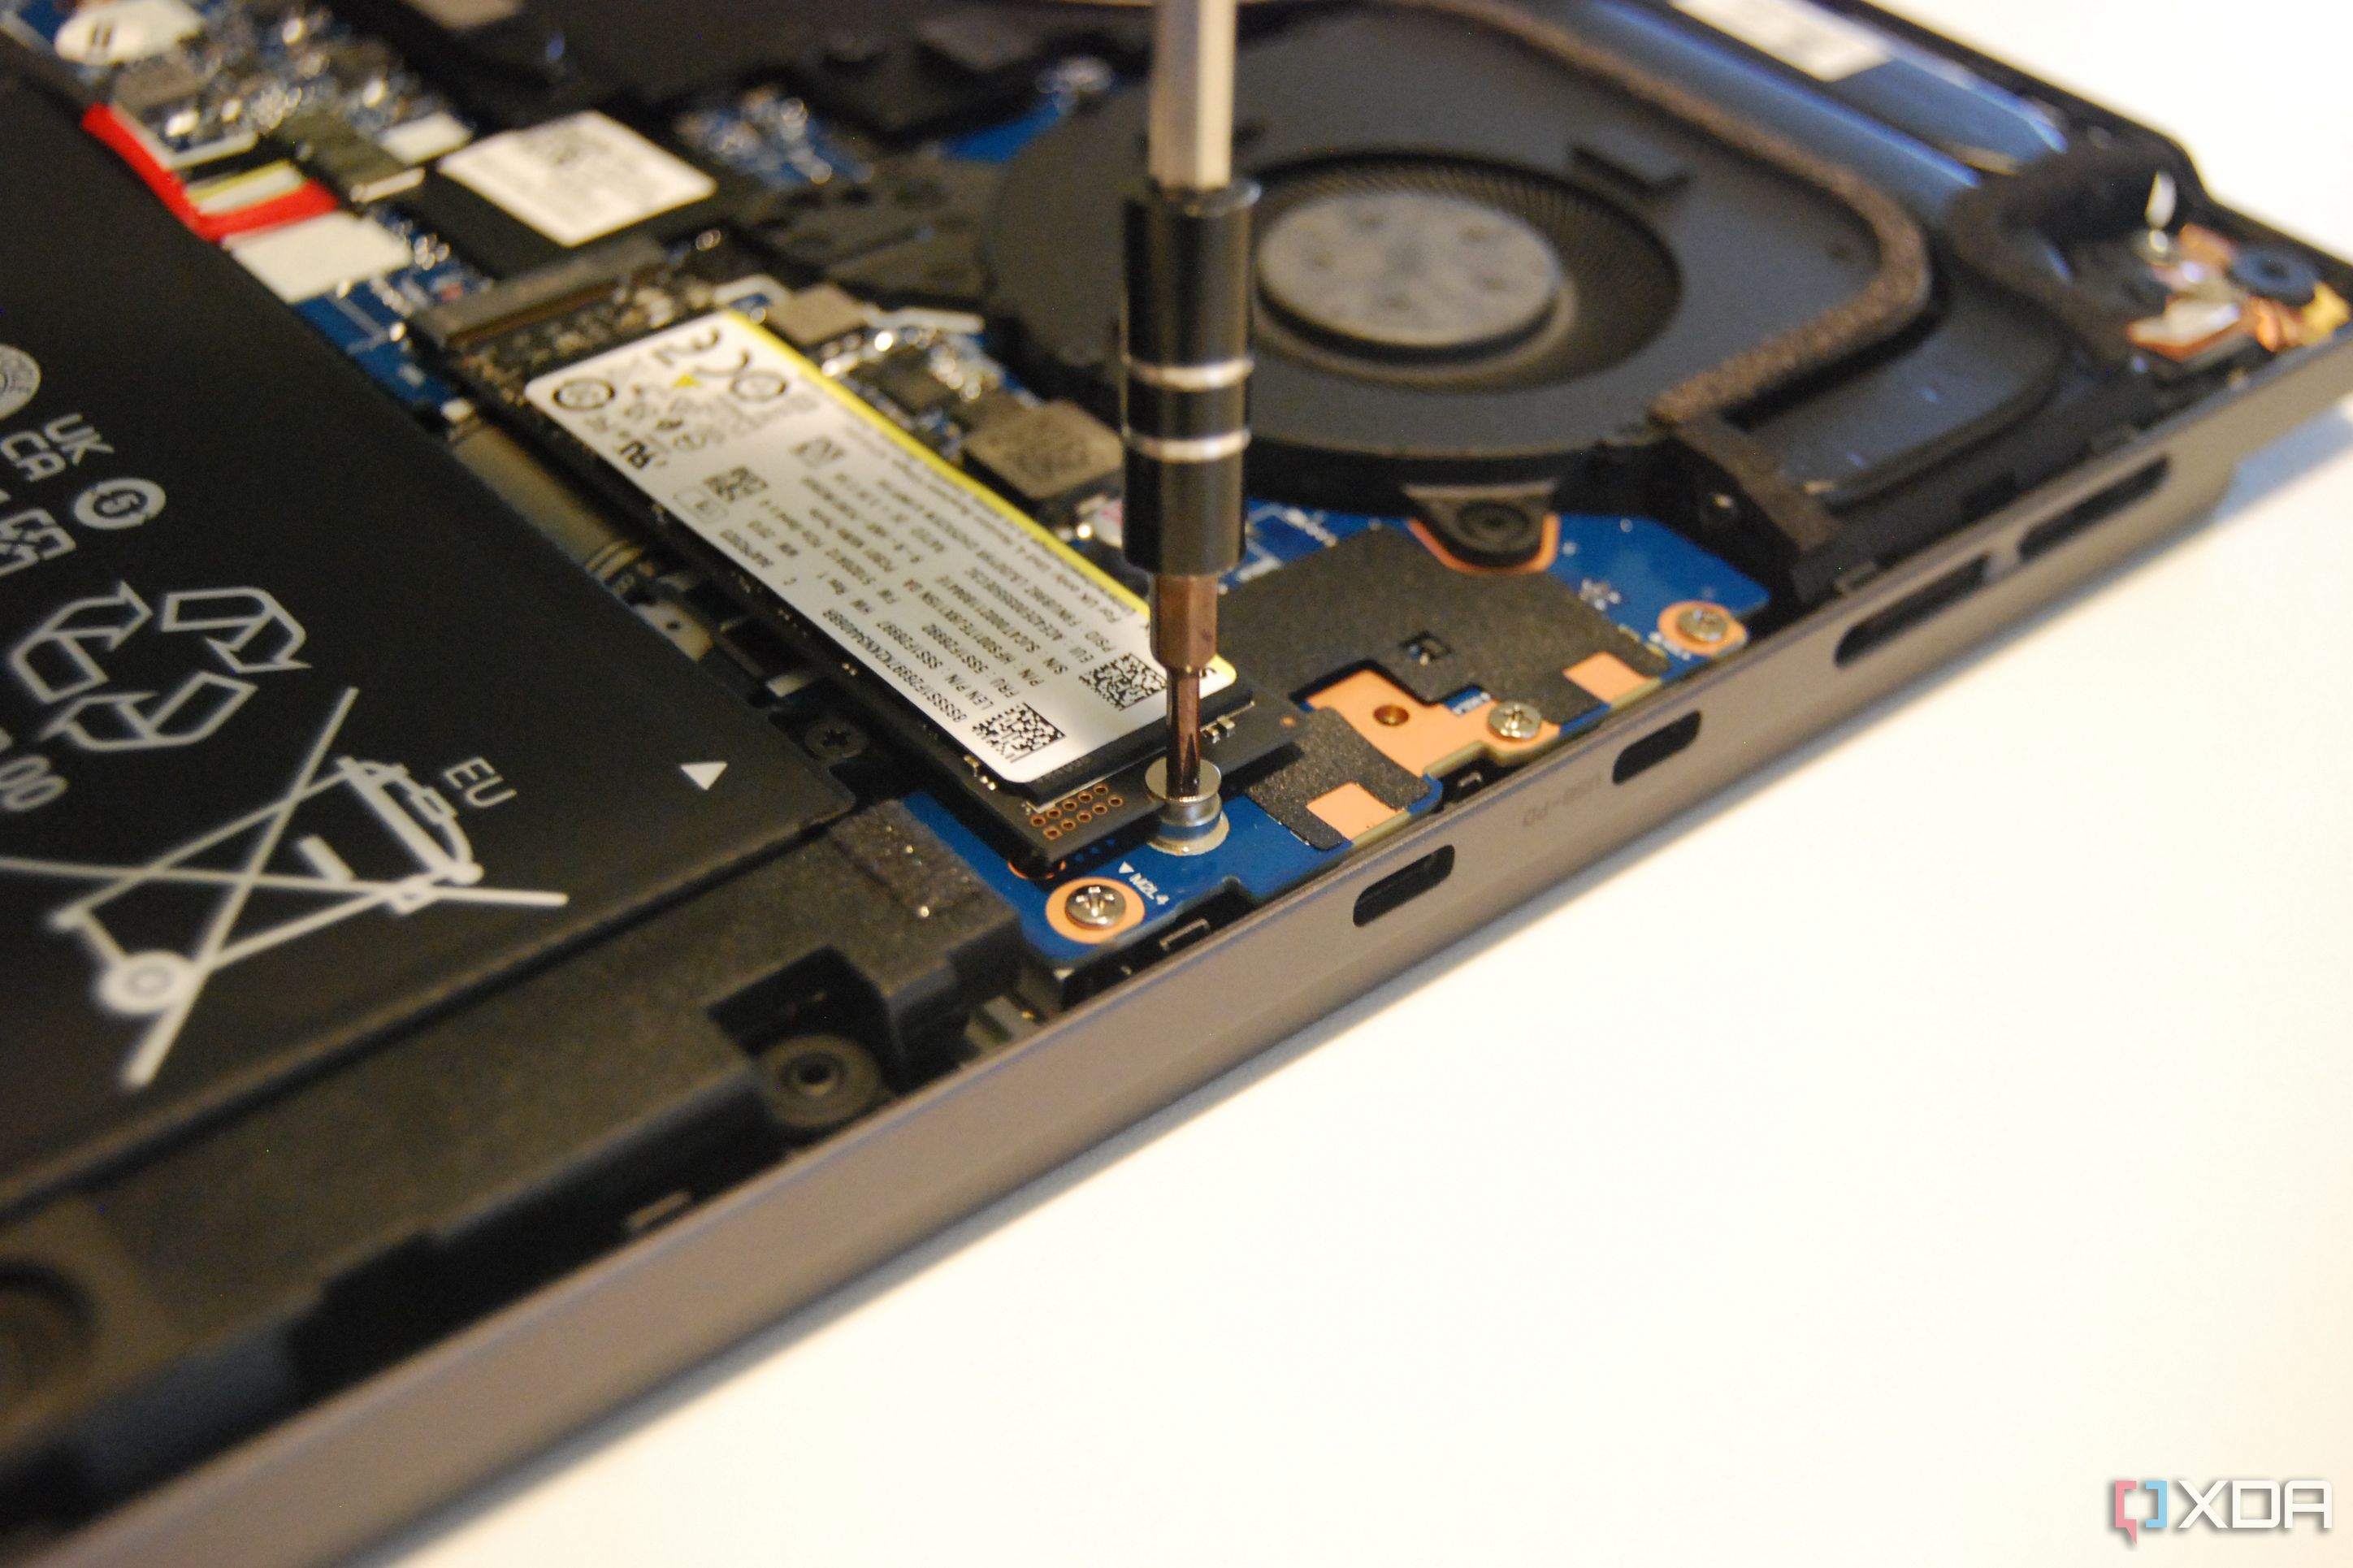
- Insert the brand new SSD in the identical place, then safe it with the screw you eliminated in step 4.
- Shut the laptop computer or PC.


In case your machine has a number of SSD slots, you might be able to set up the brand new SSD with out eradicating your present one, too. On this case, we’re assuming you are changing your drive altogether.
Step 4: Restore the system picture on the brand new SSD
Upon getting the brand new SSD put in, all you’ll want to do now could be restore the system picture utilizing each the restoration drive and the system picture drive. For this course of, comply with these steps:
- Plug in each the restoration drive and the system picture drive whereas your laptop is off.
- Flip the pc on and press F2, Deleteor different key to enter the boot menu or BIOS in your PC.
Try our information on the way to enter the BIOS to see widespread keys for accessing the BIOS on totally different laptop manufacturers.
- Navigate to the boot choices and be sure that your restoration drive is the primary choice your PC is ready besides from.
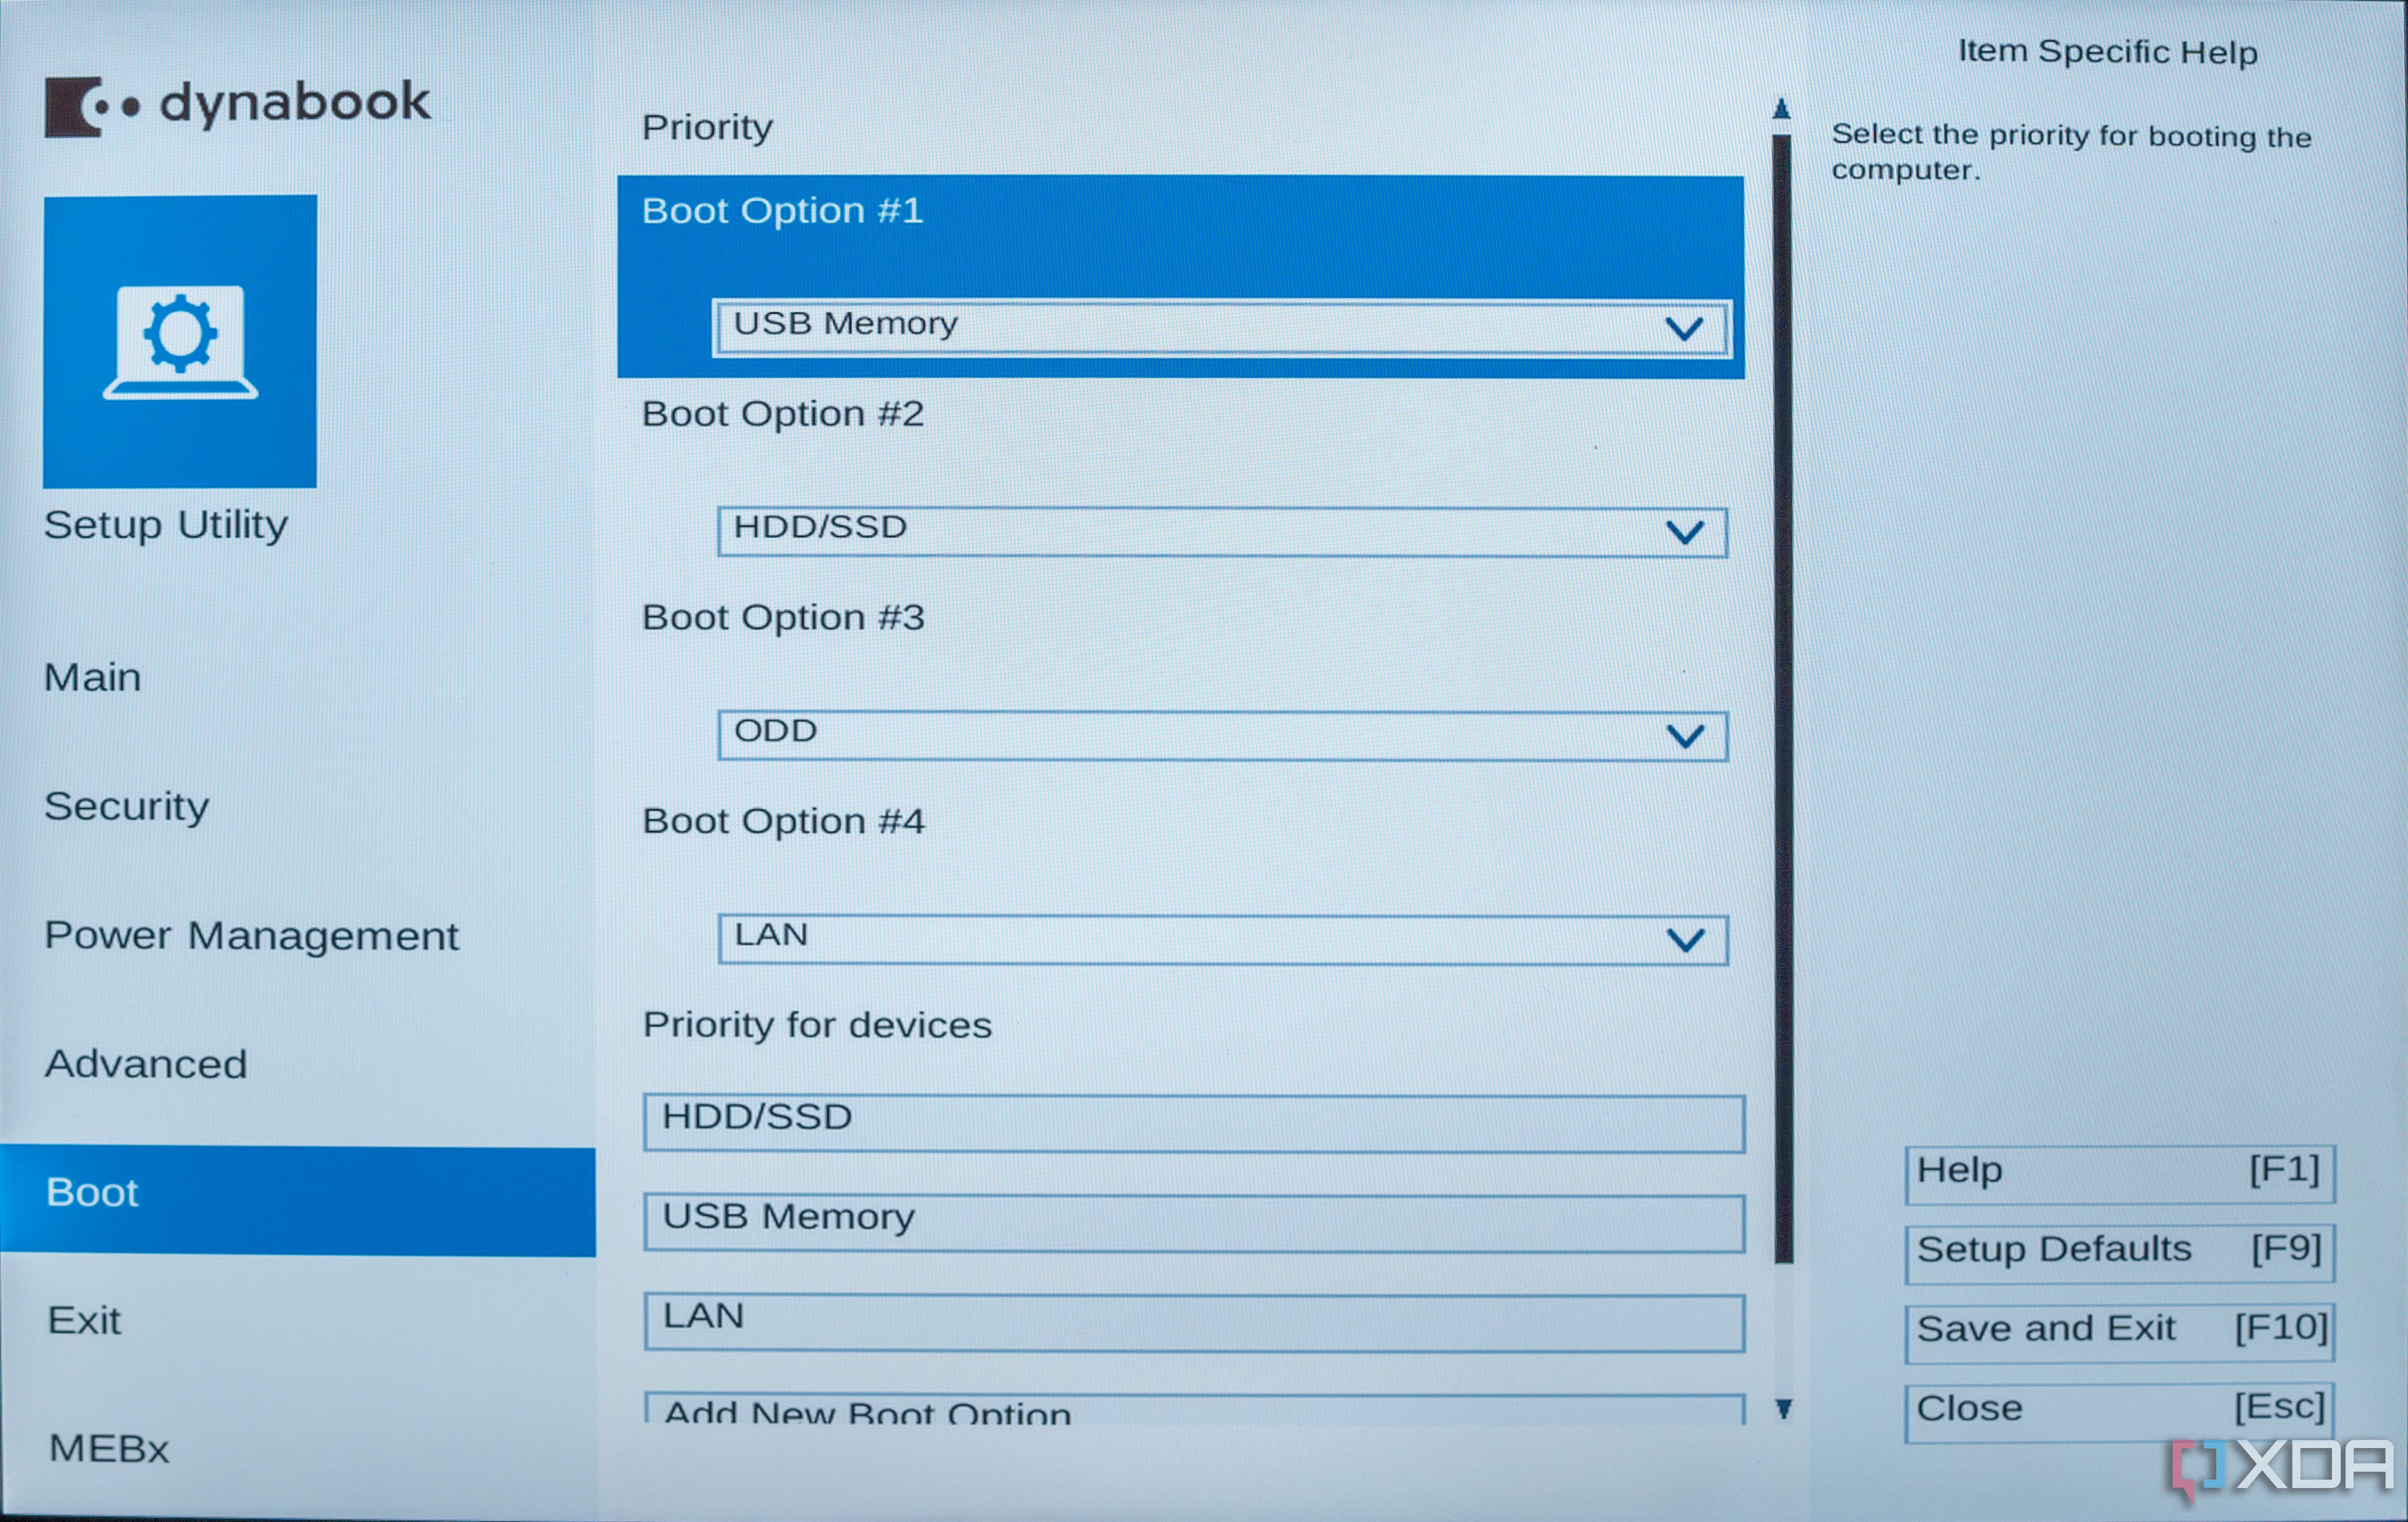
You might want to vary the boot order once more after ending the restore course of. Some BIOS variations might have a boot menu that does not require you to enter the complete BIOS to vary the boot order. This technique is simpler and circumvents this step, nevertheless it’s not at all times out there.
- Save your adjustments and exit to restart the pc.
- Your PC will begin in a restoration atmosphere. Begin by selecting your required language and area.

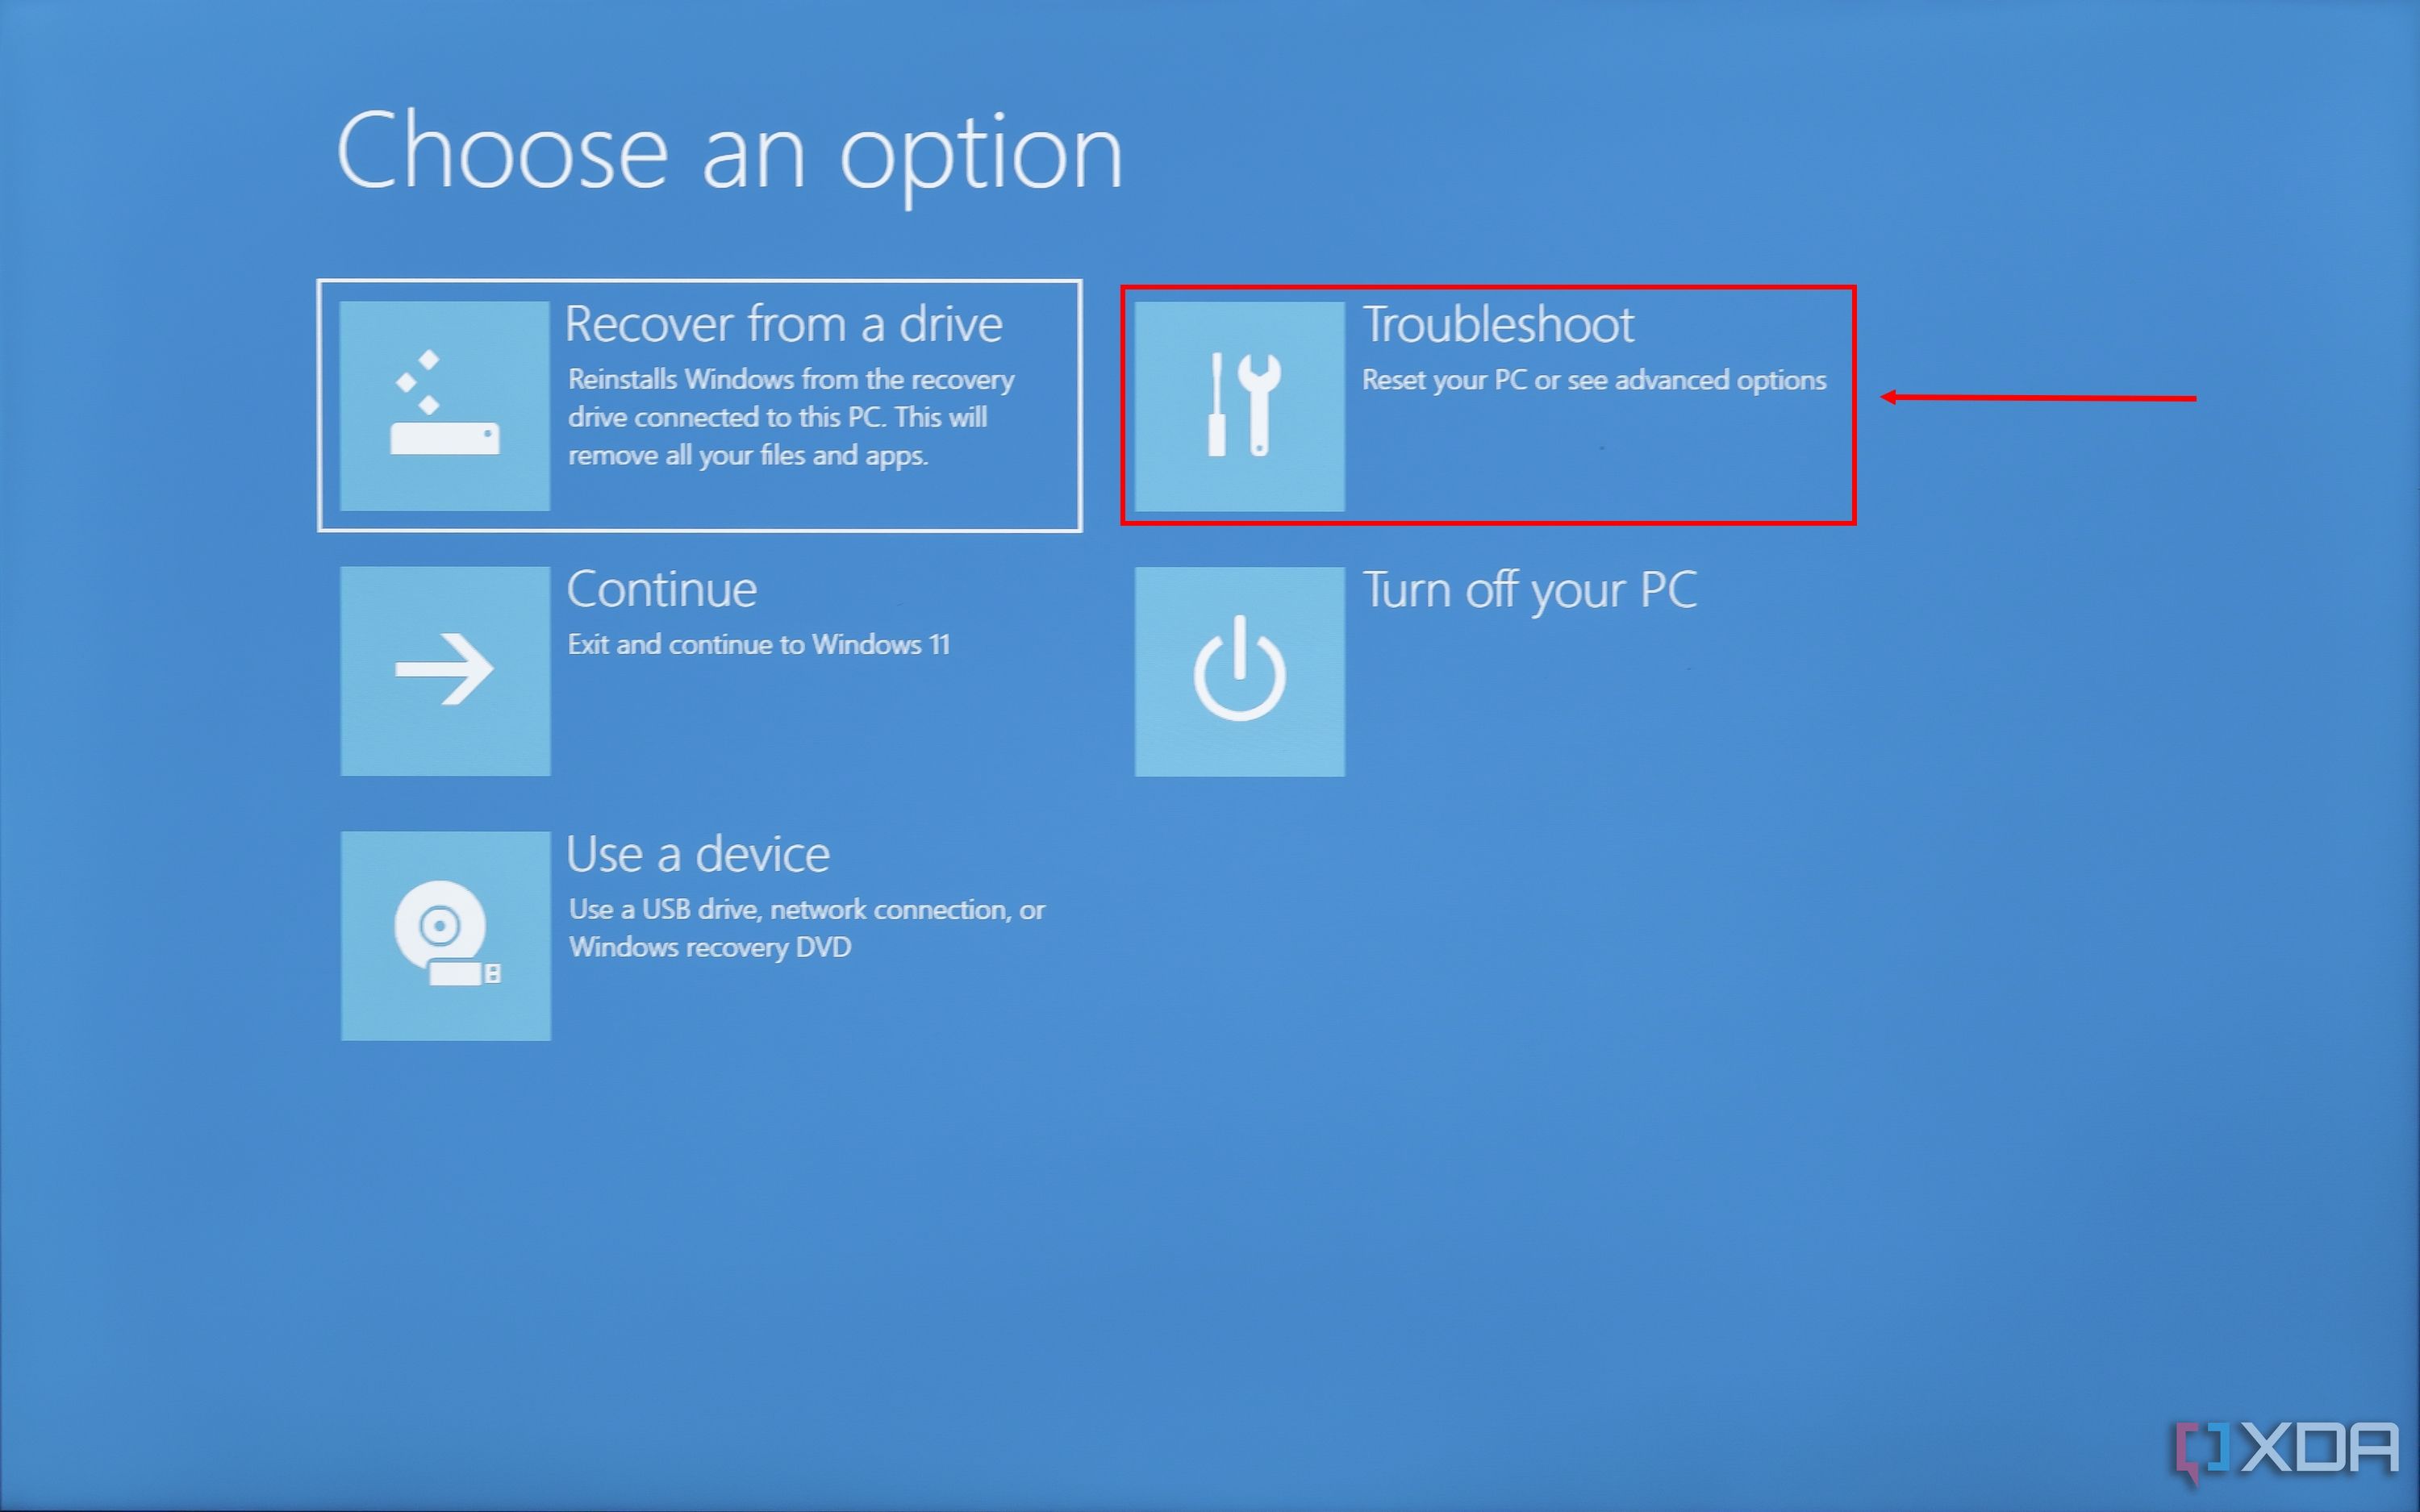
- Select Troubleshoot.
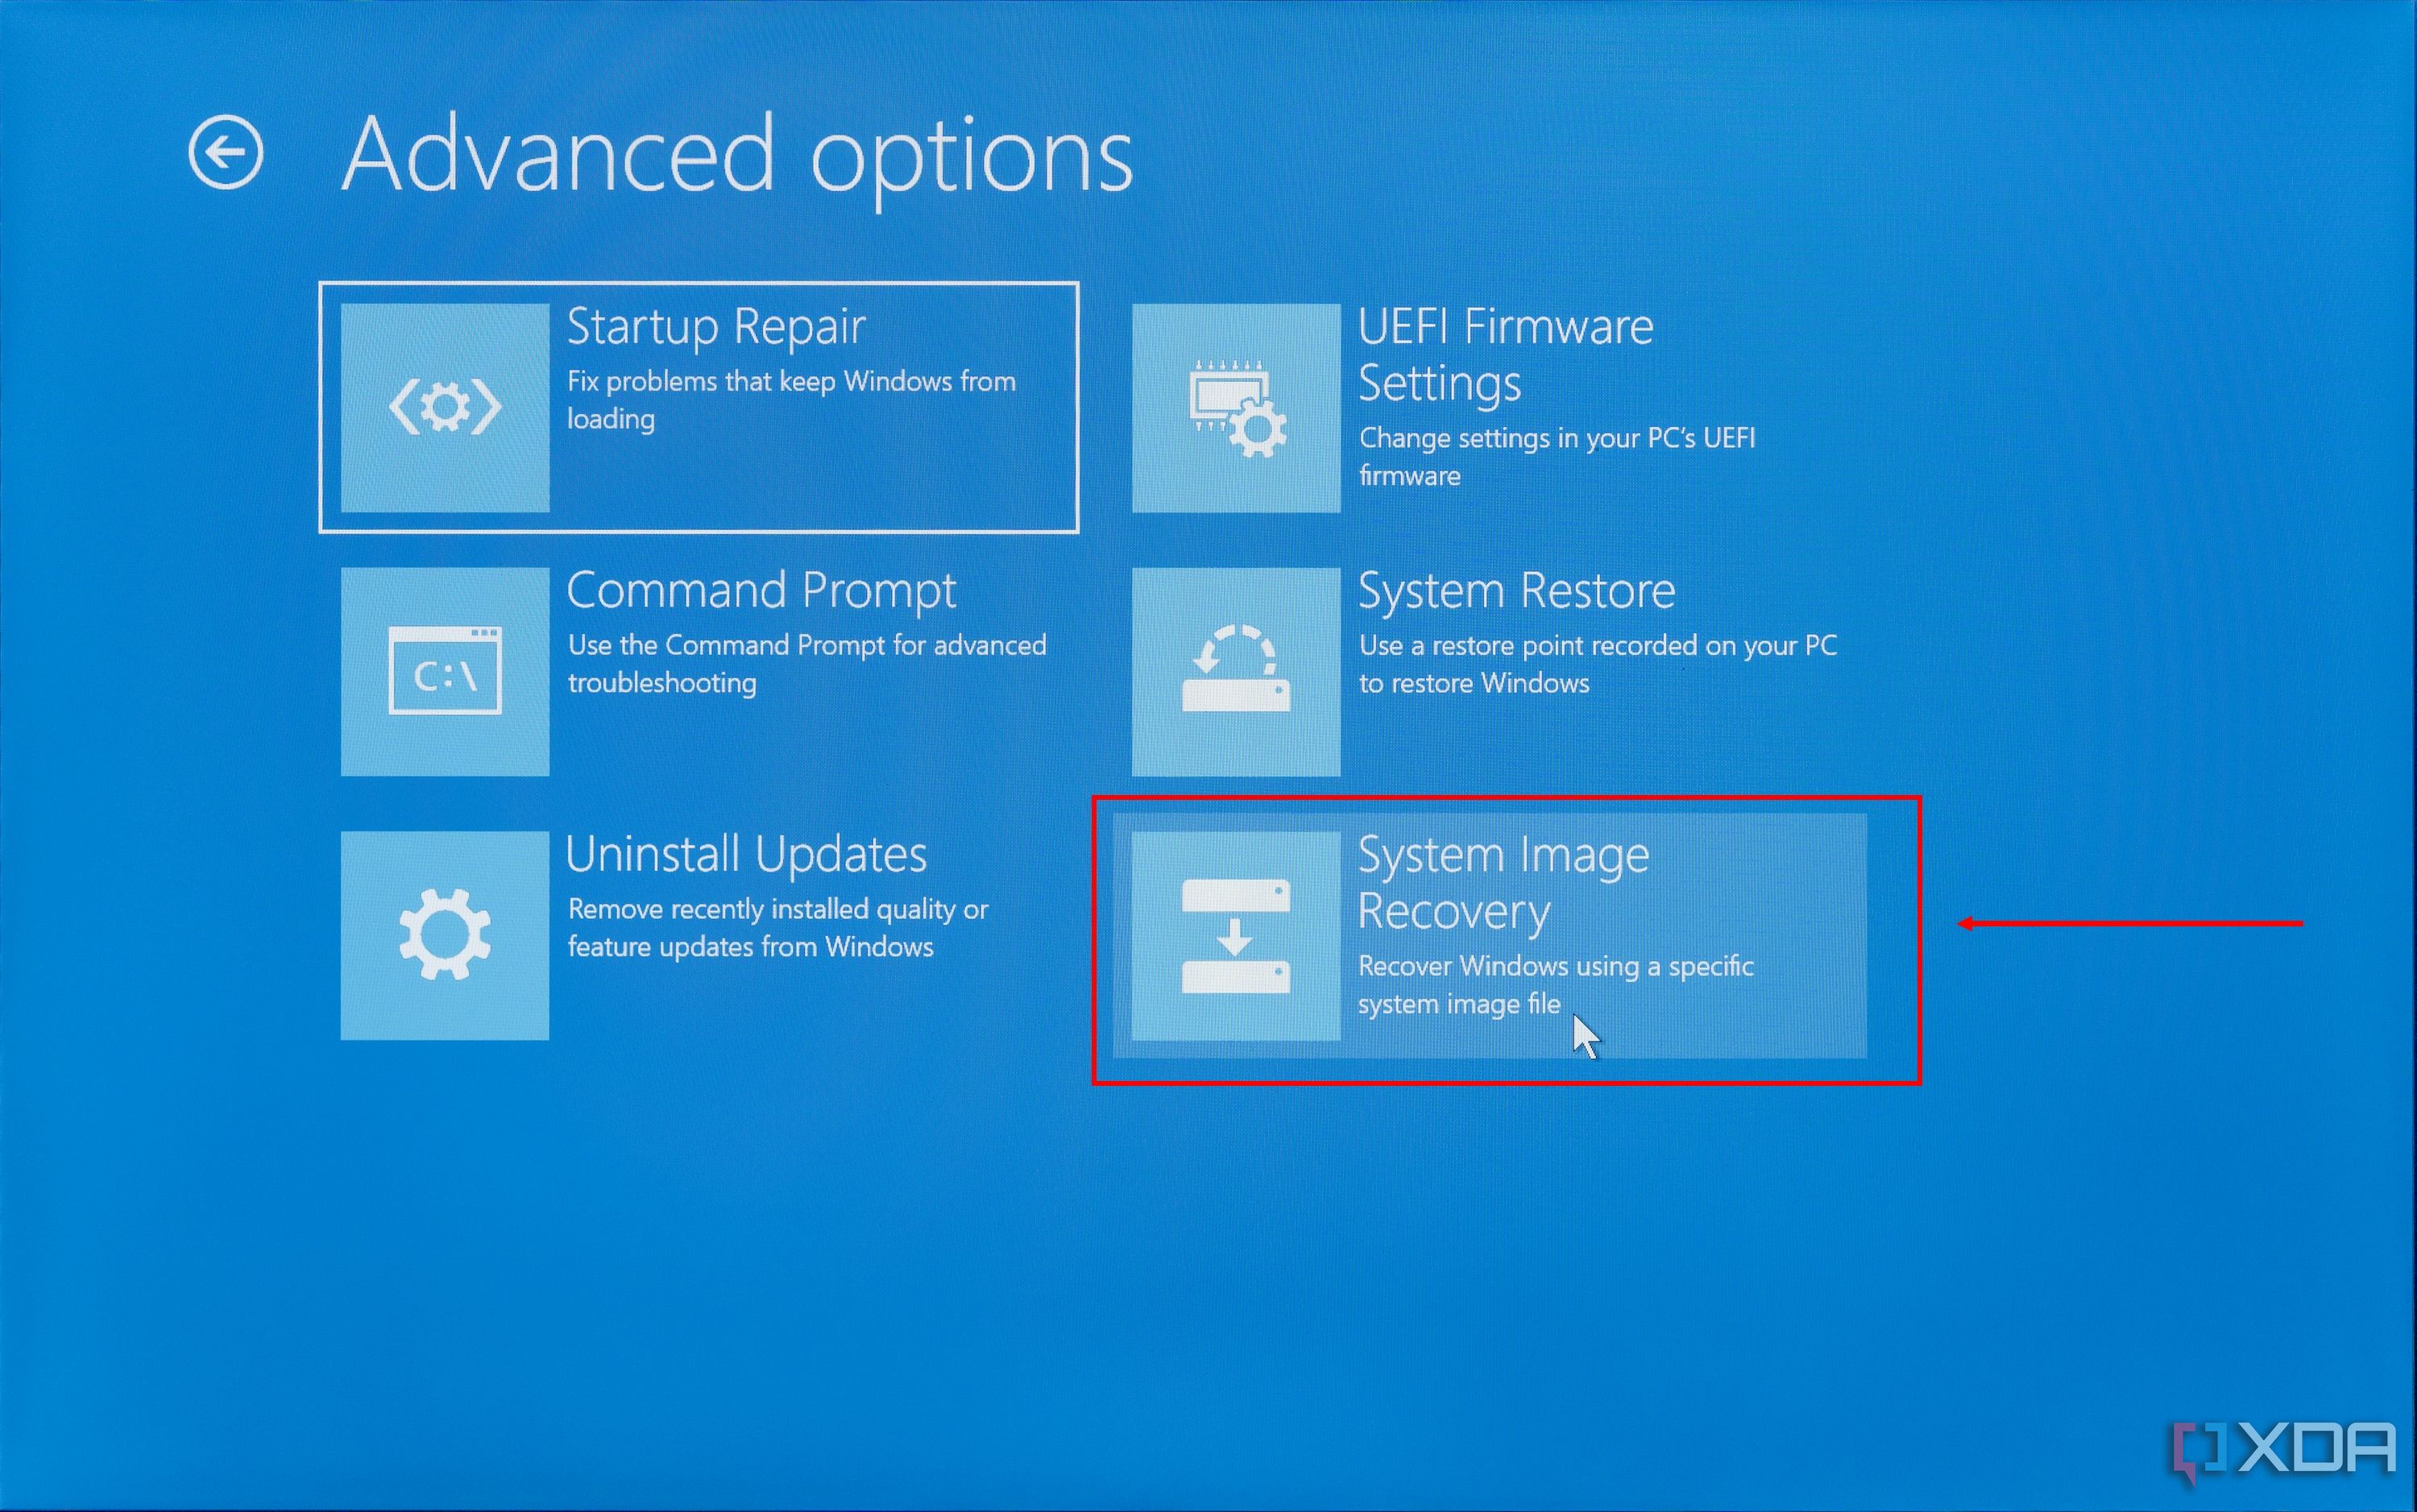
- Choose Superior choices.
- Click on System Picture Restoration (it could be in a special place relying in your Home windows model).
- If the drive you are restoring to is protected by BitLocker, you might want the restoration key. This will likely be linked to your Microsoft account, otherwise you would want to have saved it elsewhere. That is unlikely, although, since you may be utilizing a brand new drive.
- You will see the most recent system picture out there to recuperate from in your exterior drive. Click on Subsequent.
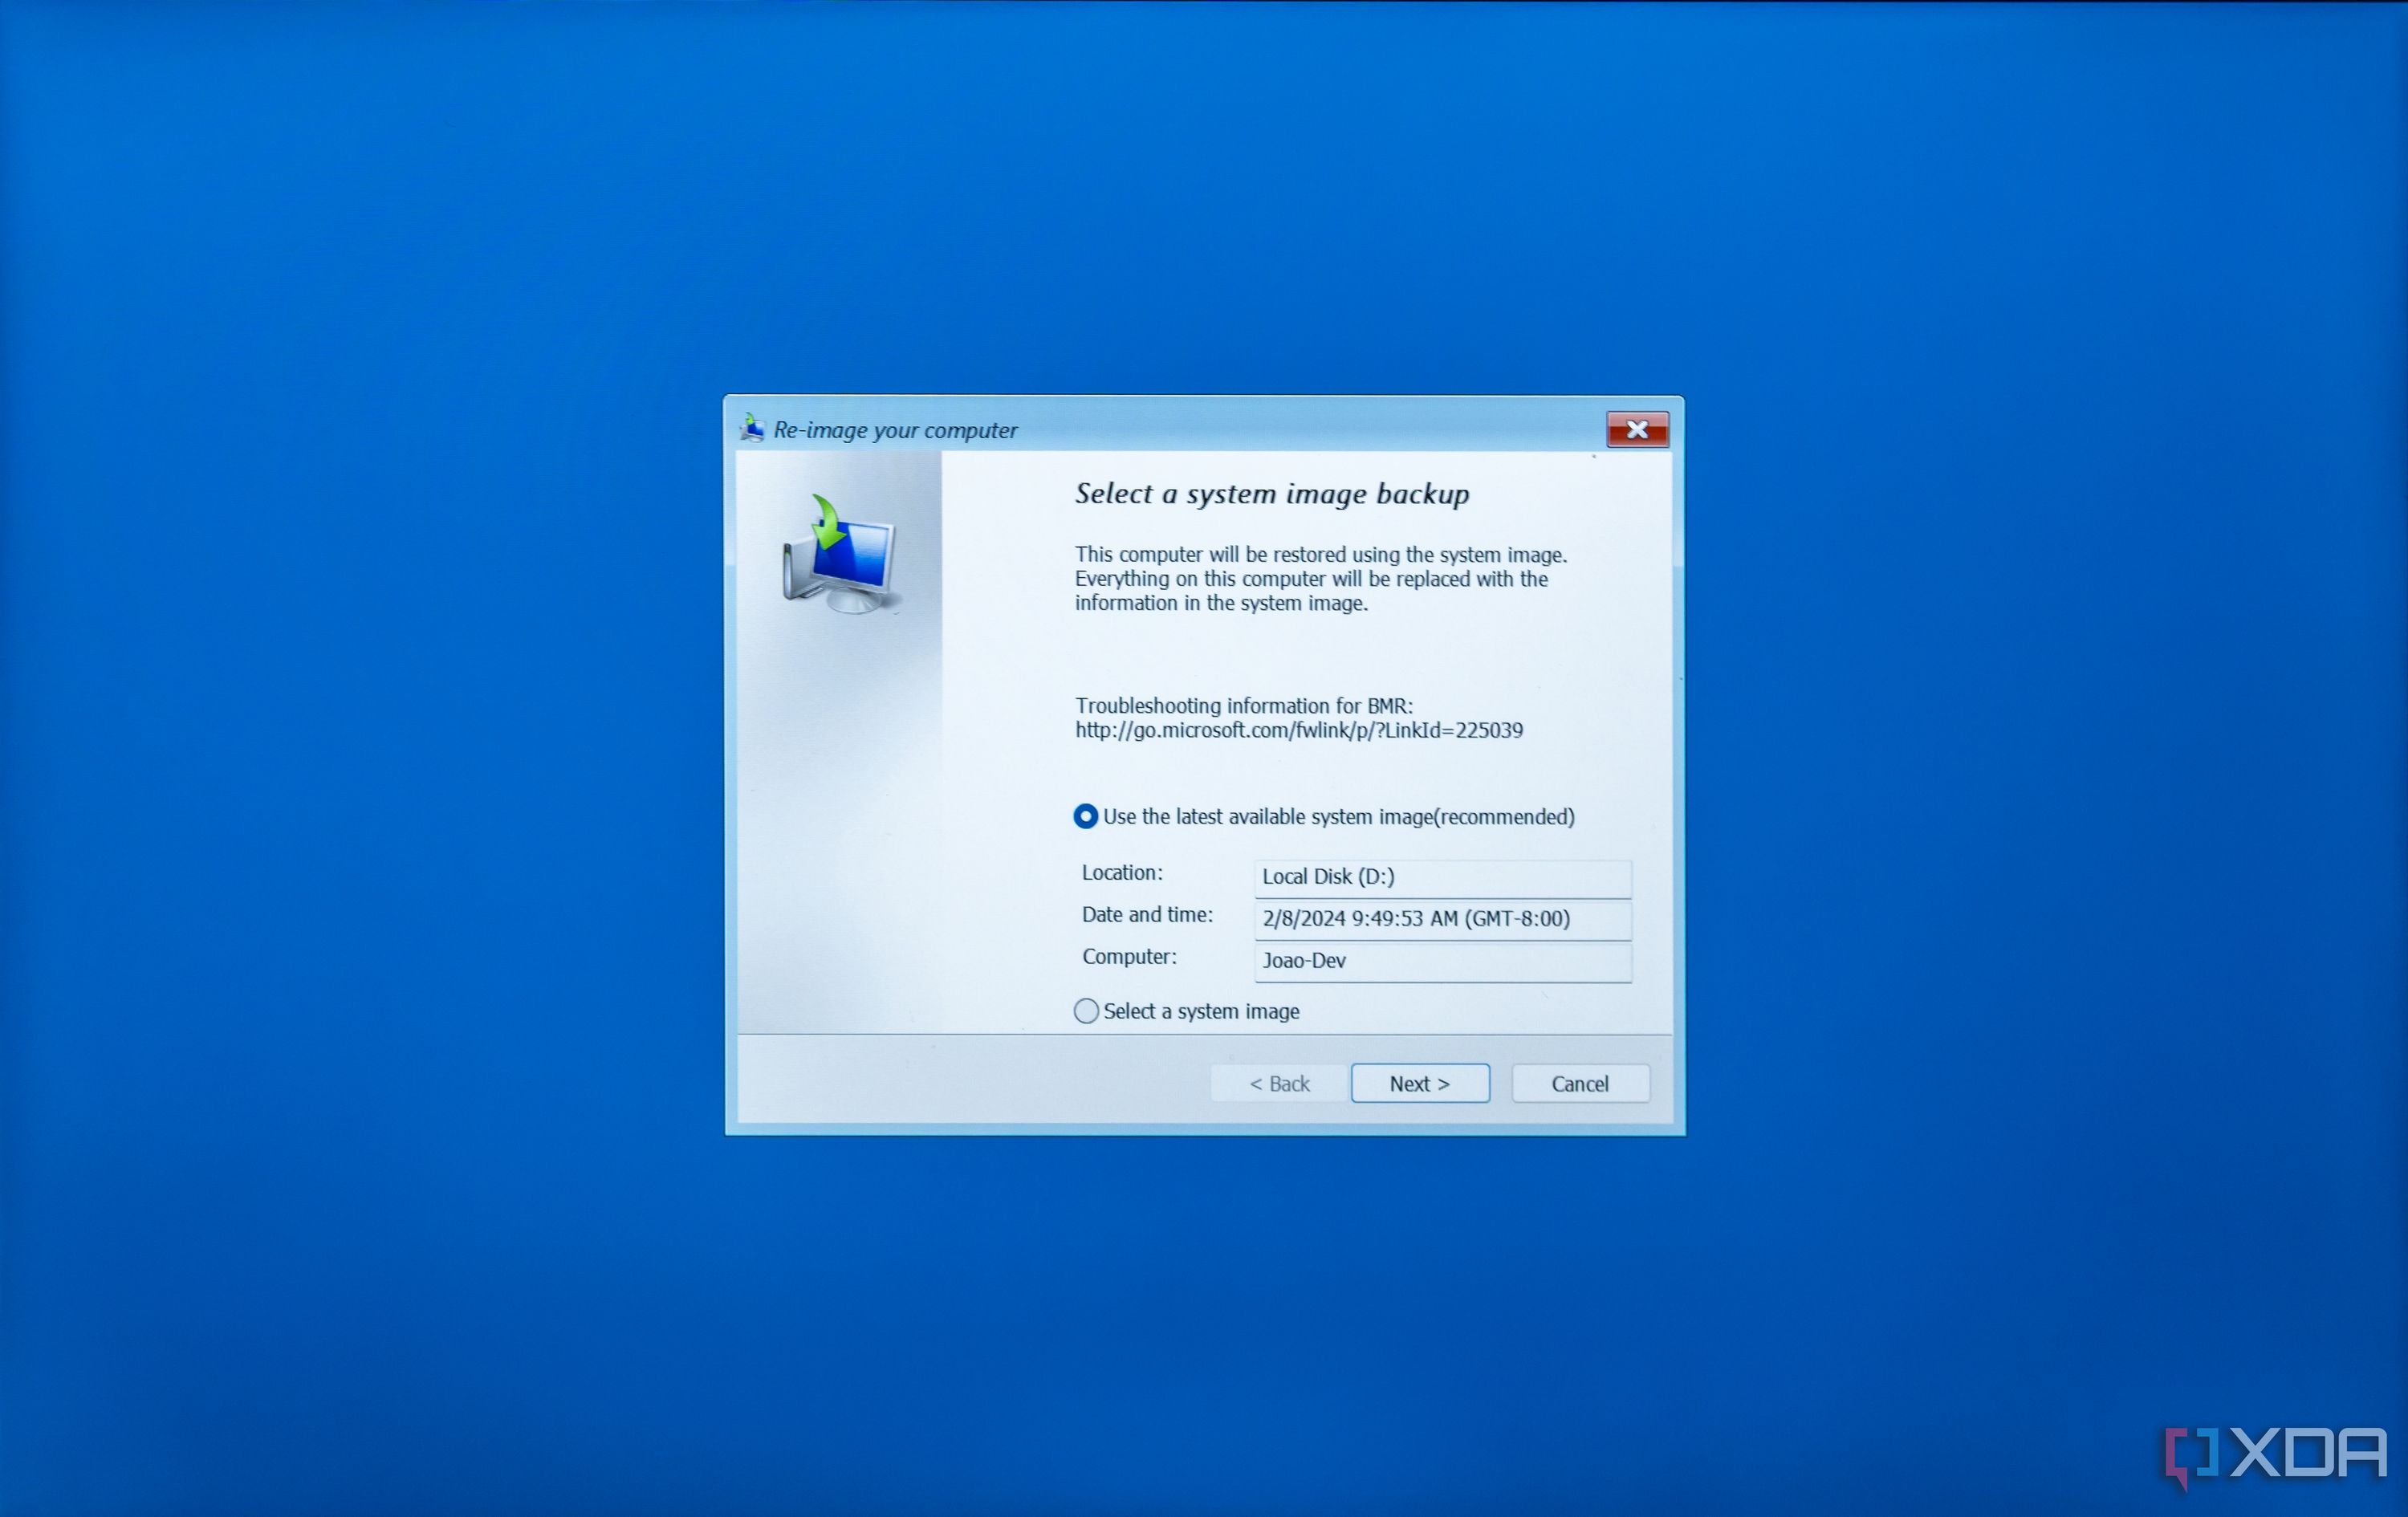


- Allow the checkbox that claims Format and repartition disks to make the brand new drive match your previous one fully.

- Click on Subsequent after which click on Subsequent once more on the affirmation web page.
- You will see a warning to verify that you just need to delete the info in your goal drive. Click on OK.
- The method can take some time to complete relying on how a lot information is being restored.
- As soon as it finishes, you may see a warning letting you may must re-enable encryption for the restored drives. Click on OK after which Restart now to restart your laptop with the brand new drive.
- At this level, take away the USB drives out of your PC and, if wanted, return into the BIOS to make your SSD the first boot choice once more (see step 3).
- Restart your PC once more and you will be again in Home windows, identical to it was in your previous drive.

What to do after restoring your Home windows set up
There should not be any massive extra steps to take when you’re again in Home windows, since every thing ought to be the place you left it. The one factor to do is re-enable encryption to your PC if you need the additional layer of safety. You are able to do this in Home windows 11 by going to Settings > Privateness & safety > System encryption.
One different factor price trying into is your disk administration, significantly in case your new drive has extra space than your previous drive. When restoring the drive, Home windows will use the very same structure as the unique drive, so any extra house will likely be unallocated. You will want to enter Disk Administration to increase your partitions so you should use that house, or create a brand new partition if extending is not doable.
Aside from that, you are all set. Whereas some care is required, the method is not too exhausting to comply with, so try to be up and working comparatively shortly.